How To Finish Drywall Corners
Introduction
How To Finish Drywall Corners: Finishing drywall corners is a crucial step in the process of creating a smooth and polished interior wall surface. Corners are vulnerable areas where two drywall panels meet, and properly finishing them not only enhances the aesthetics of a room but also ensures that the corners are durable and resistant to damage. Whether you’re tackling a DIY home improvement project or working as a professional contractor, mastering the art of finishing drywall corners is an essential skill.
In this comprehensive guide, we’ll walk you through the step-by-step process of finish drywall corners, sharing expert tips and techniques to help you achieve a professional-looking result. By the end of this tutorial, you’ll have the knowledge and confidence to tackle corner finishing with ease.
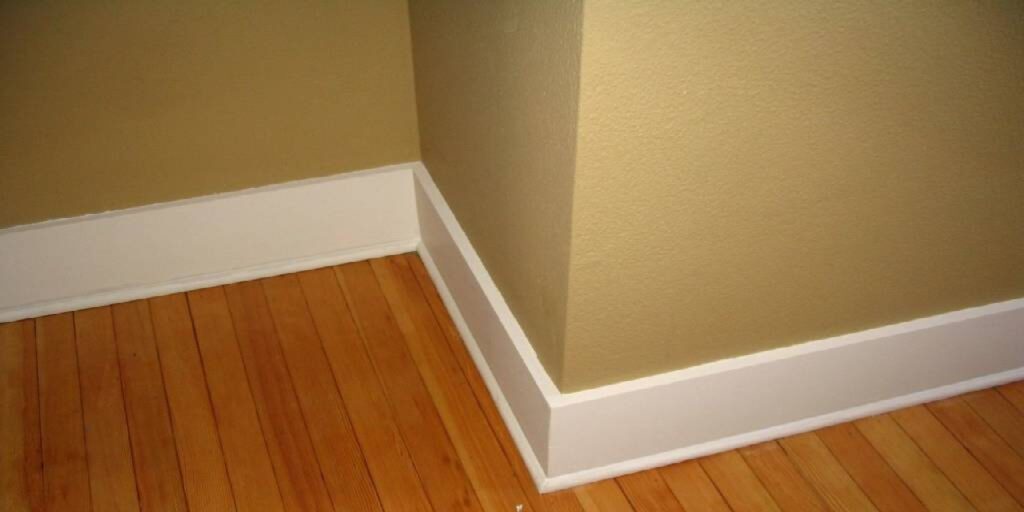
Before we delve into the actual finishing process, it’s essential to understand the different types of drywall corners you might encounter. There are two primary types: inside corners and outside corners. Inside corners are where two wall surfaces meet, typically forming a 90-degree angle, while outside corners occur at the edges of walls or where walls meet other architectural features like door frames.
The first step in finishing drywall corners is to gather the necessary tools and materials. You’ll need joint compound (also known as mud), a taping knife, a corner trowel or a corner roller, drywall tape (either paper or fiberglass mesh), sandpaper, a utility knife, a mixing pan or bucket, and a mixing paddle. Having these items ready before you start will make the process smoother and more efficient.
Before applying joint compound, it’s crucial to prepare the corner properly. Remove any loose or protruding drywall paper or debris. If necessary, use a utility knife to trim any excess drywall mud or irregularities along the corner. The goal is to create a clean, flat surface for the joint compound to adhere to.
The next step involves applying drywall tape and joint compound to the corner. Start by embedding the tape into the corner using a taping knife. Then, apply a thin layer of joint compound over the tape, feathering the edges to create a smooth transition. Depending on the condition of the corner and the number of coats required, you may need to repeat this step multiple times, allowing each layer to dry before applying the next.
Once the joint compound is completely dry, it’s time to sand the corner to achieve a smooth finish. Use fine-grit sandpaper to gently sand the surface, removing any imperfections and creating a seamless look. After sanding, inspect the corner for any remaining irregularities and touch up as needed. Finally, you can prime and paint the finished corner to match the rest of the wall, leaving you with beautifully finished drywall corners that add to the overall aesthetic appeal of your space.
In the following sections, we’ll dive into each step in more detail, offering tips and techniques to ensure your drywall corners are finished to perfection. Whether you’re a novice or an experienced DIYer, mastering these skills will greatly enhance your ability to create professional-looking walls in any room.
What is best for drywall corners?
One of the biggest reasons vinyl is the best corner bead for drywall is its elasticity. Whether you’re moving furniture, carrying groceries or moving a bulky item like a stroller around the house, the outside corners of your walls are going to take a beating. Metal corner beads can dent irreversibly on impact.
For finishing drywall corners, the best approach depends on the specific type of corner you are working with and your skill level. There are a few common methods used for finishing drywall corners:
Metal Corner Beads:
- Metal corner beads are one of the most common and durable options for protecting and finishing outside corners. They come in various styles, including standard, bullnose, and chamfer.
- Installation involves attaching the metal corner bead to the drywall corner with drywall screws or nails, mudding and taping the joint, and then feathering the joint compound to create a smooth, even surface.
- Metal corner beads provide excellent protection against damage to corners and are relatively easy to work with.
Paper-Faced Beads:
- Paper-faced corner beads are similar to metal corner beads but have paper or composite edges instead of metal. They are often used in areas where rust or corrosion is a concern.
- The installation process is similar to metal corner beads, involving mudding, taping, and feathering the joint compound.
Vinyl Corner Beads:
- Vinyl corner beads are lightweight and resistant to dents and rust, making them a good choice for areas that might be prone to impact or moisture.
- Installation is similar to metal and paper-faced beads, with the added benefit of easy trimming with scissors or a utility knife.
Bullnose Corner Beads:
- Bullnose corner beads have a rounded or curved profile, which provides a softer, more rounded appearance to outside corners. They are often used for a more decorative look.
- Installation is similar to standard corner beads, with the additional step of creating a rounded edge with joint compound.
No-Coat Corners:
- No-coat corners are a type of corner bead that comes with a pre-applied layer of joint compound.
- They are typically used in areas where a smooth, straight corner is desired with minimal hassle.
- Installation involves attaching the corner to the drywall and then applying additional coats of joint compound as needed.
Corner Tape:
- Corner tape is a self-adhesive tape specifically designed for finishing corners. It is often used for inside corners.
- Installation involves applying the tape to the corner, covering it with joint compound, and then feathering the edges.
The choice of which method to use depends on your specific project requirements, your skill level, and your personal preference. Metal corner beads are a reliable and widely used option for most applications, but other materials may be more suitable depending on factors like moisture exposure or the desired appearance. It’s essential to follow proper installation techniques and take your time with mudding and taping to achieve a smooth, professional finish.
How do you use wood putty on corners?
How To Use Wood Filler On Corners
Step 1: Mix The Wood Filler.
Step 2: Sand Down The Rough Edges.
Step 3: Apply The Filler To The Wood Surface.
Step 4: Use A Putty Knife To Smooth The Filler.
Step 5: Let The Wood Filler Dry.
Step 6: Sand The Filled Area.
Step 7: Apply Some Finish To Retouch.
Water-Based Wood Filler.
Wood putty is a versatile material that is commonly used in woodworking projects to fill in gaps, cracks, and holes in wooden surfaces. It is particularly useful when it comes to corners, as these areas often require special attention and care. In this guide, we will walk you through the process of using wood putty on corners, providing you with step-by-step instructions to achieve a professional-looking finish.
Before you begin, it is important to gather all the necessary tools and materials. You will need a container of wood putty, a putty knife, sandpaper, a clean cloth, and a small brush. Additionally, make sure the surface you are working on is clean and free from dust or debris. This will ensure that the wood putty adheres properly and provides a seamless finish.
Step 1: Start by preparing the wood putty. Open the container and use the putty knife to scoop out a small amount of putty. Place it on a clean surface, such as a piece of cardboard or a disposable plate. This will make it easier to work with and prevent any contamination of the remaining putty in the container.
Step 2: Using the putty knife, apply the wood putty to the corner that needs to be filled. Start at one end of the corner and work your way towards the other end, applying a thin layer of putty. Make sure to press the putty firmly into the corner to ensure proper adhesion.
Step 3: Once the putty is applied, use the putty knife to smooth out the surface. Hold the putty knife at a slight angle and gently scrape off any excess putty, creating a smooth and even finish. Take your time during this step to achieve the desired result.
Step 4: Allow the wood putty to dry completely. The drying time will vary depending on the brand and type of putty used, so refer to the manufacturer’s instructions for guidance. Avoid touching or disturbing the putty while it is drying to prevent any imperfections.
Step 5: Once the putty is dry, use sandpaper to smooth out the surface further. Start with a coarse-grit sandpaper and gradually switch to finer grits until the surface is smooth and level with the surrounding wood. Wipe away any dust with a clean cloth.
By following these steps, you can effectively use wood putty on corners to achieve a seamless and professional-looking finish. Remember to always read and follow the instructions provided by the manufacturer of the wood putty for best results. With a little practice and patience, you can master the art of using wood putty to enhance the appearance of your woodworking projects.
Do drywall corners need tape?
What Happens if You Don’t Tape Drywall Corners? Drywall loses some of its fire resistance when drywall seams are not properly finished with tape and joint compound. A gap in your drywall—even if it’s hidden behind trim—is a greater fire hazard than sealed joints. It may even be against the building code in your area.
Yes, drywall corners typically need tape as part of the finishing process. Drywall tape is used to reinforce and strengthen the joints where two pieces of drywall meet, ensuring a smooth and durable finish. Here’s why drywall tape is important for corners:
Preventing Cracks: The primary purpose of drywall tape is to prevent cracks from forming along the seams where drywall panels meet. Without tape, these seams are more prone to cracking over time due to the natural expansion and contraction of the building materials.
Creating a Smooth Surface: Drywall tape helps create a seamless and smooth transition between the two adjacent drywall panels. It covers the slight gaps and irregularities that may exist at the joint, resulting in a visually appealing finish.
Reinforcing the Joint: Joint compound (mud) alone is not sufficient to provide long-term structural support at the corners. Drywall tape, when embedded in joint compound, adds strength to the joint, making it more resistant to impacts and stresses.
There are two common types of drywall tape used for corners:
Paper Tape: This traditional tape is made of paper and is applied with a layer of joint compound. It’s relatively easy to work with and provides a smooth finish.
Fiberglass Mesh Tape: Fiberglass mesh tape is self-adhesive and adheres directly to the drywall surface. It’s often preferred for its ease of use, but it may require additional coats of joint compound to achieve a smooth finish.
The exact method for taping drywall corners may vary depending on whether it’s an inside corner or an outside corner. However, in both cases, the tape is a crucial component of the finishing process to ensure a professional and long-lasting result.
In summary, while the application of drywall tape is an extra step in the drywall finishing process, it’s essential for creating sturdy, crack-resistant, and visually appealing corners. Skipping this step can lead to structural issues and a less polished appearance in the long run.
Is tape necessary for drywall?
In almost all cases, you need to apply drywall tape to the seams to reinforce the compound and keep it from crumbling out when dry. Drywall pros use paper tape, because it’s fast and offers the smoothest finish, but it can be difficult to work with. Fiberglass mesh tape is more user-friendly.
Introduction:
Drywall installation is a common practice in construction and home improvement projects. It involves the use of gypsum panels to create smooth and even walls. While tape may not be necessary for every step of the drywall installation process, it plays a crucial role in achieving a professional and durable finish.
Importance of Tape in Drywall:
One of the primary purposes of tape in drywall installation is to reinforce the joints between the gypsum panels. These joints are vulnerable to cracking and shifting over time, especially in areas with temperature and humidity fluctuations. By applying tape over the joints, it helps to create a seamless and solid surface, preventing cracks and ensuring the longevity of the walls.
Types of Drywall Tape:
There are several types of tape available for drywall installation, including paper tape and fiberglass mesh tape. Paper tape is the most commonly used option and is applied by embedding it in joint compound. It is known for its strength and ability to prevent cracks. On the other hand, fiberglass mesh tape is self-adhesive and offers added flexibility, making it suitable for corners and curved surfaces.
Application Process:
To use tape in drywall installation, the joints between the gypsum panels need to be properly prepared. This involves applying a layer of joint compound over the joints, smoothing it out, and then embedding the tape into the compound. The tape is pressed firmly into place, ensuring it adheres well to the joint compound. Once the tape is in position, another layer of joint compound is applied over it, followed by sanding and finishing to achieve a seamless appearance.
Tape is indeed necessary for drywall installation. It plays a vital role in reinforcing joints, preventing cracks, and ensuring the durability of the walls. By using the appropriate type of tape and following the correct application process, a professional and long-lasting finish can be achieved. Whether it is a small repair or a large-scale construction project, tape should always be considered an essential component of the drywall installation process.
What type of corner bead is best?
While metal is the traditional material used for corner beads, vinyl is the contemporary preference for modern drywall contractors and DIY enthusiasts. Modern vinyl types of drywall corner beads provide significant advantages over their traditional metal counterparts, including, most importantly, durability.
The choice of corner bead for drywall finishing depends on several factors, including the specific project requirements and personal preferences. There are different types of corner beads available, each with its own advantages and characteristics. Here are some common types and their suitability for various situations:
Metal Corner Bead:
Paper-Faced Metal: This is a popular choice for inside corners. It’s durable and resists dents and damage. The paper face allows for easy embedding of joint compound, resulting in a smooth finish.
Vinyl-Faced Metal: Often used in high-traffic areas or where moisture may be a concern. It’s resistant to rust and corrosion.
Paper-Faced Corner Bead:
Standard Paper-Faced: Suitable for inside corners, it’s cost-effective and can be used in most drywall applications. The paper surface allows for easy mudding and finishing.
Paper-Faced Composite: Combines paper and metal for added durability. It resists dents and is less likely to rust or corrode.
Vinyl Corner Bead:
Regular Vinyl: Used mainly for outside corners. It’s lightweight and resistant to rust and corrosion but may not be as durable as metal options.
Bullnose Vinyl: Has a rounded, soft edge, making it ideal for curved or rounded corners. It’s often used for aesthetic purposes.
Vinyl Corner Guards:
These are used to protect outside corners from damage, especially in high-traffic areas. They are available in various sizes and profiles.
Paper-Metal-Paper (PMP) Corner Bead:
These combine the durability of metal with the ease of finishing provided by paper-faced beads. They are suitable for both inside and outside corners.
Composite Corner Bead:
Made of materials like plastic or fiberglass. They are lightweight, resistant to rust, and may be used in areas where moisture is a concern.
Adjustable Corner Bead:
Designed for situations where the angle of the corner is not precisely 90 degrees. They can be adjusted to fit varying angles.
The choice of the best corner bead depends on your specific needs. Here are some considerations:
Durability: If you’re concerned about impact or moisture, metal corner beads are often the most durable choice.
Ease of Installation: Vinyl and paper-faced corner beads are generally easier for DIYers to work with. They are more forgiving when it comes to finishing and mudding.
Aesthetics: Consider the appearance you want. Rounded bullnose beads or decorative options can add a unique look to your corners.
Budget: Some corner beads are more cost-effective than others. Paper-faced beads are often the most budget-friendly option.
Moisture Resistance: If you’re working in a damp environment, choose a bead that is resistant to moisture and rust, such as vinyl or composite options.
In summary, there is no one-size-fits-all answer to the best corner bead, as it depends on your specific project requirements. Carefully evaluate the characteristics and needs of your project to choose the most suitable corner bead for your drywall finishing.
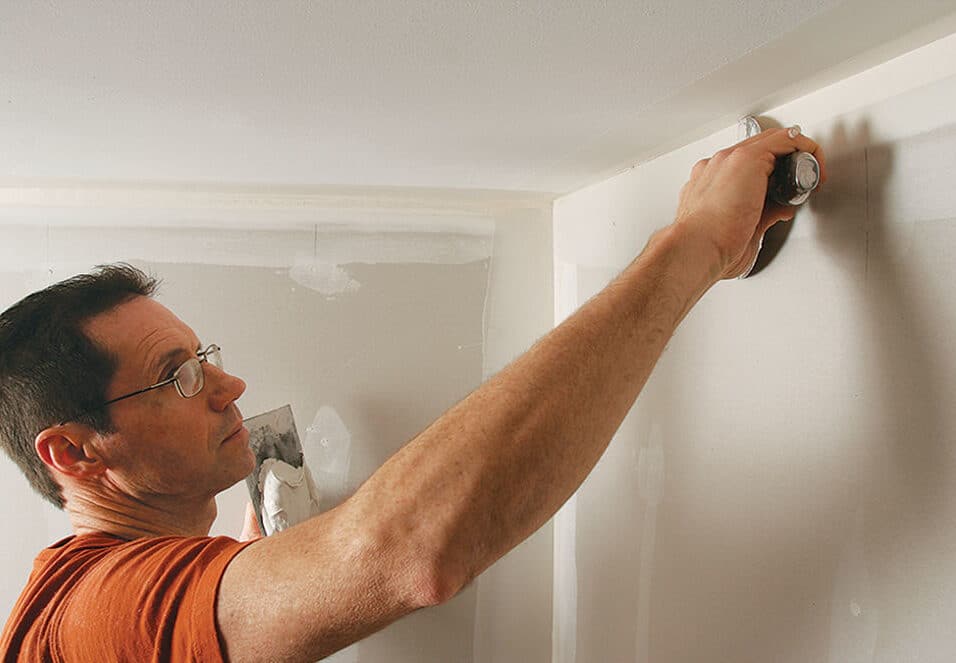
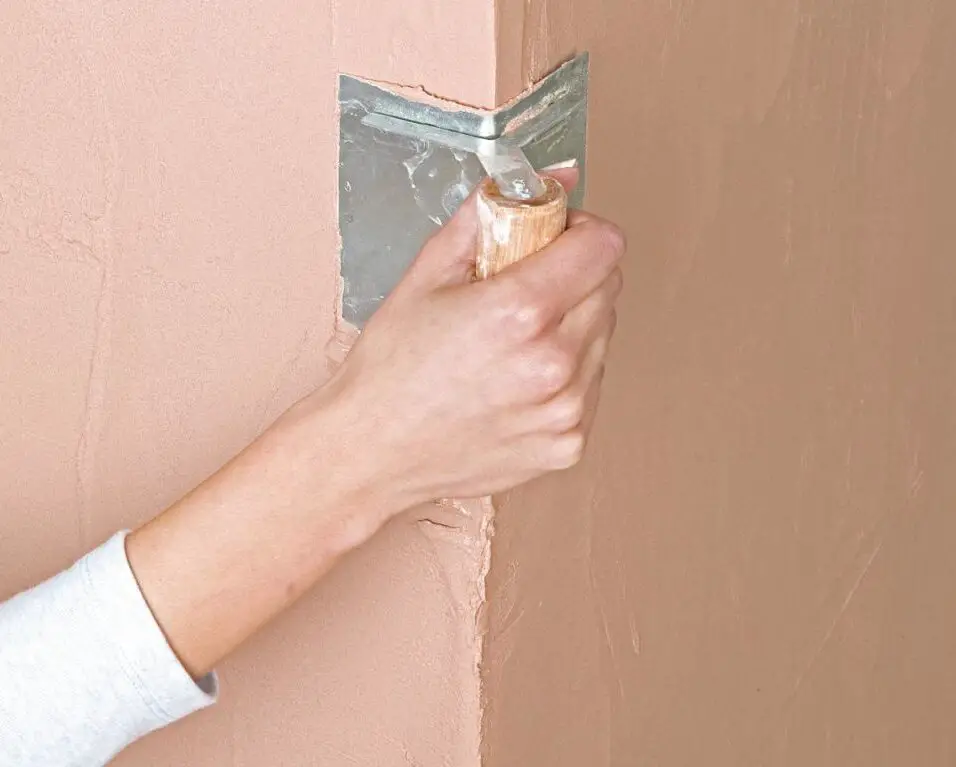
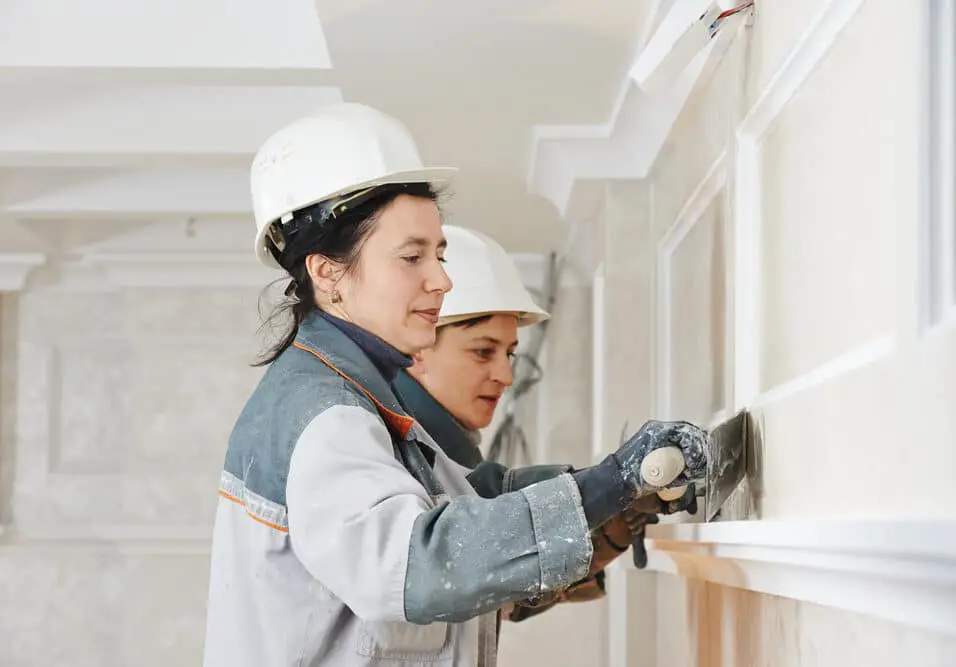
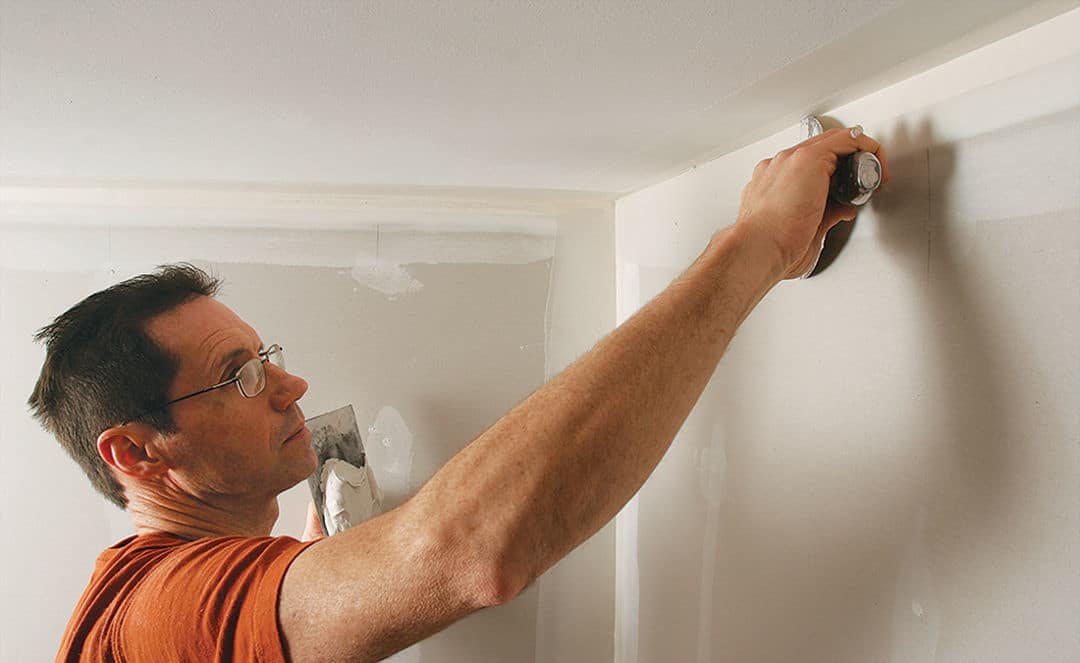
When it comes to finishing drywall corners, there are several essential tools and materials that you will need to achieve a professional and seamless result. Firstly, you will need a good quality drywall knife or taping knife. This tool is crucial for applying joint compound and smoothing it out along the corners. It is recommended to have a few different sizes of knives to accommodate different corner widths.
In addition to the drywall knife, you will also need a corner trowel or corner tool. This specialized tool is designed to create crisp and sharp corners by applying joint compound evenly. It is available in different sizes to match the width of your corners. Another important tool is a sanding block or sandpaper, which is used to smooth out any imperfections or rough edges after the joint compound has dried.
As for materials, you will need joint compound or mud, which is the primary substance used to fill and cover the seams and corners of drywall. There are different types of joint compound available, such as ready-mixed or powdered, so choose the one that suits your preference. Additionally, you will need drywall tape to reinforce the corners and prevent cracking, as well as drywall screws or nails to secure the drywall sheets to the studs.
What tools and materials are needed to finish drywall corners?
To finish drywall corners, you will need a variety of tools and materials to achieve a professional and smooth finish. Here’s a list of the essential items you’ll need:
Tools:
Taping Knife: Taping knives come in various sizes, typically ranging from 4 inches to 12 inches. You’ll need a few different sizes for different stages of the corner finishing process.
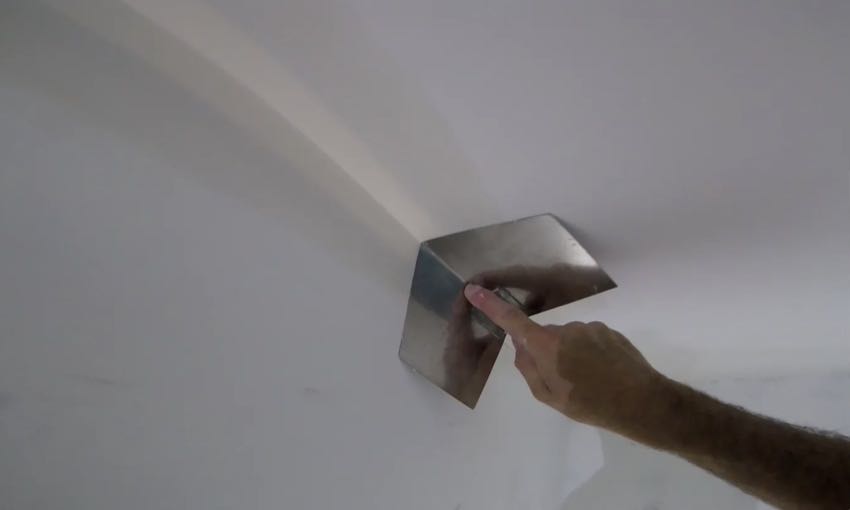
Corner Trowel or Corner Roller: These specialized tools are designed for embedding tape and smoothing joint compound in corners. Corner trowels have a flat, pointed blade, while corner rollers have a round, wheel-like shape.
Utility Knife: A utility knife with a sharp blade is essential for cutting drywall tape and trimming excess joint compound.
Mud Pan or Mud Tray: A mud pan or mud tray is used to hold and mix joint compound. It makes it easier to access the compound while working.
Mixer Paddle: If you’re using pre-mixed joint compound from a bucket, a mixer paddle attached to a drill can help ensure a smooth and consistent consistency.
Sanding Block or Sandpaper: To achieve a smooth finish, you’ll need sanding tools. A sanding block with fine-grit sandpaper is often used for this purpose.
Sanding Pole: For sanding high or hard-to-reach areas, a sanding pole with an attachment for the sanding block is helpful.
Sawhorses: Sawhorses provide a stable work surface for cutting and prepping materials.
Materials:
Joint Compound: Also known as mud, joint compound is used to fill and smooth the seams and corners of the drywall.
Drywall Tape: You can use either paper tape or fiberglass mesh tape for corners. Paper tape is applied with joint compound, while fiberglass mesh tape has an adhesive backing.
Drywall Screws: If you’re working with new drywall installation or making repairs, you’ll need drywall screws to attach the drywall to the studs.
Drywall Panels: If you’re doing a new drywall installation or repairing damaged areas, you’ll need drywall panels.
Primer: A primer is used to prepare the drywall surface for paint or other finishes.
Paint: If you’re finishing drywall corners in preparation for painting, you’ll need paint in the desired color.
Safety Gear: Safety goggles, a dust mask, and work gloves are essential for protecting your eyes, lungs, and hands while working with joint compound and sanding.
Drop Cloths: To protect floors and furnishings from dust and splatter.
Plastic Sheeting or Painter’s Plastic: This can be used to protect areas adjacent to the corners you’re finishing.
Remember to choose the right type of joint compound for your project, as there are different formulations for various purposes, such as taping, topping, or all-purpose use. Additionally, consider any additional materials or accessories needed for specific corner bead options if you’re using them.
Having the right tools and materials on hand and following proper techniques will help you achieve a clean and professional finish when working on drywall corners.
Are there any specific techniques or tips for achieving smooth and seamless drywall corners?
Achieving smooth and seamless drywall corners is essential for a professional finish. Here are some specific techniques and tips to help you achieve this:
Use the Right Joint Compound:
Select the appropriate type of joint compound for your project. All-purpose joint compound is versatile and suitable for most applications.
Prep the Corners:
Before applying joint compound, make sure the corners are clean, dry, and free of any debris or loose drywall paper. Use a utility knife to trim any irregularities or protruding edges.
Apply Drywall Tape:
For inside corners, embed drywall tape into the joint compound along the entire length of the corner. Press the tape firmly into the compound, ensuring good adhesion.
For outside corners, some professionals prefer to use metal corner bead, while others may use paper-faced corner bead or vinyl corner bead. Follow the manufacturer’s instructions for installation.
Thin Application of Joint Compound:
Apply a thin layer of joint compound over the embedded tape or corner bead. Use a taping knife or a corner trowel for inside corners and a corner roller for outside corners.
Feather the edges of the compound to create a smooth transition between the corner and the wall. Avoid leaving noticeable ridges or bulges.
Multiple Coats and Feathering:
Depending on the condition of the corner and the type of corner bead used, you may need to apply multiple coats of joint compound. Allow each coat to dry before applying the next.
Feather the edges of each coat by applying less pressure with the taping knife or corner trowel as you move away from the corner. This helps create a gradual blend with the surrounding wall.
Sand Between Coats:
After each coat of joint compound has dried, lightly sand the surface to remove any imperfections, ridges, or bumps. Use fine-grit sandpaper or a sanding block for this purpose.
Inspect and Touch Up:
After sanding, inspect the corner closely for any remaining imperfections. Fill in any gaps or low spots with additional joint compound, feathering the edges for a seamless look.
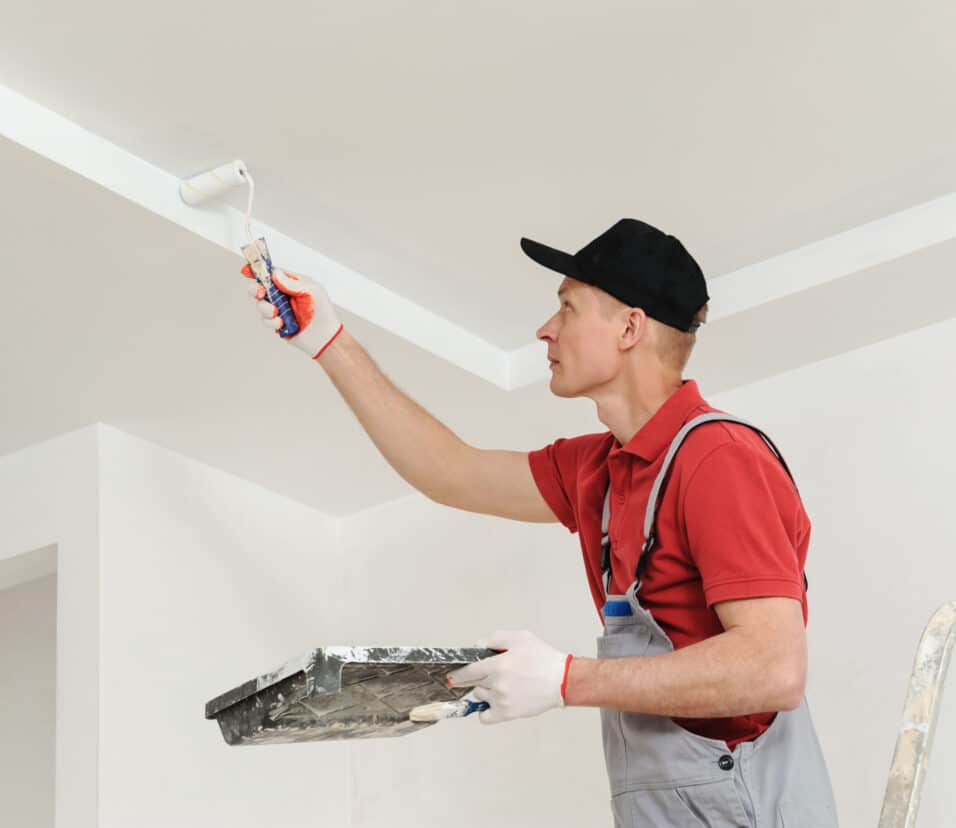
Prime and Paint:
Once the corners are smooth and you’re satisfied with the finish, apply a coat of primer to the entire wall, including the corners. This helps ensure uniform paint absorption.
After priming, paint the walls, including the corners, with your chosen paint color. This final step will give your corners a polished appearance.
Practice Makes Perfect:
Achieving smooth and seamless corners may take practice, especially if you’re new to drywall finishing. Don’t be discouraged if your first attempts aren’t perfect; with experience, your skills will improve.
Seek Professional Advice:
If you’re unsure about any aspect of finishing drywall corners, consider seeking guidance or tutorials from experienced professionals or watching instructional videos to learn the techniques.
Remember that achieving perfectly smooth and seamless corners may require patience and practice, but with the right techniques and attention to detail, you can achieve professional-looking results in your drywall finishing projects.
How long does it typically take to finish drywall corners?
Finishing drywall corners can vary in time depending on the complexity of the project and the experience of the person doing the work. On average, it can take anywhere from a few hours to a couple of days to complete the finishing process for drywall corners in a standard-sized room.
The time required is influenced by several factors, including the number of corners that need to be finished, the condition of the drywall, and the desired level of smoothness. If the corners are in good condition and only require a simple touch-up, the process can be relatively quick. However, if the corners are damaged or uneven, additional time may be needed to repair and prepare them before applying the finishing materials.
It’s important to note that the drying time of the joint compound or mud used for finishing also affects the overall duration. Each layer of compound needs to dry completely before the next layer can be applied, and this can take anywhere from a few hours to overnight. Therefore, it’s essential to factor in the drying time when estimating how long it will take to finish drywall corners.
Are there any common mistakes to avoid when finishing drywall corners?
When it comes to finishing drywall corners, there are a few common mistakes that should be avoided to ensure a professional and seamless result. One of the most important things to remember is to avoid using too much joint compound. While it may be tempting to apply a thick layer of compound to hide imperfections, this can actually create more problems. Excess joint compound can lead to cracking, shrinking, and an uneven finish. It is best to apply thin layers of compound and build up as needed, allowing each layer to dry completely before applying the next.
Another mistake to avoid is not properly sanding the joint compound. After applying the compound, it is crucial to sand it down to achieve a smooth and even surface. Failing to do so can result in visible lines and bumps, which will be difficult to hide once the paint is applied. Take the time to sand the compound thoroughly, using a fine-grit sandpaper and a sanding block or pole sander for larger areas.
Additionally, it is important to pay attention to the corner bead installation. Corner beads are used to reinforce and protect the corners, and if they are not installed properly, it can lead to cracking and damage. Make sure the corner beads are securely attached and aligned correctly before applying the joint compound. It is also essential to feather out the compound smoothly along the edges of the corner bead to create a seamless transition.
Conclusion
Finishing drywall corners is an essential step in achieving a professional and polished look for any interior space. By following the instructions provided, you can ensure that your drywall corners are smooth, seamless, and visually appealing. Whether you are a DIY enthusiast or a professional contractor, these tips and techniques will help you achieve excellent results.
One of the key aspects of finishing drywall corners is properly applying joint compound. This versatile material fills in any gaps or imperfections in the corners, creating a seamless transition between the walls. By using a taping knife or corner trowel, you can apply the joint compound evenly and smoothly. It is important to feather the edges of the compound to blend it seamlessly with the surrounding drywall, ensuring a flawless finish.
Another crucial step in finishing drywall corners is sanding. After the joint compound has dried, sanding helps to smooth out any rough patches or uneven surfaces. Using a sanding block or sandpaper, gently sand the corners until they are smooth to the touch. Be sure to remove any dust or debris before proceeding to the next step.
Finally, applying a coat of primer and paint is the final touch to complete the drywall corners. Primer helps to seal the joint compound and provides a smooth surface for the paint to adhere to. Once the primer has dried, you can apply your desired paint color, ensuring that it matches the rest of the walls. By following these steps and techniques, you can achieve professional-looking drywall corners that enhance the overall aesthetic of your space.