How To Plumb A Kitchen Sink Drain
Introduction
A properly functioning kitchen sink drain is essential for maintaining a clean and efficient kitchen. Whether you’re installing a new sink or replacing an old one, understanding how to plumb a kitchen sink drain is a valuable skill that can save you time and money. By following the right steps and using the correct tools, you can ensure that your kitchen sink drain operates smoothly, preventing clogs and leaks.
The essential components of a kitchen sink drain system, including the drainpipe, P-trap, and tailpiece, and explain their functions. Additionally, we will explore different types of materials and fittings commonly used in kitchen sink plumbing, helping you make informed choices for your installation. The step-by-step process of connecting the sink drain to the main household drainpipe, including cutting and assembling pipes, attaching fittings, and ensuring adequate ventilation.
We will also address common troubleshooting techniques and provide tips for maintaining a clean and odor-free drain. Whether you’re a DIY enthusiast or a homeowner looking to understand the basics, this guide will serve as a valuable resource for your kitchen plumbing project. So let’s get started and ensure your kitchen sink operates flawlessly.
What Angle Should Kitchen Sink Drain Pipe Be?
You likely already know that drains need to go downhill to the sewer. But do you know the right slope? Any drain line should have a drop of ¼ inch for every foot of pipe. What this means is that the pipe should be dropping ¼ inch every foot it moves horizontally.
An important thing to think about when installing plumbing is the angle at which a kitchen sink drain pipe should be placed. The main goal is to make sure that water and waste can easily move from the sink to the septic tank or main sewage system.
It is best for the drain pipe to slope down from the sink to the main drainage line. Usually, a slope of 2% or more is suggested, which is 1/4 inch per foot. This small slope lets gravity help the water flow smoothly and keeps trash and other things from building up in the pipe.
Keeping the angle right keeps the drain from getting clogged and stops water from sitting still, which can cause bad smells and germs to grow. In addition, it makes sure that trash is taken away quickly, which reduces the chance of jams and backups.
The drain pipe can be changed during fitting to get the right slope. To make the needed downward slope, plumbers usually use a mix of straight pipe pieces and fittings with angles, like elbows. To stop leaks and water damage, it’s very important to make sure that the joints are properly sealed. A 1/4-inch-per-foot slope is a typical suggestion, but different requirements may be set by local building codes and laws. It is important to check the rules that apply in your area or get help from a qualified plumber to make sure you are following the rules in your area.
Which Pipe Is Used For Kitchen Sink?
PVC Pipes
1. PVC Pipes. PVC is a plumbing pipe known for its versatility, lightweight, and blockage resistance. This piping is generally used as part of a sink, toilet, or shower drain line, though it’s sometimes used as a home’s main water supply pipe.
Several types of pipes are used to connect the kitchen sink to the main drainage system in a kitchen. The main pipes in a kitchen sink are the vent pipe, the trash pipe, and the supply pipe. A supply line brings clean water to the kitchen sink for the water supply. Polyvinyl chloride (PVC), cross-linked polyethylene (PEX), or copper are the most common materials used for these lines in homes. The PEX and PVC pipes are cheaper and easy to install, but the copper pipes last longer and don’t rust.
You can get rid of waste by using a trash pipe to move wastewater and food scraps away from the sink. PVC is the material most often used for drain lines. PVC pipes can handle cooking waste because they are light, strong, and don’t break down when exposed to chemicals. A vent pipe is also used in kitchen sink plumbing, along with the supply and waste lines. The vent pipe lets air into the drainage system, which stops pressure and makes sure the water flows properly. PVC or ABS (acrylonitrile butadiene styrene) plastic is often used to make vent lines.
What Are The Parts Of A Kitchen Sink Drain?
Here are the parts of a sink drain you need to know about:
- Strainer basket: This part fits into the opening at the bottom of your sink basin.
- Strainer flange: This piece sits directly below your strainer basket.
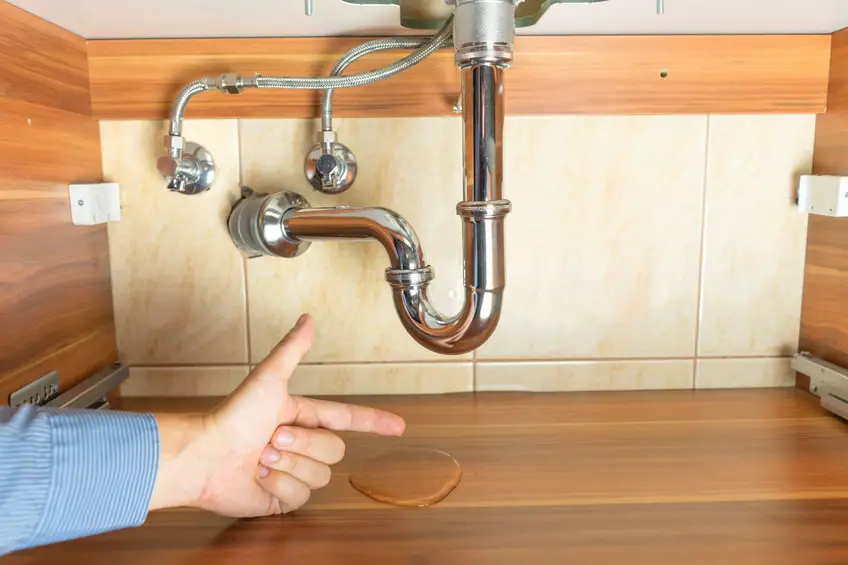
- P-trap: Made up of two pipes, this assembly removes waste and water from your sink.
A kitchen sink drain consists of several essential parts that work together to facilitate the proper drainage of water and waste.
These parts include the drainpipe, P-trap, tailpiece, strainer basket, and drain assembly
Drainpipe: The drainpipe is a vertical pipe that connects the sink to the main sewer line or septic tank. It carries the wastewater from the sink down into the sewage system.
P-trap: The P-trap is a curved section of pipe that resembles the letter “P” or “U.” It is located beneath the sink and serves two purposes. Firstly, it traps a small amount of water in its bend, creating a seal that prevents sewer gases from entering the kitchen. Secondly, it collects debris and prevents it from flowing further down the drain, making it easier to remove clogs.
Tailpiece: The tailpiece is a short pipe that connects the sink drain to the P-trap. It extends vertically from the sink drain and usually has a threaded connection for easy installation.
Strainer Basket: The strainer basket is a removable component that sits in the sink’s drain opening. It helps to catch solid debris and prevent it from entering the drainpipe. The basket is often equipped with small holes or perforations that allow water to pass through while capturing larger objects.
Drain Assembly: The drain assembly refers to the combination of all the components mentioned above, including the drainpipe, P-trap, tailpiece, and strainer basket. It forms a complete system for draining water and waste from the kitchen sink.
How Deep Should A Sink Drain Be?
Some sink drains need to be roughed in at a height of 18 to 20 inches in order to pass tests. The rough-in height should be a little lower than this range of heights because most sink lines start at 24 inches and end at 28 inches.
When installing plumbing, the width of a sink drain is an important thing to think about because it affects how well water drains and how well the sink works overall. Most of the time, a sink drain should be about 2 to 4 inches deep.
The drain’s depth is found by measuring from the sink’s base to the middle of the drain hole. This measurement is very important to make sure there is enough room for water to flow easily and for the plumbing parts that are needed.
If the drain is too small, water may not flow as quickly and it is more likely to get clogged. There may be pools of water in the sink, which could make it hard to clean the dishes and lead to health problems. If the drain is too deep, on the other hand, water may splash and splatter a lot when the sink is in use.
To think about how the sink and pipes are set up when choosing the right drain depth. The best drain level can be changed by things like the sink’s size, the type of faucet being used, and the building codes and rules in your area. Sometimes, tailpieces or drain extensions that can be adjusted can be used to fine-tune the drain depth to fit the needs. The drain level can be raised or lowered by adjusting these add-ons.
What Materials Do You Need To Plumb A Sink?
What You’ll Need For This Project
- Pop-Up Drain Assemblies.
- Plumber’s Putty.
- Pipe Cutter.
- Measuring Tape.
- Tail Piece.
- Trap Adaptor.
- Extension (AS NEEDED)
Plumbing a sink requires several materials to ensure proper installation and functionality. The specific materials needed may vary depending on the type of sink, local building codes, and personal preferences. But here are some common materials used in sink plumbing:
Pipes: Different types of pipes are used for supply lines and drain lines. Common options include copper pipes, PEX (cross-linked polyethylene) pipes, PVC (polyvinyl chloride) pipes, and ABS (acrylonitrile butadiene styrene) pipes. Copper pipes are durable and resistant to corrosion, while PEX and PVC pipes are more affordable and easier to work with.
Fittings: Fittings are used to connect pipes and ensure watertight connections. Common fittings include couplings, elbows, tees, and adapters. These fittings are available in various materials such as brass, copper, PVC, and PEX, depending on the type of pipe being used.
Valves: Valves are essential for controlling water flow. Shut-off valves, usually made of brass or chrome-plated brass, are installed on the supply lines to the sink. They allow for convenient maintenance or repair by isolating the water supply to the sink without affecting the rest of the plumbing system.
Faucet: The faucet is the fixture that controls the flow of water into the sink. It typically includes a spout, handles, and internal components. Faucets are available in a variety of materials, including stainless steel, brass, chrome, and nickel.
Drain Assembly: The drain assembly consists of components that facilitate the proper drainage of water and waste. This includes the drainpipe, P-trap, tailpiece, strainer basket, and any required gaskets or seals. These components are often made of PVC, ABS, or stainless steel.
What Is The Best Height For Sink Drain?
About 16 to 20 inches
Sink discharge hole (vertical): About 16 to 20 inches above the floor; consider the drain pipe to be the vertical centerline. Sink side-to-side buffer: From the centerline, 15 inches minimum, 20 inches recommended.
The height of a sink drain is an important factor to consider when installing a sink, as it affects both functionality and user comfort. While there is no universally “best” height for a sink drain, there are general guidelines and considerations to keep in mind.
The standard height for a sink drain is typically around 18 to 20 inches above the finished floor. This measurement includes the distance from the bottom of the sink basin to the center of the drain opening. However, it’s important to note that local building codes and regulations may specify specific requirements for drain height, so it’s essential to consult the applicable guidelines in your area. When determining the height of the sink drain, it’s crucial to consider the comfort and convenience of users.
The drain should be positioned at a height that allows for easy use without excessive bending or stooping. The average height of most people’s elbows when standing is around 36 inches, so positioning the drain at a height that is approximately waist-high can provide optimal comfort. To consider other factors such as the depth of the sink, the type of faucet being used, and any special needs or preferences of the users. For example, individuals with mobility issues may require a higher or lower drain height to accommodate their specific needs.
Can I Use Pvc Pipe For Sink Drain?
For kitchen drains, generally, PVC pipes are preferable to metal pipes as PVC pipes don’t corrode. The installation process of PVC pipe under the kitchen sink is not very tough. But you need to check some things and follow the steps properly to establish a flawless connection.
PVC (polyvinyl chloride) pipe can be used for sink drains and is a common choice in plumbing installations. PVC pipes have several advantages that make them suitable for sink drain applications.
Firstly, PVC pipes are lightweight and easy to handle, making them convenient for DIY installations. They are also relatively inexpensive compared to other pipe materials, such as copper or stainless steel. Secondly, PVC is a durable material that is resistant to corrosion and chemical degradation. This makes it a reliable choice for sink drains, as it can withstand the constant exposure to water and various household chemicals.
PVC pipes also have smooth interiors, which helps facilitate smooth water flow and prevents the accumulation of debris or waste that can lead to clogs. They are also relatively easy to clean, which helps maintain proper drainage over time. Furthermore, PVC pipes are available in various sizes, allowing for flexibility in fitting different sink configurations and plumbing layouts. They can be easily cut and joined using PVC cement and fittings, providing a secure and watertight connection.
What Is A Kitchen Sink Drain Flange?
A sink flange connects the sink drain to a section of pipe called a tailpiece to create a tight seal. It is made of metal and sits around the edge of the drain rather like a collar, and it usually has a grid-like section covering the drain that looks like a strainer.
A kitchen sink drain flange is an essential component of the sink’s drain assembly. It is the visible part of the drain that is installed on top of the sink basin and provides a connection point for the drain pipe. The drain flange consists of two main parts: the flange itself and the strainer basket. The flange is a circular ring-shaped piece that is usually made of stainless steel, chrome-plated brass, or other durable materials. It is designed to fit into the drain opening of the sink basin and sits flush with the sink surface.
The flange typically has holes or slots that allow water to flow into the drain while capturing larger debris and preventing it from entering the drain pipe. These holes or slots are where the strainer basket is placed. The strainer basket is a removable component that sits inside the flange and serves as a filter for catching food particles, debris, and other solid materials.
It helps prevent clogs in the drainpipe and can be easily removed for cleaning and maintenance. The drain flange also plays a role in providing a secure and watertight connection between the sink basin and the drain pipe. It is typically sealed using plumber’s putty or silicone sealant to ensure that no water leaks out from the area around the drain.
How Do I Install A New Sink Drain?
To install a new sink drain, start by applying plumber’s tape to the threads of the drain flange. Insert the drain flange into the sink’s drain opening and tighten the locknut underneath the sink. Installing a new sink drain can be done by following a few simple steps.
Here is a general guide on how to install a new sink drain:
Prepare the workspace: Turn off the water supply to the sink and place a bucket or towel under the sink to catch any water that may spill during the installation process. Clear out any items or clutter from the sink cabinet to provide ample space to work.
Remove the old drain: Disconnect the existing drain pipe from the sink and remove the old drain flange. This can typically be done by loosening the slip nuts or compression nuts that hold the drain assembly in place. Use pliers or a wrench if necessary.
Clean the sink opening: Remove any old putty or sealant from the sink opening. Thoroughly clean the area to ensure a smooth and clean surface for the new drain installation.
Apply plumber’s putty: Roll a small amount of plumber’s putty into a rope-like shape and apply it around the underside of the new drain flange. Carefully place the flange into the sink opening and press it firmly to create a watertight seal.
Install the gasket and slip nut: Place the rubber gasket onto the drainpipe underneath the sink and secure it with a slip nut. Make sure the drainpipe aligns properly with the drain flange.
Connect the tailpiece and P-trap: Attach the tailpiece to the drainpipe and secure it with a slip nut. Install the P-trap by connecting it to the tailpiece and the main drain line. Ensure all connections are tightened securely.
Test for leaks: Turn on the water supply and let water flow through the drain. Check for any leaks around the connections and tighten them if necessary. Also, inspect the drain flow to ensure it is working properly.

Conclusion
Plumbing a kitchen sink drain may seem like a daunting task, but with the right knowledge and guidance, it can be a manageable project. Throughout this guide, we have covered the essential components, materials, and steps involved in properly plumbing a kitchen sink drain. By following these instructions and paying attention to key details, you can ensure a functional and reliable drain system.
One of the crucial aspects of plumbing a kitchen sink drain is understanding the purpose and function of each component. The drainpipe, P-trap, and tailpiece work together to prevent clogs and leaks while allowing wastewater to flow smoothly. By selecting the appropriate materials and fittings, you can ensure durability and longevity in your drain system. Additionally, the importance of precise measurements, proper alignment, and secure connections. These factors play a significant role in preventing leaks and ensuring optimal performance.
Taking the time to carefully cut and assemble pipes, attach fittings, and provide adequate ventilation will go a long way in maintaining a functional and trouble-free kitchen sink drain. Regular maintenance, such as using drain cleaners and traps, can prevent clogs and unpleasant smells. Addressing minor issues promptly can help avoid major problems down the line. By following the guidance provided in this guide, you have the necessary tools to successfully plumb a kitchen sink drain. Remember to prioritize safety, double-check your work, and seek professional help if needed. With a well-plumbed kitchen sink drain, you can enjoy a clean and efficient kitchen for years to come.


