How To Make An Accent Wall With Wood Trim
Introduction
How To Make An Accent Wall With Wood Trim: Creating an accent wall with wood trim is a fantastic way to add warmth, texture, and visual interest to any room in your home. Whether you want to enhance the cozy ambiance of your living room or bring a touch of rustic charm to your bedroom, this DIY project can transform your space into a stunning focal point. In this article, we will guide you through the step-by-step process of making an accent wall with wood trim, allowing you to unleash your creativity and achieve a unique look that reflects your personal style.
Wood trim is a versatile material that offers numerous benefits when it comes to accent walls. Its natural beauty and timeless appeal can instantly elevate the aesthetic of any room. Additionally, wood trim provides a warm and inviting atmosphere, making it an excellent choice for creating a cozy and comfortable space. Whether you prefer a sleek and modern design or a more rustic and traditional look, wood trim can be customized to suit your preferences. Furthermore, wood is a sustainable and eco-friendly option, adding an element of sustainability to your home decor.
Before embarking on your accent wall project, it is essential to gather all the necessary materials and tools. You will need wood trim of your choice, measuring tape, a miter saw or a hand saw, a level, a nail gun or a hammer and nails, wood glue, sandpaper, a paintbrush, and paint or stain. It is crucial to select high-quality wood trim that complements the style and color scheme of your room. Consider the dimensions of your wall and calculate the amount of trim required to ensure a seamless and professional finish.
How to build a trim accent wall?
- Measure and Plan the Accent Wall Design. Measure the Wall. Design the Board and Batten Layout. Determine How Many MDF Boards You Will Need.
- Prepare the Accent Wall.
- Install Wall Molding. Install Base Trim Piece. Install Top Horizontal Boards. Install Vertical Board Pieces.
- Add Finishing Touches.
Building a trim accent wall is a fantastic way to add visual interest and depth to any room. Whether you want to create a focal point or simply enhance the overall aesthetic appeal, a trim accent wall can transform the look and feel of your space. In this guide, we will provide you with step-by-step instructions on how to build a trim accent wall, ensuring that you achieve professional-looking results.
Choosing the Right Trim:
The first step in building a trim accent wall is selecting the right trim for your project. There are various types of trim available, such as crown molding, chair rail, and baseboards. Consider the style and theme of your room when choosing the trim. For a more traditional look, crown molding can add elegance and sophistication. On the other hand, chair rail trim can provide a more contemporary and modern feel. Additionally, baseboards can be used to create a clean and finished look.
Measuring and Planning:
Once you have chosen the trim, it’s time to measure and plan the layout of your accent wall. Start by measuring the length and height of the wall where you want to install the trim. This will help you determine the quantity of trim pieces you will need. Next, create a layout plan by sketching the wall and marking the placement of each trim piece. This will ensure that you have a clear vision of how the finished accent wall will look.
Preparing the Wall:
Before installing the trim, it’s essential to prepare the wall surface. Start by cleaning the wall to remove any dirt or dust. If there are any imperfections, such as holes or cracks, fill them with spackling compound and sand them smooth. Once the wall is clean and smooth, apply a coat of primer to ensure proper adhesion of the trim. Allow the primer to dry completely before proceeding to the next step.
Installing the Trim:
Now comes the exciting part – installing the trim. Begin by cutting the trim pieces to the appropriate length using a miter saw or a hand saw. Apply a thin layer of construction adhesive to the back of each trim piece and press it firmly against the wall. Use a level to ensure that the trim is straight and aligned correctly. Secure the trim in place with finishing nails or a nail gun. Repeat this process for each trim piece until the accent wall is complete.
By following these instructions, you can successfully build a trim accent wall that will enhance the beauty of your room. Remember to take your time, measure accurately, and pay attention to detail for the best results. Once the trim is installed, you can further enhance the wall by painting it in a contrasting color or leaving it in its natural wood finish. The possibilities are endless, and the end result will be a stunning accent wall that adds character and charm to your space.
What kind of trim do you use for an accent wall?
Use wood trim accent walls to create some WOW
The DIY slat wall uses natural wood colour to bring a bit of calm in a bold and modern wall design. My DIY Picture Frame. Wainscotting has a more traditional feel and creates a continuous flow that bring together a long room.
When it comes to accent walls, choosing the right trim can make all the difference in enhancing the overall aesthetic appeal of the space. The trim serves as a decorative element that frames the accent wall, adding depth and visual interest to the room. However, the type of trim you use for an accent wall depends on various factors, including the style and theme of the room, the color and texture of the accent wall, and personal preferences. In this article, we will explore different types of trim that can be used to create a stunning accent wall.
Types of Trim for Accent Walls:
Crown Molding: Crown molding is a popular choice for accent walls as it adds an elegant and sophisticated touch to the room. It is typically installed at the top of the wall, where it meets the ceiling, creating a seamless transition between the two. Crown molding comes in various styles and sizes, allowing you to choose the one that complements the overall design of the room.
Baseboard Trim: Baseboard trim, also known as skirting board, is another common option for accent walls. It is installed at the bottom of the wall, where it meets the floor, providing a clean and finished look. Baseboard trim can be simple and understated or ornate and decorative, depending on the desired style.
Chair Rail: Chair rail trim is typically installed horizontally on the wall, dividing it into two sections. It not only adds visual interest but also serves a practical purpose of protecting the wall from furniture damage. Chair rail trim can be used to create a more traditional or formal look, especially when combined with wainscoting or wallpaper.
Considerations for Choosing Trim:
When selecting trim for an accent wall, it is essential to consider the overall style and theme of the room. If the room has a modern and minimalist design, opting for sleek and simple trim would be more appropriate. On the other hand, if the room has a traditional or vintage-inspired look, choosing more ornate and detailed trim can enhance the overall aesthetic.
Additionally, the color and texture of the accent wall should also be taken into account. The trim should complement and enhance the wall color rather than overpowering it. For example, if the accent wall has a bold and vibrant color, opting for neutral-toned trim can create a balanced and harmonious look.
Choosing the right trim for an accent wall can significantly impact the overall look and feel of a room. Crown molding, baseboard trim, and chair rail are just a few options to consider, each offering its unique style and functionality. By considering the room’s design, the color and texture of the accent wall, and personal preferences, you can select the perfect trim to create a visually stunning accent wall that enhances the overall aesthetic appeal of the space.
How do you paint a wood trim accent wall?
How to Make a Wood Accent Wall
- Step One: Choose Your Colors and Begin. To begin, we picked a single color to paint three adjacent walls.
- Step Two: Collect Your Wood.
- Step Three: Begin Securing the Wood.
- Step Four: Caulk and Fill in Holes.
- Step Five: Paint!
Painting a wood trim accent wall can be a great way to add visual interest and depth to a room. Whether you want to highlight a specific area or create a focal point, a painted wood trim accent wall can transform the overall look and feel of your space. However, it is important to follow the right steps and techniques to ensure a successful outcome. In this guide, we will provide you with a step-by-step process on how to paint a wood trim accent wall.
Preparation:
Before you begin painting, it is crucial to prepare the wood trim and the wall surface. Start by cleaning the wood trim thoroughly to remove any dirt, dust, or grease. Use a mild detergent and water solution, and scrub the trim gently with a soft brush. Rinse it off with clean water and allow it to dry completely. Next, prepare the wall surface by filling any cracks or holes with a suitable filler. Sand the wall lightly to create a smooth surface for painting. Cover the floor and any furniture in the room with drop cloths or plastic sheets to protect them from paint splatters.
Priming:
Priming the wood trim is an essential step to ensure proper adhesion and a smooth finish. Apply a coat of primer specifically designed for wood surfaces using a brush or a roller. Make sure to cover the entire trim evenly, including the edges and corners. Allow the primer to dry completely before moving on to the next step. This will typically take a few hours, but refer to the manufacturer’s instructions for the exact drying time.
Painting:
Once the primer is dry, it’s time to paint the wood trim accent wall. Choose a high-quality paint that is suitable for wood surfaces. Stir the paint thoroughly to ensure an even consistency. Start by cutting in the edges of the trim with a brush, and then use a roller to paint the larger areas. Apply the paint in thin, even coats, allowing each coat to dry before applying the next. This will help prevent drips and ensure a smooth finish. Depending on the desired color and coverage, you may need to apply multiple coats of paint. Allow the final coat to dry completely before removing any protective coverings and enjoying your newly painted wood trim accent wall.
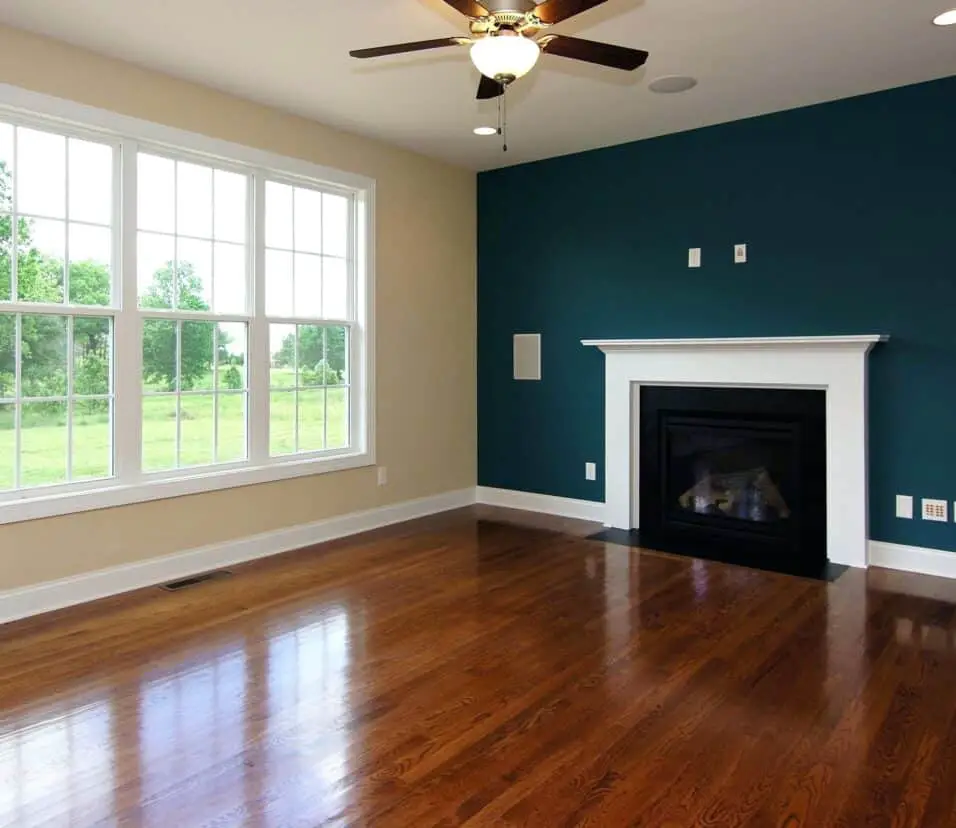
What wall is best for an accent wall?
You can’t go wrong painting your living room accent wall color on the wall behind the couch, and we’d recommend avoiding any walls that have large windows or doors, because they attention draw away from the accent wall itself. Interior designers share their expert advice below to help you decide.
An accent wall can be a great way to add visual interest and personality to a room. It serves as a focal point that draws attention and creates a unique atmosphere. However, choosing the right wall for an accent can be a daunting task. There are several factors to consider, such as the room’s layout, color scheme, and the desired effect. In this article, we will explore different types of walls that are best suited for accent walls and discuss their advantages and disadvantages.
Choosing the Main Wall:
When selecting a wall for an accent, it is important to consider the room’s layout and the wall’s visibility. The main wall, which is typically the one directly opposite the entrance or the one that naturally catches the eye, is often the best choice for an accent wall. This wall acts as a backdrop for the room and can create a dramatic impact when highlighted with a different color or texture.
Color and Texture:
The color and texture of the accent wall play a crucial role in determining its effectiveness. Bold and vibrant colors can make a statement and add energy to the room, while softer and muted tones create a more calming and sophisticated ambiance. It is essential to consider the existing color scheme of the room and choose a color that complements or contrasts with it harmoniously.
Another important aspect to consider is the texture of the accent wall. Textured walls, such as those with exposed brick, stone, or wood paneling, can add depth and visual interest to the room. They create a tactile experience and can make the accent wall stand out even more. However, smooth walls can also be effective, especially when paired with a bold color or a unique piece of artwork.
Room Size and Lighting:
The size of the room and the amount of natural light it receives should also be taken into account when choosing an accent wall. In smaller rooms, it is advisable to select a wall that is not too overpowering, as it can make the space feel cramped. Opting for a lighter or softer color can help create an illusion of more space. On the other hand, in larger rooms, a bold and vibrant accent wall can add depth and create a sense of coziness.
Choosing the best wall for an accent wall depends on various factors, including the room’s layout, color scheme, desired effect, and the texture of the wall. By considering these aspects, you can create a visually appealing and harmonious space that reflects your personal style and enhances the overall ambiance of the room.
What is the best wood for accent walls?
MDF is a super smooth engineered wood product that is often used for simple DIY projects including wood walls. Working with MDF is very similar to working with real wood and it can be cut into any size planks or other shapes just like plywood. Pros: MDF is super smooth which makes it exceptionally easy to cut.
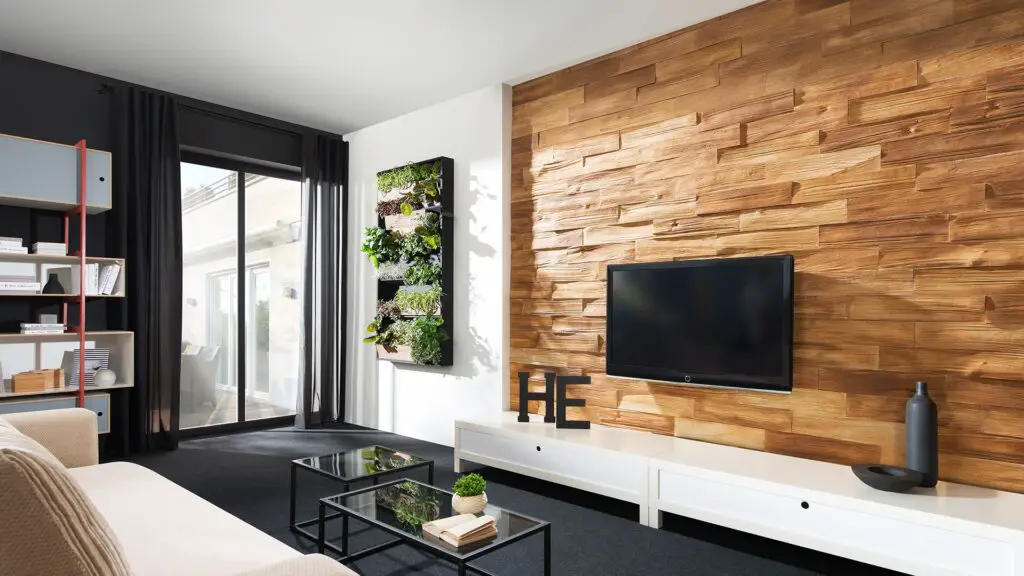
When it comes to accent walls, choosing the right wood can make all the difference in transforming a space. The best wood for accent walls depends on various factors such as the desired aesthetic, durability, and maintenance requirements. Whether you’re looking to create a rustic, modern, or industrial look, there are several options to consider. In this article, we will explore some of the top choices for accent wall wood and discuss their unique characteristics.
Rustic Charm with Reclaimed Barn Wood:
If you’re aiming for a rustic and weathered look, reclaimed barn wood is an excellent choice for accent walls. This type of wood carries a rich history and adds character to any space. Reclaimed barn wood often features unique textures, knots, and imperfections that give it a distinct charm. It can be left unfinished for a more natural look or stained to enhance its color and protect it from wear and tear. The warmth and authenticity of reclaimed barn wood make it a popular choice for accent walls in farmhouse-style homes or spaces that aim to evoke a sense of nostalgia.
Sleek and Modern with Shiplap:
For those seeking a more contemporary and streamlined aesthetic, shiplap is an excellent option. Shiplap is a type of wooden board that is installed horizontally with a slight gap between each board. This creates a clean and modern look that works well in various settings. Shiplap accent walls can be painted in a crisp white for a classic look or in bold colors to add a pop of personality to a room. The versatility of shiplap makes it a popular choice for accent walls in both residential and commercial spaces.
Industrial Chic with Reclaimed Pallet Wood:
If you’re looking to add an industrial touch to your space, reclaimed pallet wood can be an ideal choice for an accent wall. Pallet wood is often weathered and has a rough texture, which adds to its industrial charm. This type of wood is typically sourced from discarded shipping pallets and can be repurposed to create unique accent walls. Reclaimed pallet wood can be left untreated for a raw and rustic look or sealed with a clear coat to preserve its appearance. It is a cost-effective option that adds a touch of character and sustainability to any space.
The best wood for accent walls depends on the desired aesthetic and the overall style of the space. Reclaimed barn wood offers rustic charm and a sense of history, while shiplap provides a sleek and modern look. Reclaimed pallet wood adds an industrial touch and promotes sustainability. Ultimately, the choice of wood for an accent wall should align with the overall design vision and personal preferences. By carefully considering the characteristics and unique qualities of different wood options, you can create a stunning accent wall that enhances the ambiance of any room.
Creating an accent wall with wood trim can add a touch of elegance and warmth to any room. The process involves several steps to ensure a successful and visually appealing result. Firstly, you need to choose the right wall for your accent. Consider selecting a wall that is the focal point of the room or one that could benefit from some visual interest.
Reclaimed Pallet Wood
Once you have chosen the wall, measure and mark the area where the wood trim will be installed. It is essential to ensure accurate measurements to avoid any gaps or unevenness. Next, gather the necessary materials such as wood trim, adhesive, nails, a saw, and a level. Make sure the wood trim complements the overall style and color scheme of the room.
Before installing the wood trim, it is crucial to prepare the wall surface. Clean the wall thoroughly and remove any existing paint or wallpaper. Sand the surface to create a smooth and even base for the wood trim. Apply a primer to the wall to enhance the adhesion of the trim and prevent any discoloration.
Now, it’s time to install the wood trim. Start by cutting the trim to the appropriate lengths and angles using a saw. Apply adhesive to the back of each piece of trim and press it firmly onto the wall, ensuring it is level and aligned with your markings. Secure the trim further by nailing it into place. Repeat this process until the entire accent wall is covered with wood trim.
Finally, inspect the installed wood trim for any gaps or imperfections. Fill any gaps with wood filler and sand the surface once again for a seamless finish. You can then paint or stain the wood trim to achieve the desired look. Remember to take your time and pay attention to detail throughout the process to create a professional-looking accent wall with wood trim.
What materials are needed to create an accent wall with wood trim?
When it comes to creating an accent wall with wood trim, there are several materials that you will need to ensure a successful and visually appealing result. Firstly, you will need the wood trim itself. This can be in the form of pre-cut trim pieces or raw lumber that you can cut to size. It is important to choose a wood species that suits your desired aesthetic and is suitable for interior use.
In addition to the wood trim, you will also need a measuring tape, a level, a miter saw or a coping saw for cutting the trim at the correct angles, a nail gun or a hammer and finishing nails for securing the trim to the wall, a stud finder to locate the wall studs for secure attachment, and a caulk gun and wood filler for filling any gaps or nail holes. It is also recommended to have sandpaper and a paintbrush or roller on hand if you plan on painting or staining the wood trim.
How can wood trim be properly installed on an accent wall?
Installing wood trim on an accent wall requires careful planning and attention to detail. Here are the steps to ensure a proper installation:
First, measure and mark the desired height and width of the accent wall. Use a level and pencil to create straight lines that will serve as a guide for the placement of the wood trim. It is important to ensure that the lines are level and evenly spaced to achieve a professional-looking result.
Next, gather the necessary materials for the installation. This typically includes wood trim pieces, a miter saw or a miter box and hand saw, a nail gun or hammer and nails, a tape measure, a level, and wood glue. It is important to choose high-quality wood trim that complements the overall design of the room.
Before installing the wood trim, it is recommended to paint or stain the pieces to the desired color or finish. This will ensure a cohesive look and protect the wood from potential damage. Once the trim is prepared, begin by attaching the horizontal pieces first, using a nail gun or hammer and nails. Ensure that each piece is securely fastened to the wall and aligned with the marked lines.
Wood Trim
After the horizontal pieces are in place, move on to the vertical pieces. Use a miter saw or miter box and hand saw to cut the trim at the appropriate angles for corners and edges. Apply wood glue to the back of each piece before attaching it to the wall. This will provide additional stability and prevent the trim from shifting over time.
Finally, use a nail gun or hammer and nails to secure the vertical pieces to the wall. Take care to align each piece with the marked lines and ensure that they are level. Once all the trim pieces are installed, fill any nail holes with wood filler and sand them smooth. Finish the installation by applying a clear coat or sealant to protect the wood and enhance its appearance.
By following these steps and using the proper tools and techniques, you can achieve a professional-looking accent wall with wood trim that adds warmth and character to any room.
Are there any specific tools or techniques required for making an accent wall with wood trim?
When it comes to creating an accent wall with wood trim, there are indeed specific tools and techniques that are essential for achieving a successful result. Firstly, you will need a few basic tools such as a measuring tape, level, pencil, and a miter saw. These tools will help you accurately measure and cut the wood trim to the desired lengths and angles.
In addition to these basic tools, you will also need a nail gun or a hammer and finishing nails to secure the wood trim to the wall. A nail gun is recommended as it provides a quicker and more efficient way of attaching the trim. However, if you don’t have access to a nail gun, a hammer and finishing nails will still do the job.
When it comes to techniques, it is important to start by properly preparing the wall surface. This involves cleaning the wall and ensuring it is smooth and free from any imperfections. Next, you will need to measure and mark the desired placement of the wood trim on the wall. Using a level will help ensure that the trim is straight and aligned correctly. Finally, you will need to cut the wood trim to the appropriate lengths and angles, making sure to miter the corners for a seamless and professional look.
What are some tips or recommendations for achieving a professional-looking accent wall with wood trim?
When it comes to creating a professional-looking accent wall with wood trim, there are several tips and recommendations that can help you achieve the desired result. Firstly, it is crucial to carefully plan and measure the wall before starting the installation process. This will ensure that the wood trim is properly aligned and fits seamlessly on the wall. Additionally, selecting high-quality wood trim is essential for a professional finish. Opt for durable and well-finished trim that complements the overall aesthetic of the room.
Another important tip is to properly prepare the wall surface before installing the wood trim. Ensure that the wall is clean, smooth, and free from any imperfections. Sanding the wall and applying a primer can help create a smooth and even surface for the trim. Additionally, using a level and measuring tape during the installation process is crucial to ensure that the trim is straight and evenly spaced.
Furthermore, paying attention to the details can greatly enhance the professional look of the accent wall. Take the time to properly miter the corners of the wood trim for a seamless and polished appearance. Additionally, using a nail gun or adhesive specifically designed for wood trim can help ensure a secure and long-lasting installation. Finally, consider adding a clear coat or stain to the wood trim to protect it and enhance its natural beauty.
Conclusion
Creating an accent wall with wood trim is a fantastic way to add character and warmth to any space. This versatile design technique allows you to showcase your personal style and create a focal point that will surely impress your guests. By following the instructions provided, you can easily transform a plain wall into a stunning feature that enhances the overall aesthetic of your room.
One of the key benefits of using wood trim for an accent wall is its natural beauty and timeless appeal. Wood has a unique ability to bring a sense of warmth and texture to any space, making it a popular choice among homeowners and interior designers alike. Whether you opt for a rustic, reclaimed wood look or a sleek, modern design, the possibilities are endless when it comes to incorporating wood trim into your accent wall.
Another advantage of creating an unique accent wall with wood trim is the opportunity to showcase your creativity and craftsmanship. With a wide range of wood species, finishes, and installation techniques available, you can customize your accent wall to suit your personal taste and the overall style of your home. Whether you prefer a more traditional approach or want to experiment with unconventional patterns and designs, wood trim allows you to bring your vision to life.