How To Cover Rough Interior Walls
Introduction
How To Cover Rough Interior Walls: Are you tired of looking at the rough and unsightly walls in your home? Do you want to give your interior walls a fresh and polished look? If so, you’ve come to the right place. In this article, we will discuss the various methods and techniques you can use to cover rough interior walls and transform them into smooth and beautiful surfaces.
Firstly, it’s important to understand why your walls are rough in the first place. Rough walls can be the result of several factors, such as poor quality paint, improper application techniques, or even water damage. These imperfections can make your walls look unattractive and can be a source of frustration for homeowners. However, with the right approach, you can easily cover up these rough spots and create a flawless finish.
One of the most common methods for covering rough interior walls is by applying a fresh coat of paint. This is a relatively simple and cost-effective solution that can instantly improve the appearance of your walls. Before painting, it’s important to prepare the surface by cleaning it thoroughly and filling in any cracks or holes. Once the surface is smooth and clean, you can apply a primer to ensure that the paint adheres properly. Finally, choose a high-quality paint in the color of your choice and apply it evenly using a roller or brush.
If painting is not enough to cover up the roughness of your walls, you may consider using wallpaper or wall coverings. Wallpaper is available in a wide range of designs and patterns, allowing you to add a personal touch to your space. Before applying wallpaper, make sure to clean and prepare the walls as you would for painting. Then, carefully measure and cut the wallpaper to fit your walls, and use wallpaper adhesive to secure it in place. This method can be a bit more time-consuming than painting, but it can provide a more textured and visually appealing finish.
What is the best way to cover rough walls?
7 Creative Ideas for Covering Your Damaged Wall Without Paint
- Temporary Wallpaper – Easy Solution.
- Wall Tiles for Lasting Impression.
- Tile Decals – Redecorating Tiled Walls.
- Wall Decals – Let the Walls Speak.
- Tapestry & Curtains – Your Signature Theme.
- Art Accent Wall.
- Paintings & Sculptures.
When it comes to covering rough walls, there are several options available that can help improve the appearance and texture of the surface. Whether you are dealing with cracked plaster, uneven drywall, or rough concrete, finding the best way to cover these imperfections is essential to achieving a smooth and polished finish.
One popular method for covering rough walls is to use a technique called skim coating. Skim coating involves applying a thin layer of joint compound or plaster over the entire surface of the wall to create a smooth and even finish. This method is particularly effective for walls with minor imperfections, such as small cracks or bumps.
Another option for covering rough walls is to use textured paint. Textured paint contains additives that create a textured surface, which can help to hide imperfections and add visual interest to the wall. This type of paint is available in a variety of finishes, including sand, stone, and popcorn, allowing you to choose the texture that best suits your aesthetic preferences.
If you prefer a more traditional approach, wallpaper can also be used to cover rough walls. Wallpaper is available in a wide range of patterns and textures, making it a versatile option for concealing imperfections. Additionally, wallpaper can provide an extra layer of insulation and soundproofing, making it a practical choice for both aesthetic and functional purposes.
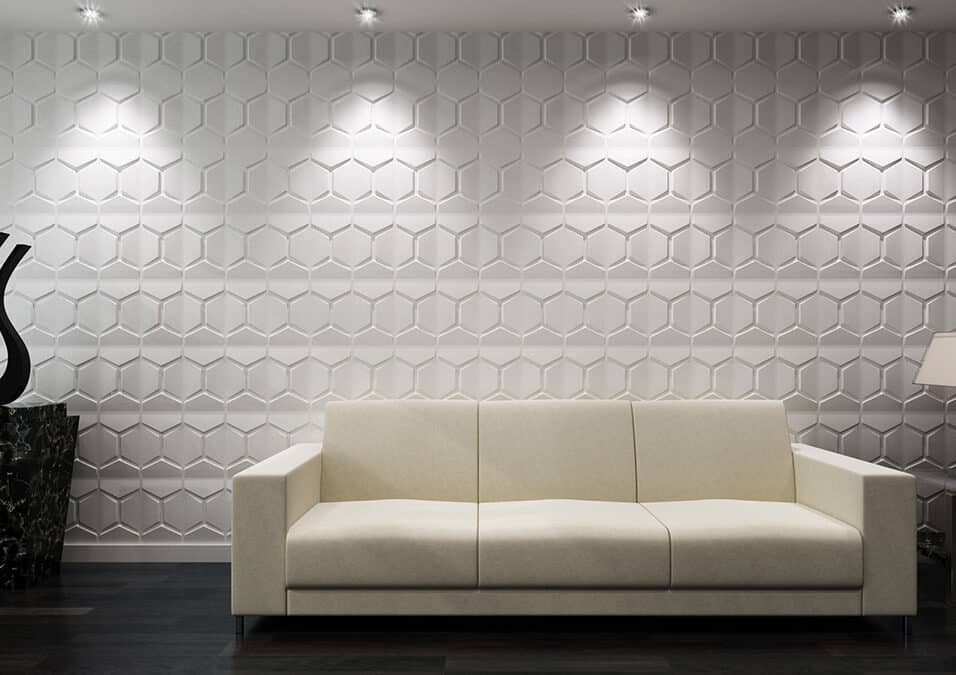
For those looking for a quick and easy solution, peel-and-stick wall panels or tiles can be a great option. These panels are designed to adhere directly to the wall, providing an instant transformation. They are available in various materials, such as wood, stone, and metal, allowing you to achieve the desired look without the need for extensive preparation or installation.
How do you cover a bad wall without plastering?
Use a joint compound instead of plaster
Working with a joint compound is easier than with plaster, although it isn’t thick and gives a similar finish. Baldicana recommends the following process: Apply a thin layer of joint compound to the wall. Use a putty knife or trowel to spread the compound evenly across the wall.
There are several ways to cover a bad wall without plastering, providing a quick and cost-effective solution to improve the appearance of your space. Whether you are dealing with cracks, holes, or uneven surfaces, these methods can help you achieve a smooth and attractive finish without the need for extensive plastering work.
One option is to use wallpaper or wall decals to cover up the imperfections on your wall. Wallpaper comes in a variety of patterns and textures, allowing you to choose a design that suits your style and preferences. Wall decals are another great option, as they can be easily applied and removed without causing any damage to the underlying wall surface.
Another alternative is to use fabric to cover the bad wall. This method involves attaching fabric to the wall using adhesive or a staple gun. Not only does this help to hide any imperfections, but it also adds texture and visual interest to the space. You can choose from a wide range of fabrics, including patterned, textured, or even sheer materials, depending on the desired effect.
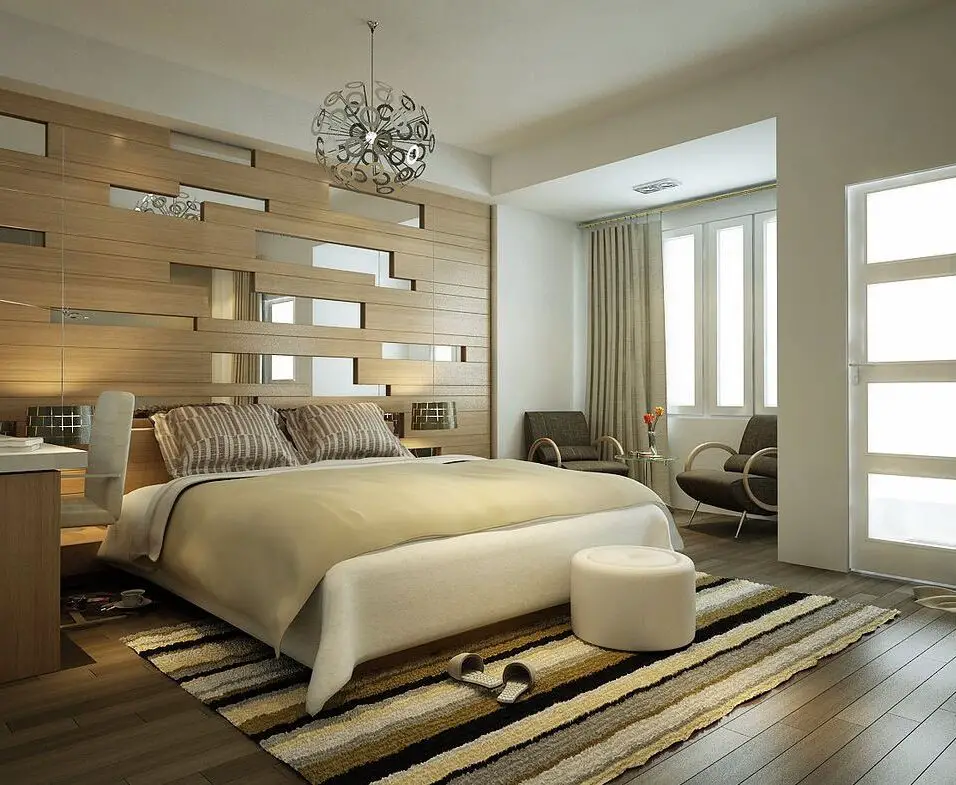
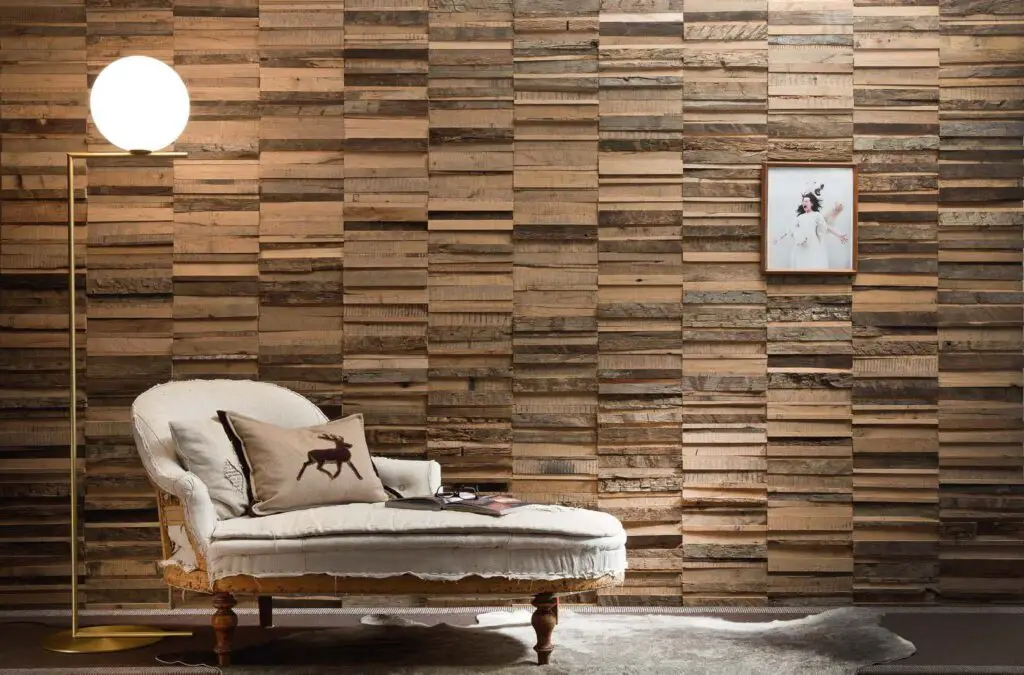
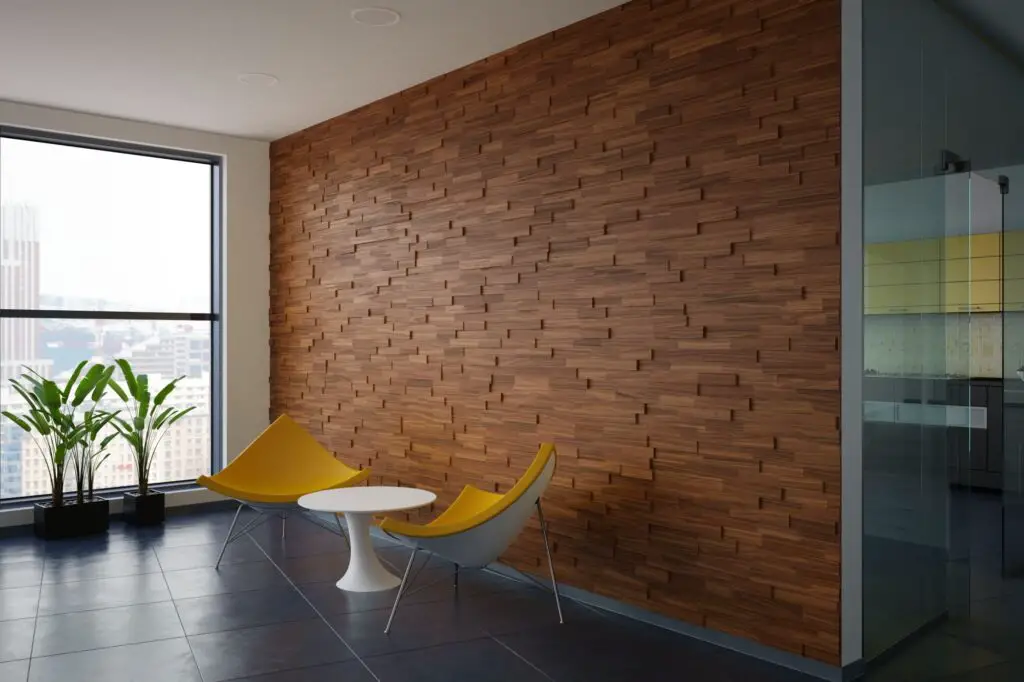
If you prefer a more natural look, consider using wood paneling or shiplap to cover the bad wall. These materials can be easily installed over the existing wall surface, providing a rustic and charming aesthetic. Wood paneling comes in various finishes and styles, allowing you to create a unique and personalized look for your space.
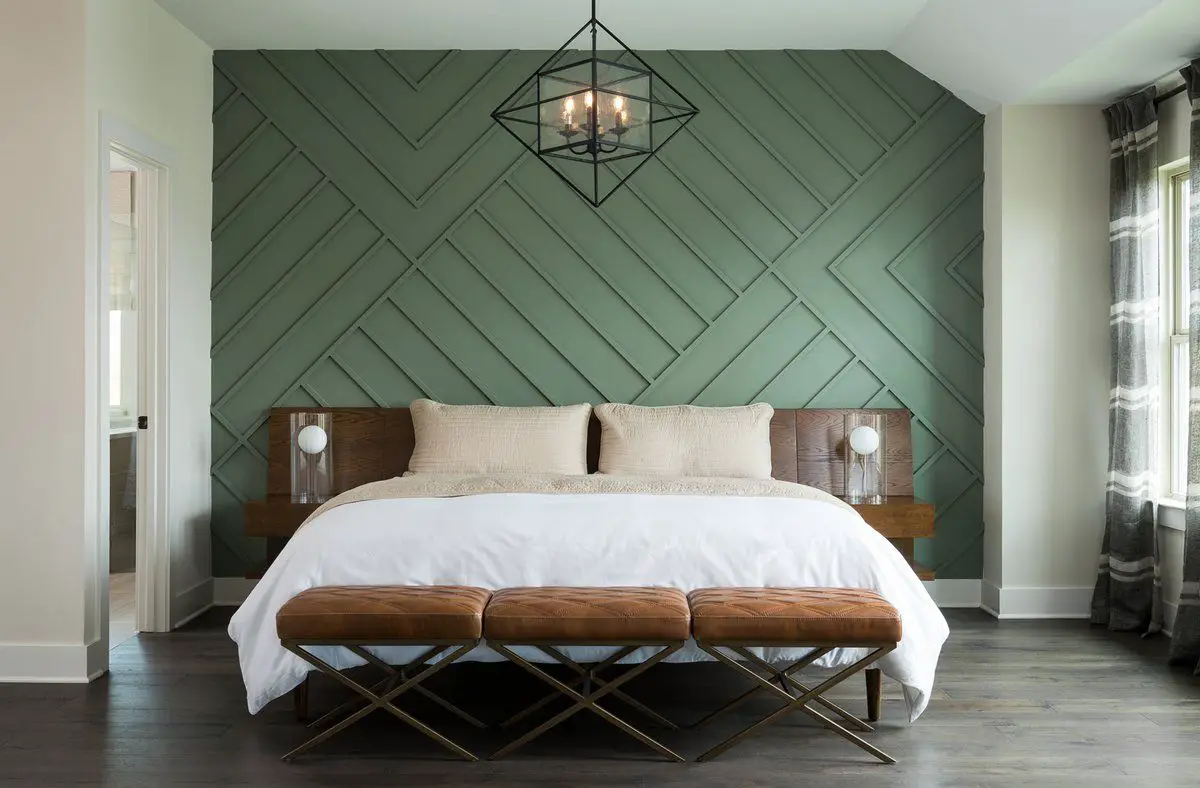
Lastly, you can also consider using decorative tiles or panels to cover the bad wall. Decorative tiles come in a variety of designs and materials, such as ceramic, glass, or metal, allowing you to create a focal point or accent wall in your space.
How do you hide bumpy walls?
12 Ways to Hide a Flaw on the Wall
- Create an art collage. Magicians know the power of misdirection, and so do designers.
- Hang an art piece on a swing arm.
- Add a shop-style clothing rack.
- Use chalkboard paint.
- Hang draperies.
- Explore your options for brick.
- Panel an unattractive ceiling.
- Cover wall vents with screens.
When it comes to home decor, having smooth and flawless walls is essential for creating a polished and visually appealing space. However, not all walls are perfect, and many homeowners find themselves dealing with bumpy or uneven surfaces. Whether it’s due to previous wallpaper removal, drywall imperfections, or other factors, hiding bumpy walls can be a challenging task.
One effective way to hide bumpy walls is by using textured paint. Textured paint contains additives that create a textured finish, which helps to disguise any imperfections on the wall’s surface. This type of paint is available in various textures, such as sand, popcorn, or stucco, allowing you to choose the one that best suits your aesthetic preferences. Applying textured paint can be done using a roller or a brush, and it provides a cost-effective solution for hiding bumpy walls.
Another option for concealing bumpy walls is by using wallpaper. Wallpaper comes in a wide range of patterns and textures, making it a versatile choice for covering up imperfections. Opting for a textured or embossed wallpaper can help to camouflage any bumps or unevenness on the wall’s surface. Additionally, wallpaper can add depth and visual interest to a room, enhancing its overall appearance.
If you prefer a more natural and rustic look, consider using wood paneling or shiplap. These materials can be installed directly over bumpy walls, providing a smooth and even surface. Wood paneling and shiplap are not only great for hiding imperfections but also add warmth and character to a space. They can be stained or painted to match your desired color scheme, allowing for customization.
Lastly, if you’re looking for a temporary solution, using fabric or tapestries can help to hide bumpy walls. Hanging fabric or tapestries on the wall can create a soft and textured look, effectively concealing any unevenness. This option is ideal for renters or those who want to experiment with different patterns and colors without committing to a permanent solution.
How do you cover damaged plaster walls?
Mix up a small batch of setting-type joint compound and use it to fill the crack and all the holes. Smooth the wet compound with a trowel; then, as it begins to harden, wet it and smooth it again. After the compound sets, sand the area lightly, then prime and paint.
When it comes to damaged plaster walls, there are several options for covering up the imperfections and restoring the appearance of the wall. Whether the damage is due to cracks, holes, or water damage, it is important to address the issue promptly to prevent further deterioration and maintain the structural integrity of the wall.
One common method for covering damaged plaster walls is to use joint compound or spackle to fill in any cracks or holes. This involves applying the compound or spackle to the damaged area with a putty knife, smoothing it out, and allowing it to dry. Once dry, the area can be sanded down to create a smooth surface that can be painted or wallpapered over. If the damage is more extensive, such as large holes or sections of missing plaster, a patching material may be necessary.
In some cases, it may be necessary to remove the damaged plaster entirely and replace it with new plaster or a drywall patch. This is a more involved process that requires cutting out the damaged section, applying new plaster or a drywall patch, and then finishing it to match the surrounding wall.
Regardless of the method used, it is important to properly prepare the damaged area before applying any cover-up materials. This may involve cleaning the area, removing loose plaster or debris, and ensuring the surface is smooth and dry. By taking the time to properly prepare the damaged plaster walls, you can ensure a more successful and long-lasting repair.
Is there a thick paint to cover bad walls?
Paint designed for uneven surfaces may be sold under a range of names including elastomeric paint, high-build paint, crack-free paint or renovation paint (which is basically a filler and undercoat in one). These paints are much thicker than ordinary paints which gives them much better coverage.
Yes, there are thick paints available in the market that can effectively cover bad walls. Whether you have cracks, holes, or uneven surfaces, a thick paint can help you achieve a smooth and flawless finish.
One of the main advantages of using a thick paint is its ability to fill in gaps and cracks on the wall. The thick consistency of these paints allows them to easily cover up any blemishes or unevenness on the surface. This means that you don’t have to spend extra time and effort on repairing the walls before painting them. The thick paint will do the job of concealing the imperfections for you.
Another benefit of using a thick paint is its excellent hiding power. These paints are formulated with high levels of pigments, which provide superior coverage compared to regular paints. This means that you can achieve a solid and opaque finish with fewer coats of paint. The thick paint will effectively hide any stains, marks, or discolorations on the walls, giving you a fresh and clean look.
Thick paints also have a higher viscosity, which makes them easier to apply and control. The thick consistency allows the paint to adhere well to the surface, reducing the chances of drips or runs. This makes it ideal for DIY enthusiasts or beginners who may not have much experience in painting. The thick paint will provide a more forgiving application, allowing you to achieve a professional-looking result.
In conclusion, if you have bad walls that need to be covered, using a thick paint is a great solution. It will effectively hide any imperfections, provide excellent coverage, and make the painting process easier. Whether you’re a professional painter or a DIY enthusiast, a thick paint can help you achieve a smooth and flawless finish on your walls.
When it comes to covering rough interior walls, there are several effective techniques that can help you achieve a smooth and polished finish. One technique is to use a technique called skim coating, which involves applying a thin layer of joint compound or plaster over the rough surface. This helps to fill in any imperfections and create a smooth base for painting or wallpapering.
Another technique is to use wall liners or wall coverings. Wall liners are thick, textured papers that can be applied directly to the rough walls. They provide a smooth and even surface for painting or wallpapering. Additionally, using a high-quality primer before painting can also help to hide imperfections and create a smoother finish.
Overall, the key to effectively covering rough interior walls is to properly prepare the surface and choose the right materials. By using techniques like skim coating, wall liners, and priming, you can achieve a professional-looking finish that will transform your rough walls into a smooth and polished surface.
Are there any specific materials or products that work best for covering rough interior walls?
When it comes to covering rough interior walls, there are several materials and products that can be particularly effective in achieving a smooth and polished finish. One of the most commonly used materials is drywall compound, also known as joint compound or mud.
In addition to drywall compound, another popular option is textured paint. This type of paint contains additives that create a textured finish, effectively camouflaging any roughness on the walls. Textured paint can be applied with a roller or brush, and it is available in various patterns and textures to suit different preferences. It is important to properly prepare the walls before applying textured paint by cleaning and priming them to ensure proper adhesion.
Can you provide step-by-step instructions on how to cover rough interior walls?
When it comes to covering rough interior walls, there are several steps you can follow to achieve a smooth and polished finish. Here is a step-by-step guide to help you through the process:
Step 1: Prepare the walls
Before you begin covering the rough interior walls, it is important to prepare them properly. Start by removing any loose paint or wallpaper using a scraper or sandpaper. Fill in any cracks or holes with a suitable filler and sand them down until smooth. Clean the walls thoroughly to remove any dust or debris.
Step 2: Apply a primer
Once the walls are prepared, apply a coat of primer. This will help the covering material adhere better and provide a more even finish. Use a roller or brush to apply the primer evenly, making sure to cover the entire surface. Allow the primer to dry completely before moving on to the next step.
Step 3: Choose your covering material
There are various options available for covering rough interior walls, such as drywall, plaster, or textured paint. Consider the desired outcome and choose the material that best suits your needs. Each material may have specific application instructions, so make sure to follow the manufacturer’s guidelines.
Step 4: Apply the covering material
Depending on the chosen material, follow the instructions for application. For drywall, measure and cut the panels to fit the walls, then secure them in place using screws or nails. Apply joint compound to fill in the gaps between the panels and smooth it out with a trowel. For plaster or textured paint, use a roller or brush to apply the material in even strokes, working from top to bottom.
Step 5: Finishing touches
Once the covering material is applied, allow it to dry completely. Sand down any rough spots or imperfections to achieve a smooth surface. Apply additional coats if necessary, following the manufacturer’s instructions. Finally, paint or decorate the walls according to your preference to complete the transformation.
By following these step-by-step instructions, you can effectively cover rough interior walls and achieve a” “
Are there any potential challenges or considerations to keep in mind when covering rough interior walls?
When covering rough interior walls, there are several potential challenges and considerations that you should keep in mind. Firstly, it is important to assess the condition of the walls before proceeding with any covering technique.
Another consideration is the type of covering material you choose. Some materials may require additional preparation or priming of the walls before application. It is important to read and follow the manufacturer’s instructions carefully to ensure proper adhesion and longevity of the covering.
Additionally, the thickness of the covering material can impact the overall appearance of the walls. Thicker materials may hide imperfections better but can also make the room feel smaller. On the other hand, thinner materials may not provide as much coverage but can create a more spacious feel.
Are there any alternative solutions or approaches to consider for covering rough interior walls?
Yes, there are alternative solutions and approaches to consider for covering rough interior walls. One option is to use textured paint or wallpaper to create a visually appealing finish that can help hide imperfections on the walls. Textured paint can be applied with a roller or brush, and it comes in various textures such as sand, popcorn, or stucco. Wallpaper with a textured design can also be a great option, as it can add depth and interest to the walls while covering up any roughness.
Another alternative solution is to install wall panels or tiles. Wall panels and tiles not only cover up rough surfaces but also provide insulation and soundproofing benefits. They come in a wide range of designs and styles, allowing you to choose the one that best suits your interior decor.
Conclusion
Covering rough interior walls can be a challenging task, but with the right techniques and materials, it is definitely achievable. Whether you are looking to improve the aesthetics of your home or simply want to create a smoother surface for painting or wallpapering, there are several options available to you.
One popular method is to use drywall compound or joint compound to fill in the rough areas and create a smooth surface. This can be a time-consuming process, as it often requires multiple layers of compound and sanding in between. However, the end result is a seamless and professional-looking finish.
Another option is to use textured paint or wallpaper to covering damaged up the roughness. Textured paint can add depth and interest to your walls, while also disguising any imperfections. Wallpaper, on the other hand, can provide a more traditional and elegant look. Both options are relatively easy to apply and can be a quick fix for rough interior walls.
If you are looking for a more permanent solution, you may consider installing new drywall over the existing rough walls. This can be a more expensive and time-consuming option, as it requires removing the old walls and installing new ones. However, it can provide a completely smooth and flawless finish, and also allows for insulation and soundproofing options.
Covering rough interior walls requires careful consideration of your desired outcome, budget, and time constraints. Whether you choose to use drywall compound, textured paint, wallpaper, or opt for a complete wall replacement, it is important to properly prepare the surface and follow the necessary steps for a successful result. With patience and attention to detail, you can transform your rough walls into a beautiful and polished interior.