Mastering Trim and Baseboard Repainting: DIY Guide
How To Repaint Trim And Baseboards: Repainting trim and baseboards can be a great way to freshen up the look of a room and give it a polished finish. Over time, these areas can become scuffed, chipped, or discolored, making the entire space appear worn and outdated. However, with the right tools and techniques, repainting trim and baseboards can be a relatively simple and cost-effective DIY project.
It is important to properly prepare the surfaces before beginning the repainting process. This involves removing any existing paint or varnish, filling in any cracks or holes, and sanding the surfaces to create a smooth and even base. This step is crucial for ensuring that the new paint adheres properly and provides a long-lasting finish.
It is essential to choose the right type of paint for the job. Trim and baseboards are often subject to a lot of wear and tear, so it is important to select a paint that is durable and easy to clean. Semi-gloss or high-gloss paints are commonly used for trim and baseboards as they provide a smooth and shiny finish that is resistant to scuffs and stains. It is also important to consider the color of the paint and how it will complement the overall color scheme of the room.
The surfaces are prepared and the paint is chosen, it is time to start painting. It is recommended to use a small brush or a foam roller for trim and baseboards, as these tools allow for more precision and control. It is important to apply thin and even coats of paint, allowing each coat to dry completely before applying the next. This will help to prevent drips and ensure a smooth and professional-looking finish.

Can you paint over painted baseboards?
Priming raw wood baseboards before painting is crucial.Clean surfaces may not need primers, but primed or painted baseboards do.
Cover painted baseboards. Baseboards are generally painted over to update or change the room’s color. Update your baseboards without replacing them easily and cheaply.
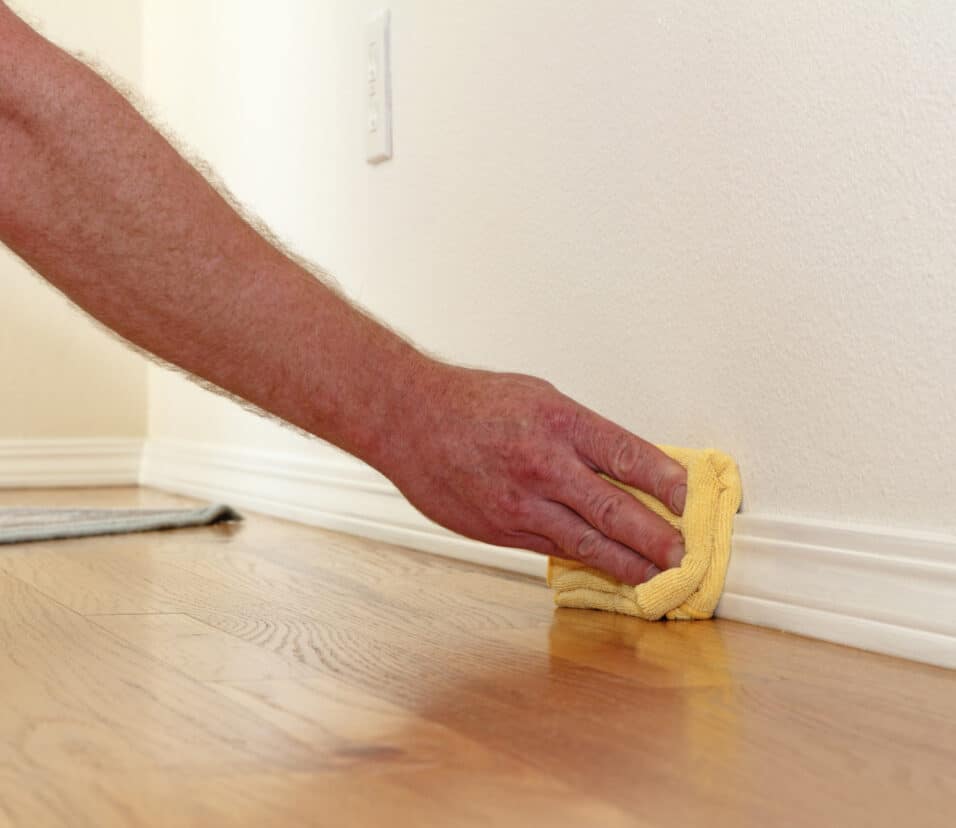
Prepared painted baseboards to paint. Clean baseboards to eliminate dust, grease, and filth. Clean and rinse baseboards with moderate detergent and water. After cleaning, lightly sand baseboards before painting.
A primer helps new paint stick and finish evenly after baseboard prep. Primers hide baseboard faults. Use baseboard or general-purpose primer. Prime evenly with a brush or roller and let dry before painting.
High-quality trim and baseboard paint should be used. The luster and longevity of this paint preserve baseboards. Highlight baseboards with a decor-matching or contrasting color.
Apply paint to baseboards using brush or roll. Complete the baseboard after painting edges and corners. Apply paint thinly and evenly to avoid drips. Each coat should dry before applying the next. You may require numerous paint coats for the appropriate shade and coverage.
Do I need to sand before repainting trim?
Prepare the Trim
Scuff-sand trim. First 80-grit, then 100- and 120-grit. Remove fresh trim luster only with 120-grit. Sand flat surfaces with a block or folded sandpaper.
Many wonder if they should sand trim before painting. This varies on paint and trim. New paint may be sanded. Sanding may be unnecessary.
Sanding may not be needed with proper trim and paint. This facilitates trim cleaning and painting. Trimming saves time and effort.
Paint chips are removed by sanding. Sanding smooths and bonds paint. We remove trim defects and rough places for a professional finish.
Paint type matters. Sanding may not be needed with latex or water-based paint. These paints stick to trim without sanding. Sanding is essential for oil-based paint. Oil paints stick after sanding.
Sanding before painting varies on trim quality and color. Good trim and paint may not need sanding. Sanding damaged or oil-based paint creates a smooth, durable surface.
Do I need to sand my baseboards before painting?
Should I sand baseboards before painting?Yes!First sand baseboards. Clean, smooth the surface.
People wonder if baseboards need sanding before painting. Baseboard appearance and painting goal define the solution. Baseboards may not need sanding before painting.
For smooth baseboards, sand before painting. It removes baseboard imperfections and roughness. Sanding removes peeling paint or polish.
Smooth, in good condition baseboards may not need sanding. Light fine-grit sanding may roughen the surface and increase paint adherence.
Sand baseboards carefully and with the correct equipment to avoid damage. A block-wrapped sanding block or sandpaper can smooth and prevent gouging.
Before sanding, clean baseboards of dirt, dust, and oil. Sanding and paint adhesion will improve.
While not necessary, sanding baseboards before painting might be helpful. Sanding depends on baseboard condition and painting aims. Avoid damage by carefully sanding baseboards with the correct equipment.
“
Can you paint over painted wood trim?
“
Yes, it is possible to paint over painted wood trim. Whether you want to update the color of your trim or simply refresh its appearance, painting over painted wood trim can be a cost-effective and relatively easy way to achieve the desired result. However, there are a few important factors to consider before embarking on this project.
Firstly, you need to assess the condition of the existing paint on the wood trim. If the paint is in good condition, meaning it is not peeling, cracking, or chipping, you can proceed with painting over it. However, if the paint is in poor condition, it is recommended to remove it completely before applying a new coat. This can be done through sanding or using a chemical paint stripper.
Secondly, it is important to properly prepare the wood trim before painting. This involves cleaning the surface to remove any dirt, dust, or grease. You can use a mild detergent and water solution for this purpose. Additionally, sanding the surface lightly can help create a smooth and even base for the new paint to adhere to.
Thirdly, choosing the right type of paint is crucial for a successful outcome. It is recommended to use a high-quality latex or oil-based paint specifically designed for trim. These paints are durable and provide a smooth finish. Additionally, consider the color you want to achieve and select a paint that matches your desired shade.
Lastly, when painting over painted wood trim, it is important to apply multiple thin coats rather than one thick coat. This helps ensure an even and professional-looking finish. Allow each coat to dry completely before applying the next one. Additionally, consider using a brush or roller specifically designed for trim to achieve precise and smooth application.
“
Is it better to sand or strip paint?
“
Paint removal usually requires sanding or stripping. Both methods have pros and cons, so the situation and paint type determine which to use.
Sandpaper or sanding machines remove paint. This method works best with thin paint or small areas. Sanding smooth surfaces and good paint removes paint quickly.
Sanding makes process control better. A smooth finish is achieved by layer-by-layer paint removal with pressure and sandpaper type. Sanding—without chemicals—is cleaner than stripping.
Not every situation is ideal for sanding. Large areas or layers can be laborious to paint. Old, thick, or multi-coated paint makes sanding harder. Maybe stripping works better.
Chemical strippers dissolve paint. This method is recommended for large-scale removal of old, thick, or tough paint. Painting is removed faster when stripped, especially with many layers.
Stripping helps remove paint from hard-to-reach areas and fine details that Sanding cannot reach. Because it involves less human labor, stripping is easier than sanding. Stripping involves toxic chemicals, making it messier and riskier.
Unlike Sanding, Stripping removes paint from tight areas and details. It’s easier to strip than sand. Chemical peeling is messy and dangerous.
Refinished trim and baseboards need supplies. Paint trim and baseboard well. Better-cleaning satin or semi-gloss paint lasts longer. Primers smooth baseboards.
Small brush or roller paint. Quality synthetic brushes apply evenly. Artist tape stops spills. Putty and wood filler before painting. Sand or block before painting.
Paint, primer, paintbrush, roller, painter’s tape, putty knife, wood filler, and sandpaper or block are needed to paint trim and baseboards
What steps should be followed to properly prepare trim and baseboards for repainting?
Proper preparation is crucial for achieving a professional-looking finish when repainting trim and baseboards. The first step is to remove any existing paint or finish from the surface. This can be done by sanding the trim and baseboards with sandpaper or using a chemical paint stripper. Once the surface is smooth and free of old paint, it is important to clean it thoroughly to remove any dust, dirt, or grease. A mild detergent solution and a sponge or cloth can be used for this purpose.
After cleaning, any holes, cracks, or imperfections in the trim and baseboards should be filled with wood filler. Once the filler is dry, it should be sanded down to create a smooth surface. Next, it is important to apply a primer specifically designed for trim and baseboards. The primer will help the paint adhere better and provide a more even finish. It is recommended to apply at least two coats of primer, allowing each coat to dry completely before applying the next.
Finally, before painting, it is important to protect adjacent surfaces by applying painter’s tape. This will prevent any accidental paint splatters or smudges. Once the preparation is
What steps should be followed to properly prepare trim and baseboards for repainting?
Preparing trim and baseboards before repainting is crucial to ensure a smooth and long-lasting finish. Here are the steps that should be followed:
Clean the surfaces: Start by removing any dust, dirt, or grime from the trim and baseboards. Use a mild detergent and water solution to clean the surfaces thoroughly. Rinse with clean water and allow them to dry completely.
Remove old paint or finish: If there is any peeling or chipping paint, it needs to be removed. Use a scraper or sandpaper to gently scrape off the old paint. Be careful not to damage the wood underneath. If there is a previous finish, it may need to be stripped using a chemical stripper.
Fill in gaps and holes: Inspect the trim and baseboards for any gaps, cracks, or nail holes. Use a wood filler or putty to fill in these imperfections. Smooth out the filler with a putty knife and let it dry completely. Sand the filled areas until they are smooth and level with the rest of the surface.
How should the trim and baseboards be painted to achieve a smooth and even finish?
To achieve a smooth and even finish when painting trim and baseboards, it is important to follow a few key steps. First, make sure to thoroughly clean the surfaces to be painted. Use a mild detergent and water solution to remove any dirt, dust, or grease. Once the surfaces are clean, sand them lightly to create a smooth and even surface for the paint to adhere to. This will also help to remove any existing paint or varnish that may be peeling or chipping.
After sanding, it is important to prime the trim and baseboards before applying the final coat of paint. Primer helps to create a smooth and even surface for the paint to adhere to, and it also helps to prevent any stains or discoloration from bleeding through the paint. Apply the primer evenly using a brush or roller, and allow it to dry completely before moving on to the next step.
Are there any specific techniques or tips for painting intricate or detailed trim and baseboards?
When it comes to painting intricate or detailed trim and baseboards, there are a few techniques and tips that can help you achieve a professional-looking finish. Firstly, it is important to choose the right brush for the job. A small, angled brush with fine bristles will allow for more precision and control when painting intricate details.
Another important tip is to use a primer specifically designed for trim and baseboards. This will help the paint adhere better and provide a smoother finish. Before painting, make sure to clean the trim and baseboards thoroughly to remove any dirt or grease. Sanding the surface lightly can also help create a smoother surface for the paint to adhere to.
When painting intricate details, it is best to start with the smallest areas first and work your way outwards. Take your time and use steady, controlled strokes to avoid any drips or smudges. If you make a mistake, don’t panic. Simply wait for the paint to dry and then carefully touch up the area with a small brush.
Lastly, to ensure the longevity and durability of the newly painted trim and baseboards, consider applying a clear topcoat or sealant. This will provide an extra layer of protection against wear and tear, making your paint job last longer.
How can one ensure the longevity and durability of the newly painted trim and baseboards?
Ensuring the longevity and durability of newly painted trim and baseboards requires proper preparation, application, and maintenance. Firstly, it is important to thoroughly clean the surfaces before painting. This can be done by wiping them down with a mild detergent and water solution, followed by rinsing and allowing them to dry completely. Any loose or peeling paint should be scraped off and sanded to create a smooth surface for the new paint to adhere to.
Once the surfaces are clean and smooth, it is crucial to apply a high-quality primer before painting. The primer helps to seal the surfaces, prevent stains from bleeding through, and improve the adhesion of the paint. It is recommended to use a primer specifically designed for trim and baseboards, as it will provide better durability and protection.
When it comes to painting the trim and baseboards, using a high-quality paint is essential. Opt for a paint that is specifically formulated for trim and baseboards, as it will be more durable and resistant to wear and tear. Apply the paint in thin, even coats, using a brush or roller. It is important to allow each coat to dry completely before applying the next one.
To ensure the longevity and durability of the newly painted trim and baseboards, it is also important to properly maintain them. Avoid using harsh cleaning agents or abrasive materials that can damage the paint. Regularly dust and clean the surfaces with a soft cloth or sponge. If any touch-ups or repairs are needed, address them promptly to prevent further damage.
Conclusion
Repainting trim and baseboards is a relatively simple and cost-effective way to refresh the look of a room. By following the steps outlined in this guide, homeowners can achieve professional-looking results without the need for hiring a professional painter.
First and foremost, it is important to properly prepare the surfaces before painting. This includes cleaning the trim and baseboards, sanding any rough areas, and filling in any holes or cracks. Taking the time to properly prepare the surfaces will ensure that the paint adheres well and provides a smooth and even finish.
Choosing the right paint and tools is crucial for a successful painting project. Opting for a high-quality paint that is specifically designed for trim and baseboards will ensure a long-lasting and durable finish. Additionally, using the right tools such as a high-quality brush or roller will make the painting process easier and more efficient.
Taking the time to apply multiple thin coats of paint rather than one thick coat will result in a more professional-looking finish. This allows the paint to dry evenly and minimizes the risk of drips or streaks. Additionally, allowing each coat to dry completely before applying the next will ensure a smooth and flawless finish.
Repainting trim and baseboards is a DIY project that can easily be accomplished by homeowners. By following the steps outlined in this guide and taking the time to properly prepare the surfaces, choose the right paint and tools, and apply multiple thin coats, homeowners can achieve professional-looking results and refresh the look of their rooms.
” Learn how to repaint trim and baseboards with our step-by-step guide. Get expert tips and tricks for achieving a professional finish and giving your home a fresh new look.