
How To Replace Water Supply Valve For Toilet
Introduction
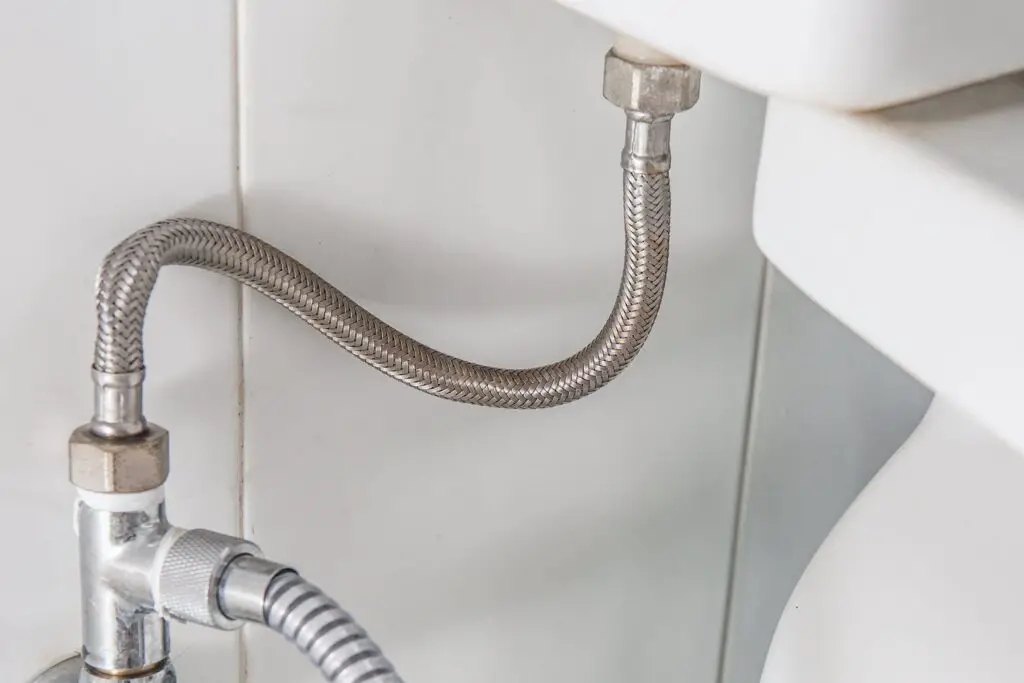
How To Replace Water Supply Valve For Toilet: The water supply valve, often located behind or beneath the toilet, controls the flow of water to the tank. Over time, these valves may develop leaks or become less effective, necessitating replacement. Before starting the process, it’s crucial to turn off the water supply to the toilet. Locate the shut-off valve typically found on the water line leading to the toilet, and turn it clockwise until it is fully closed.
To begin the replacement, you will need a few tools, including an adjustable wrench, pliers, and Teflon tape. Once the water supply is shut off, drain the toilet tank by flushing it and then use a sponge or towel to soak up any remaining water. The most common reason for fill valve failure is internal component degradation due to constant exposure to water and minerals in the water supply.
The actual process of replacing the water supply valve involves unscrewing the existing valve and installing the new one with the help of Teflon tape to ensure a watertight seal. Be sure to follow all manufacturer instructions and safety guidelines during the installation process. Over time, these minerals can cause clogs or create problems with the valve’s sealing mechanism, leading to leaks or inconsistent water flow.

How much does it cost to replace a toilet supply valve?
Fixr estimates that replacing a flush valve costs $75–200 and fixing a constantly running toilet costs $400. A skilled plumber will charge for the new valve and labor. Plumbing charges depend on geography and work complexity. Plumbers charge $100–250 to replace toilet supply valves.
Due to market conditions and location, costs may change over time, so get multiple quotations from plumbers or check local hardware stores for current supply pricing.
A defective toilet supply valve can cause water damage and inconvenience, but replacing it is a cheap fix. Whether you DIY or hire a plumber, fixing the problem quickly is crucial for a working toilet.
Replace your toilet fill valve if it’s old, leaks, or inefficient. Upgrade to a modern, efficient fill valve to conserve water, prevent water damage, and keep your toilet running smoothly for years.
What happens if the toilet valve fails?
When the fill valve fails, one of several things can happen: Water can blast upward from the fill valve, causing it to drip out of the tank and onto the floor. The fill valve will never close again, resulting in water simply continuously flowing into the tank.
If the toilet valve fails, it can lead to various issues that can be quite inconvenient and potentially cause damage to your bathroom and home. The toilet valve is responsible for regulating the flow of water into the toilet tank. When it fails, the consequences can include:
Constant Water Leaks: A faulty valve may result in continuous water leaks, leading to wastage of water and higher water bills. The constant flow of water can also cause damage to the floor and nearby fixtures.
Toilet Tank Refilling Problems: A failed valve may prevent the toilet tank from refilling properly after each flush. This can result in weak flushes or an incomplete flush, leaving waste and toilet paper behind, requiring multiple flushes and reducing the toilet’s efficiency.
Water Overflow: In some cases, a malfunctioning valve can lead to water overflowing from the tank into the bowl and eventually onto the bathroom floor. This not only wastes water but also creates a potential slip hazard.
Inconsistent Water Flow: A valve that is partially open or partially closed can cause inconsistent water flow, leading to unpredictable flushing behavior and inadequate water levels in the bowl.
Structural Damage: If a leak goes unnoticed for an extended period, it can cause water damage to the flooring and subflooring, leading to costly repairs and potential mold growth.
Why is the toilet valve leaking?
Plumbing supply shutdown valves under toilets or under sinks can go years without being switched off and reopened. Neoprene washers can become brittle or mineral-crusted and lose their leak-sealing capacity if inactive.
Various circumstances might cause a leaking toilet valve, so fixing it quickly prevents water waste and bathroom damage. Here are some frequent toilet valve leak causes:
Regular use can deteriorate toilet valve rubber gaskets and seals. Wear and tear can cause minor leaks that worsen. Water might leak through loose connections between the water supply line and valve.
The valve body itself may develop cracks or defects, leading to water leakage around the valve. If the valve or its components are made of metal, corrosion can occur due to exposure to water and minerals. Corrosion weakens the valve’s structure and can lead to leaks.
Toilet fill valves last 5 years or longer, depending on quality, flush frequency, and hard water. Fill valves can clog or leak like any other water-exposed valve.
Toilet fill valve longevity depends on valve quality, water quality, and use frequency. A decent, well-maintained fill valve can last 5–10 years. However, certain valves may wear out after a few years, while others can survive longer with careful care.
Internal component breakdown from water and mineral exposure causes most fill valve failure. Over time, these minerals can clog valves or cause sealing issues, causing leaks or irregular water flow.
Fill valves can last longer with regular maintenance and cleaning. Regularly flushing the toilet tank and cleaning the valve might extend its life. To avoid valve damage and water waste, fix issues like continuous running or slow filling immediately.
What is the toilet fill valve called?
Ballcocks (also balltaps or float valves) fill water tanks like those in flush toilets without overflow or backflow with low water pressure. The toilet fill valve, often known as the “ballcock” or “float valve,” is essential to toilet flushing. Mainly regulates toilet tank water level and refills after each flush.
The moniker “ballcock” comes from older toilet designs with a floating ball on a metal arm. As the tank water level dropped after flushing, the ball did too. The fill valve would open and allow water to enter the tank until the ball reached a certain level, then shut off.
In modern toilets, the ballcock mechanism has been replaced with more efficient designs, such as the “float valve.” This updated version typically features a plastic float attached to the end of an adjustable arm. As the water level lowers during flushing, the float drops, triggering the fill valve to open. When the float reaches the desired water level, it signals the valve to close, stopping the water flow.
Can I replace the water supply valve myself, or should I hire a professional plumber?
DIY toilet water supply valve replacement is easy for most households. If you’re unsure about DIY plumbing or run into problems, see a professional plumber.
Your knowledge and comfort with DIY plumbing will determine whether you can change your toilet’s water supply valve yourself or pay a plumber. Water supply valve replacement is usually easy for homeowners with basic plumbing skills and the correct tools.
If you have DIY knowledge and are confident, you may replace the water supply valve yourself. This saves money on plumbing services and gives you the satisfaction of completing a home repair.
You may choose to employ a plumber if you’re unsure about your plumbing skills or lack expertise with similar undertakings. Plumbers are trained and equipped to handle the task quickly and correctly, reducing the danger of mistakes or leaks that could cause bigger problems.
How do I shut off the water supply to the toilet before replacing the valve?
To shut off the water supply, locate the shut-off valve usually positioned on the water line leading to the toilet. Turn the valve clockwise until it is fully closed. This step is crucial to avoid any water flow while working on the valve replacement.
Before replacing the water supply valve for your toilet, it’s crucial to shut off the water supply to avoid any water flow while conducting the replacement process. Shutting off the water supply is a straightforward task that requires locating and turning off the shut-off valve, typically found on the water line leading to the toilet.
To begin, locate the shut-off valve, which is usually located on the wall or floor behind or beneath the toilet. It is a small lever-type valve connected to the water supply line. The valve may have a round or oval handle that you can turn.
To shut off the water supply, simply turn the valve handle clockwise until it is fully closed. This motion stops the flow of water from the water line to the toilet tank, effectively shutting off the supply. Once the valve is fully closed, you can verify that the water flow has ceased by attempting to flush the toilet. If there is no water refilling the tank after flushing, you have successfully shut off the water supply.
Is it necessary to drain the toilet tank before replacing the water supply valve?
Yes, it’s essential to drain the toilet tank before replacing the water supply valve. You can do this by flushing the toilet and then using a sponge or towel to soak up any remaining water. This precaution ensures a clean and dry working area for the valve replacement process.
When you turn off the water supply to the toilet by closing the shut-off valve, the water flow to the tank is halted. However, there is still water inside the tank that needs to be emptied. If you were to attempt replacing the water supply valve without draining the tank, you risk creating a mess as water can spill out when you disconnect the old valve.
To drain the toilet tank, simply flush the toilet. This action will force most of the water out of the tank and into the bowl. After flushing, use a sponge or towel to soak up any remaining water inside the tank. A dry working area makes the valve replacement process more manageable and reduces the risk of water damage to your bathroom floor or surrounding areas.
Conclusion
Replacing the water supply valve not only restores functionality to your toilet but also helps prevent water wastage and potential water damage due to leaks. Remember, a well-maintained toilet system is essential for the overall efficiency of your home plumbing.
Throughout this journey, you’ve learned valuable skills, such as turning off the water supply, draining the toilet tank, and using Teflon tape for secure fittings. Equipped with this newfound knowledge, you’ll feel more confident in addressing other plumbing issues that may arise in the future.
As with any DIY project, safety and precision are paramount. Always double-check your work, especially for leaks, before turning the water supply back on. If you encounter any difficulties during the process, don’t hesitate to seek advice from plumbing professionals or refer to additional resources.
By taking the initiative to replace the water supply valve for your toilet shut off, you’ve not only saved money on plumbing services but also gained a sense of accomplishment in maintaining your home. With your toilet now fully operational, you can enjoy peace of mind, knowing that you’ve mastered this essential household repair skill. Well done!