How To Install Metal Roofing On A Flat Roof
Introduction
How To Install Metal Roofing On A Flat Roof: Metal roofing is becoming an increasingly popular choice for homeowners looking to upgrade their roofs. With its durability, longevity, and aesthetic appeal, it offers numerous advantages over traditional roofing materials. However, installing metal roofing on a flat roof requires careful planning and execution to ensure a successful and long-lasting installation. In this article, we will provide a step-by-step guide on how to install metal roofing on a flat roof, ensuring that you have all the necessary information to complete the project successfully.
Before diving into the installation process, it is essential to understand the benefits of metal roofing. Metal roofs are known for their exceptional durability, capable of withstanding harsh weather conditions such as heavy rain, snow, and strong winds. They are also fire-resistant, making them a safer option for homeowners. Additionally, metal roofs have a longer lifespan compared to traditional roofing materials, reducing the need for frequent repairs or replacements. Moreover, metal roofing is available in a variety of styles and colors, allowing homeowners to choose a design that complements their home’s architecture.
When it comes to installing metal roofing on a flat roof, proper preparation is crucial. The first step is to assess the condition of the existing roof. Ensure that it is structurally sound and free from any damage or leaks. If there are any issues, they should be addressed before proceeding with the installation. It is also important to check local building codes and regulations to ensure compliance.
Next, you will need to gather the necessary tools and materials for the installation. These may include metal roofing panels, fasteners, underlayment, flashing, sealant, and appropriate safety equipment. It is recommended to consult with a professional or a reputable supplier to determine the specific materials required for your project.
Once you have all the materials ready, the installation process can begin. It typically involves measuring and marking the roof, installing the underlayment, attaching the metal roofing panels, and applying flashing and sealant to ensure a watertight seal. Each step requires precision and attention to detail to ensure a secure and long-lasting installation.
In conclusion, installing metal roofing on a flat roof can be a rewarding project that enhances the durability and aesthetic appeal of your home. By following the step-by-step guide provided in this article, you can successfully complete the installation process and enjoy the benefits of a metal roof for years to come. Remember to prioritize safety and consult with professionals or reputable suppliers for guidance throughout the project.”
How is metal roofing attached to the roof?
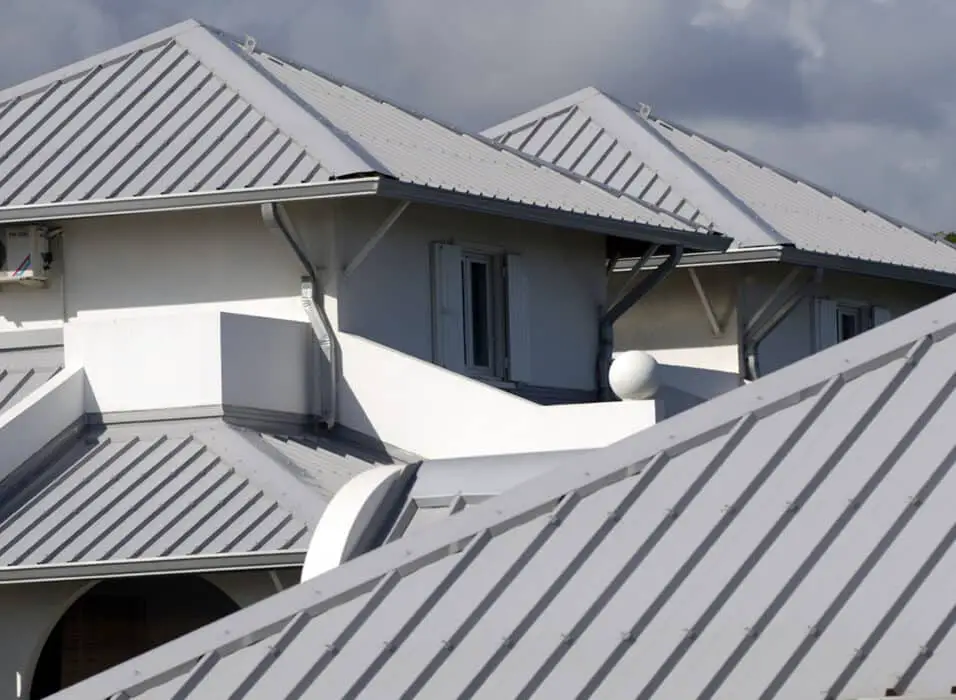
The majority of metal roofs currently in use today hold themselves in place by means of mechanical fasteners – usually corrosion-resistant bolts or screws that anchor the roof in the underlying decking material. Fasteners generally fall into one of two categories: exposed or concealed.
Metal roofing is a popular choice for homeowners due to its durability, longevity, and aesthetic appeal. One of the key factors that contribute to the success of metal roofing is the way it is attached to the roof. The method of attachment plays a crucial role in ensuring the stability and effectiveness of the metal roof. In this article, we will explore the various ways in which metal roofing can be attached to the roof, providing you with a comprehensive understanding of the process.
One common method of attaching metal roofing to the roof is through the use of screws or nails. These fasteners are typically made of stainless steel or galvanized steel to prevent corrosion and ensure long-lasting performance. The screws or nails are driven through the metal panels and into the roof deck, securing the roofing material in place. This method is relatively straightforward and can be easily accomplished by a professional roofer or a skilled DIY enthusiast.
Another method of attaching metal roofing is through the use of clips or brackets. These components are designed to hold the metal panels in place without the need for screws or nails penetrating the surface of the roof. The clips or brackets are typically installed on the roof deck, and the metal panels are then snapped or slid into place. This method offers several advantages, including ease of installation, reduced risk of leaks, and improved thermal performance.
In addition to screws, nails, clips, and brackets, metal roofing can also be attached using adhesive or sealant. This method is commonly used in situations where the roof deck is made of concrete or other non-traditional materials. The adhesive or sealant is applied to the underside of the metal panels, creating a strong bond between the roofing material and the roof deck. This method provides excellent resistance against wind uplift and can be particularly beneficial in areas prone to severe weather conditions.
It is important to note that the specific method of attachment may vary depending on the type of metal roofing being installed, as well as the design and structure of the roof. Therefore, it is crucial to consult with a professional roofing contractor who can assess your specific needs and recommend the most suitable attachment method for your metal roof.
The attachment of metal roofing to the roof is a critical aspect of the installation process. Whether through screws, nails, clips, brackets, or adhesive, the method chosen should ensure the stability, durability, and longevity of the metal roof. By understanding the various attachment methods and consulting with a professional, you can make an informed decision and enjoy the benefits of a secure and reliable metal roof for years to come.
Can I install a metal roof myself?
While most metal roofing styles can be installed as an advanced DIY project, metal roofing installation is complicated and can vary slightly based on the brand of panels or shingles that you select. We recommend that you install a metal roof with one or two helpers and fall protection equipment designed for roof work.
Installing a metal roof can be a challenging task, but it is possible to do it yourself if you have the necessary skills and knowledge. However, it is important to consider several factors before deciding to take on this project. In this article, we will discuss the advantages and disadvantages of installing a metal roof yourself, as well as provide some tips to help you successfully complete the installation.
Advantages of DIY metal roof installation
One of the main advantages of installing a metal roof yourself is the potential cost savings. Hiring a professional roofing contractor can be expensive, and by doing the installation yourself, you can save a significant amount of money. Additionally, installing a metal roof can be a rewarding DIY project that allows you to learn new skills and gain a sense of accomplishment.
Another advantage is the flexibility and control you have over the installation process. You can choose the materials, colors, and design that best suit your preferences and needs. This level of customization is not always possible when hiring a professional contractor.
Disadvantages of DIY metal roof installation
While there are advantages to installing a metal roof yourself, there are also some disadvantages to consider. One of the main challenges is the complexity of the installation process. Metal roofs require precise measurements, proper sealing, and careful handling to ensure a watertight and durable installation. If you are not experienced in roofing or construction, you may find it difficult to achieve the same level of quality as a professional.
Another disadvantage is the time and effort required. Installing a metal roof can be a time-consuming project, especially if you are doing it alone. It may require several weekends or even weeks to complete, depending on the size and complexity of your roof. Additionally, working at heights can be dangerous, so it is important to take proper safety precautions.
Tips for successful DIY metal roof installation
If you decide to install a metal roof yourself, here are some tips to help you succeed:
– Educate yourself: Before starting the installation, thoroughly research the process and gather all the necessary information and resources.
– Plan and prepare: Create a detailed plan, including measurements, materials, and tools needed. Prepare the roof surface by removing old shingles and repairing any damage.
– Follow manufacturer instructions: Carefully read and follow the installation instructions provided by the metal roofing manufacturer. This will ensure proper installation and warranty coverage.
– Seek assistance if needed: Don’t hesitate to ask for help from friends or family members, especially when it comes to lifting and positioning heavy metal panels.
– Take safety precautions: Use proper safety equipment, such as harnesses and non-slip shoes, and work carefully to avoid accidents or injuries.
By considering the advantages and disadvantages, as well as following these tips, you can make an informed decision about whether to install a metal roof yourself. Remember, if you are unsure about any aspect of the installation process, it is always best to consult with a professional roofing contractor.
What is the minimum slope for a metal roof?
3:12
The minimum pitch for all Interlock Metal Roofing Systems is three inches per foot or 3:12, meaning that the roof should slope down at least three inches for every foot of horizontal distance.
Introduction:
A metal roof is a popular choice for homeowners and businesses due to its durability, longevity, and aesthetic appeal. When installing a metal roof, one important factor to consider is the minimum slope required for proper installation and performance. The slope of a roof refers to its angle or pitch, which affects how water drains off the roof and prevents water pooling or leakage.
Importance of slope for a metal roof:
The minimum slope for a metal roof is crucial for several reasons. Firstly, it ensures effective water drainage, preventing water from accumulating on the roof’s surface. This is particularly important in areas with heavy rainfall or snowfall, as a low slope can lead to water pooling and potential leaks. Secondly, a proper slope helps to maintain the structural integrity of the roof by minimizing the weight of accumulated water or snow. Additionally, a higher slope allows for better air circulation beneath the roof, reducing the risk of moisture buildup and potential damage to the roof’s materials.
Determining the minimum slope:
The minimum slope required for a metal roof depends on various factors, including the type of metal roofing material used and the local climate conditions. Generally, the minimum slope for a metal roof is around 1:12, meaning that for every 12 horizontal inches, the roof should rise by 1 vertical inch. However, some metal roofing manufacturers may recommend a higher minimum slope, such as 3:12 or even steeper, to ensure optimal performance and longevity of the roof.
Considerations for low-slope metal roofs:
In cases where a low-slope metal roof is desired or necessary, additional precautions must be taken to ensure proper installation and performance. Low-slope metal roofs typically require the use of special underlayment materials, such as self-adhering membranes, to provide an extra layer of protection against water infiltration. It is also important to consult with a professional roofing contractor experienced in installing low-slope metal roofs to ensure compliance with local building codes and industry standards.
The minimum slope for a metal roof plays a crucial role in its performance and longevity. Adequate slope ensures effective water drainage, prevents water pooling and leakage, and helps maintain the structural integrity of the roof. It is important to consider the type of metal roofing material, local climate conditions, and any specific manufacturer recommendations when determining the minimum slope for a metal roof. For low-slope metal roofs, additional precautions and specialized installation techniques may be necessary to ensure optimal performance and protection against water infiltration.
What is the standard angle for a metal roof?
Using a simple roof pitch calculator can help you determine the degree of your angle. The minimum pitch for a lapped, non-sealed metal roof is 3:12. That ratio equals just over 14 degrees. Lapped metal roofs with sealant between the laps can go as low as ½:12, which equals around 2.5 degrees.
Introduction:
A metal roof is a popular choice for many homeowners due to its durability, longevity, and aesthetic appeal. When it comes to installing a metal roof, one important consideration is the angle at which it should be installed. The standard angle for a metal roof, also known as the roof pitch, plays a crucial role in determining its performance and functionality. In this article, we will explore the standard angle for a metal roof and discuss its significance in ensuring a successful installation.
Importance of the Standard Angle:
The standard angle for a metal roof is typically determined by the climate and weather conditions of the region where the roof is being installed. The angle of the roof affects its ability to shed water, snow, and debris, as well as its overall structural integrity. A roof with the correct pitch ensures proper drainage, prevents water pooling, and minimizes the risk of leaks or damage to the roof and underlying structure.
Factors Influencing the Standard Angle:
Several factors come into play when determining the standard angle for a metal roof. One of the primary factors is the amount of precipitation the region receives. Areas with heavy rainfall or snowfall require steeper roof pitches to facilitate efficient water or snow runoff. Additionally, the roof’s pitch can also be influenced by the roof’s design, such as its shape and slope, as well as the type of metal roofing material being used.
Common Standard Angles:
While the standard angle for a metal roof can vary depending on the factors mentioned above, there are some common standard angles that are widely used in the industry. For regions with moderate rainfall or snowfall, a roof pitch of 4:12 is often considered standard. This means that for every 12 inches of horizontal roof, there is a rise of 4 inches. However, in areas with heavy precipitation, a steeper pitch of 6:12 or even 8:12 may be recommended to ensure effective water or snow runoff.
The standard angle for a metal roof is an important consideration during the installation process. It ensures proper drainage, prevents water pooling, and helps maintain the structural integrity of the roof. Factors such as climate, precipitation levels, roof design, and roofing material all play a role in determining the appropriate pitch for a metal roof. By adhering to the standard angle guidelines, homeowners can ensure a successful and long-lasting metal roof installation.
What is the perfect slope of a roof?
The ideal slope depends on various factors such as the climate, roof material, and local building codes. As a general guideline, most residential roofs have a slope of at least 1:12, which means for every 12 units of horizontal distance, there’s a 1 unit rise.
Introduction:
When it comes to constructing a roof, one of the crucial factors to consider is the slope. The slope of a roof refers to its incline or the angle at which it is built. It plays a significant role in determining the overall functionality and durability of the roof. The perfect slope of a roof is a topic that has been widely debated among architects, engineers, and roofing professionals. It is essential to find the right balance between aesthetics, functionality, and practicality when determining the ideal slope for a roof.
Importance of Roof Slope:
The slope of a roof serves several important purposes. Firstly, it helps to shed water and prevent any accumulation on the roof’s surface. This is crucial in areas with heavy rainfall or snowfall, as a flat or low-sloped roof can lead to water pooling and potential leaks. Secondly, the slope aids in the proper drainage of rainwater, preventing any water damage to the structure. Additionally, a well-designed roof slope can enhance the overall aesthetics of a building, adding architectural appeal and visual interest.
Factors Influencing the Perfect Slope:
Several factors come into play when determining the perfect slope for a roof. One of the primary considerations is the climate of the region where the building is located. Areas with high precipitation rates typically require steeper slopes to ensure effective water drainage. On the other hand, regions with low rainfall may have roofs with gentler slopes. The type of roofing material used is another crucial factor. Some materials, such as asphalt shingles, require a minimum slope for proper installation and longevity.
Common Roof Slopes:
There are various roof slopes commonly used in construction. The most common slope range is between 4:12 and 8:12, which means that for every 12 horizontal inches, the roof rises 4 to 8 inches vertically. This slope range strikes a balance between efficient water drainage and ease of installation. Steeper slopes, such as 12:12 or greater, are often seen in areas with heavy snowfall, as they facilitate snow shedding. Conversely, low-sloped roofs, with slopes less than 4:12, are commonly found in commercial buildings and modern architectural designs.
The perfect slope of a roof depends on various factors, including climate, roofing material, and architectural design. It is crucial to find the right balance between functionality, aesthetics, and practicality when determining the ideal slope for a roof. By considering these factors and consulting with professionals, homeowners and builders can ensure that their roofs are not only visually appealing but also durable and efficient in shedding water and preventing damage.
Preparing a flat roof for metal roofing installation involves several important steps to ensure a successful and long-lasting installation. Firstly, it is crucial to thoroughly inspect the existing roof for any damage or structural issues. This includes checking for leaks, rot, or weak spots that may need to be repaired before installing the metal roofing.
Next, the roof surface should be cleaned and cleared of any debris, such as leaves or dirt, to provide a clean and smooth base for the metal roofing. This can be done by using a broom or a leaf blower to remove loose debris, followed by a thorough washing with a mild detergent and water solution.
After cleaning, it is important to ensure proper insulation and ventilation on the flat roof. This can be achieved by installing insulation boards or a vapor barrier to prevent condensation and improve energy efficiency. Additionally, proper ventilation should be provided to allow for air circulation and prevent moisture buildup, which can lead to mold or rot.
Lastly, before installing the metal roofing panels, it is essential to measure and mark the roof to determine the layout and positioning of the panels. This will help ensure a precise and accurate installation, minimizing the risk of errors or gaps between the panels.
What tools and materials are required for installing metal roofing on a flat roof?
When it comes to installing metal roofing on a flat roof, there are several essential tools and materials that you will need to ensure a successful installation. These include:
Roofing Panels: The primary material needed for metal roofing installation is the metal roofing panels themselves. These panels are typically made of steel or aluminum and come in various sizes and profiles. It is important to choose panels that are specifically designed for flat roofs to ensure proper installation and performance.
Roofing Underlayment: Before installing the metal roofing panels, it is crucial to have a proper roofing underlayment in place. This underlayment acts as a secondary barrier against water infiltration and helps to protect the roof deck from potential damage. There are different types of underlayment available, such as synthetic underlayment or self-adhering membrane, and the choice depends on the specific requirements of your flat roof.
Roofing Nails or Screws: To secure the metal roofing panels to the roof deck, you will need roofing nails or screws. These fasteners should be corrosion-resistant to ensure the longevity of the roof. It is recommended to use screws instead of nails, as they provide better holding power and are less likely to loosen over time.
Roofing Adhesive: In addition to fasteners, using roofing adhesive is often necessary to create a watertight seal between the metal panels. This adhesive is applied along the seams and edges of the panels to prevent water penetration and enhance the overall durability of the roof.
Roofing Tools: Various roofing tools are required for the installation process, including a tape measure, chalk line, roofing hammer or screw gun, tin snips, and a metal roofing shear. These tools help with accurate measurements, cutting the panels to size, and securely fastening them to the roof deck.
Overall, installing metal roofing on a flat roof requires careful planning and the use of appropriate tools and materials. It is essential to follow the manufacturer’s instructions and guidelines to ensure a proper and long-lasting installation.
How can one ensure proper ventilation and insulation when installing metal roofing on a flat roof?
Proper ventilation and insulation are crucial when installing metal roofing on a flat roof to ensure the longevity and efficiency of the roof. To achieve proper ventilation, it is important to install ridge vents or other types of ventilation systems. These vents allow hot air to escape from the attic space, preventing moisture buildup and reducing the risk of mold and rot. Additionally, intake vents should be installed at the eaves or soffits to allow fresh air to enter the attic and create a continuous airflow.
Insulation is equally important to maintain a comfortable indoor temperature and prevent energy loss. Insulating the flat roof can be done using rigid foam insulation boards or spray foam insulation. The insulation should be installed between the roof deck and the metal roofing panels to create a thermal barrier. This helps to prevent heat transfer from the roof to the interior of the building during hot weather and minimize heat loss during colder months.
By ensuring proper ventilation and insulation during the installation of metal roofing on a flat roof, you can create a more energy-efficient and comfortable living or working environment. It is recommended to consult with a professional roofing contractor to determine the specific ventilation and insulation requirements based on your climate and building structure.
What are the recommended techniques for securing metal roofing panels on a flat roof?
When it comes to securing metal roofing panels on a flat roof, there are several recommended techniques that ensure a strong and durable installation. One of the most common methods is using screws or nails specifically designed for metal roofing. These fasteners should be made of corrosion-resistant materials such as stainless steel or galvanized steel to prevent rusting over time.
Another important technique is to use a proper spacing and layout for the panels. It is crucial to follow the manufacturer’s guidelines for the recommended overlap and spacing between panels to ensure proper water drainage and prevent leaks. Additionally, using a sealant or adhesive along the seams and edges of the panels can provide an extra layer of protection against water infiltration.
Furthermore, it is essential to consider the use of metal roofing clips or brackets to secure the panels in high wind areas. These clips or brackets help to prevent uplift and ensure the panels stay in place during severe weather conditions. It is important to install these clips or brackets according to the manufacturer’s instructions to guarantee their effectiveness.
Are there any specific safety precautions or considerations to keep in mind during the installation of metal roofing on a flat roof?
When installing metal roofing on a flat roof, it is crucial to prioritize safety to prevent accidents and ensure a successful installation. Here are some important safety precautions and considerations to keep in mind:
Use proper safety equipment: Always wear appropriate personal protective equipment (PPE) such as gloves, safety glasses, and a hard hat. Additionally, use fall protection equipment like harnesses and safety ropes when working at heights.
Ensure a stable working surface: Before starting the installation, inspect the flat roof for any weak spots or structural issues. Make sure the roof is stable and can support the weight of the workers and materials. Reinforce or repair any damaged areas before proceeding.
Take weather conditions into account: Metal roofing installation should be avoided during adverse weather conditions such as high winds, rain, or snow. These conditions can make the roof surface slippery and increase the risk of accidents. Plan the installation for a calm and dry day.
Use proper ladder safety: If ladders are required for accessing the roof, ensure they are in good condition and set up securely. Use ladder stabilizers or levelers to prevent wobbling or tipping. Always maintain three points of contact while climbing up or down the ladder.
Be cautious of electrical hazards: Metal roofing installation may involve working near electrical wires or equipment. Take precautions to avoid contact with live wires and ensure proper grounding of metal materials. If necessary, consult a professional electrician to ensure safety.
By following these safety precautions and considerations, you can minimize the risk of accidents and ensure a safe and successful installation of metal roofing on a flat roof.
Conclusion
Installing metal roofing on a flat roof can be a challenging task, but with the right instructions and guidance, it is definitely achievable. This conclusion aims to summarize the key points discussed in the article and provide a final perspective on the topic.
First and foremost, it is crucial to emphasize the importance of proper planning and preparation before starting the installation process. This includes assessing the condition of the existing roof, ensuring it is structurally sound and free from any damages. Additionally, measuring the roof accurately and calculating the required materials is essential to avoid any wastage or shortage during the installation.
Next, the article highlights the significance of choosing the right type of metal roofing for a flat roof. Factors such as durability, weather resistance, and energy efficiency should be considered when selecting the material. Additionally, understanding the different installation methods and techniques is vital to ensure a secure and long-lasting roof.
Furthermore, the article provides step-by-step instructions on how to install metal roofing on a flat roof. It emphasizes the importance of starting with a clean and dry surface, removing any debris or existing roofing materials. The use of appropriate tools and safety equipment is also emphasized throughout the installation process.
Installing metal roofing on a flat roof requires careful planning, proper material selection, and adherence to the correct installation techniques. By following the instructions provided in this article, homeowners can successfully complete the installation process and enjoy the benefits of a durable and aesthetically pleasing roof. It is important to remember that if one is unsure or uncomfortable with the installation process, it is always recommended to seek professional assistance to ensure the job is done correctly and safely.