How To Install Insulation In Interior Walls
Introduction
How To Install Insulation In Interior Walls: Installing insulation in interior walls is an essential step in creating a comfortable and energy-efficient home. Insulation helps to regulate the temperature inside your house, keeping it warm in the winter and cool in the summer. It also acts as a sound barrier, reducing noise transmission between rooms. Whether you are building a new home or renovating an existing one, understanding the process of installing insulation in interior walls is crucial.
Insulation is a material that slows down the transfer of heat, and it comes in various forms such as fiberglass, cellulose, and foam. Each type of insulation has its own advantages and disadvantages, so it’s important to choose the right one for your specific needs. Additionally, the installation process may vary depending on the type of insulation you select.
Before you begin the installation process, it’s important to assess the condition of your interior walls. If you are working on a new construction project, the walls are likely to be bare and ready for insulation. However, if you are renovating an existing home, you may need to remove any existing insulation or drywall before proceeding.
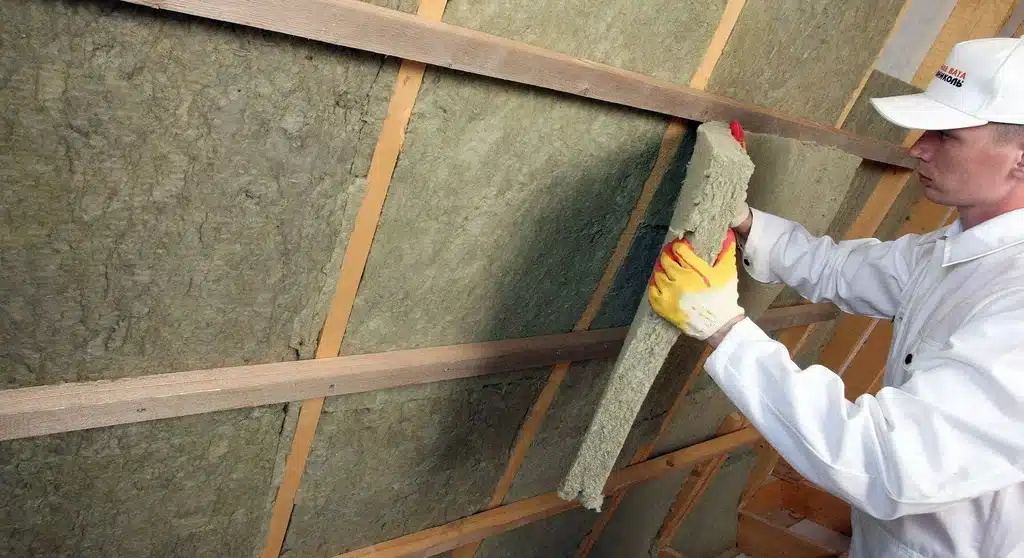
Once you have prepared the walls, the next step is to measure and cut the insulation material to fit the wall cavities. It’s important to wear protective clothing, such as gloves and a mask, to avoid any potential health hazards associated with handling insulation materials. Carefully place the insulation into the wall cavities, ensuring a snug fit and avoiding any gaps or voids. Properly installed insulation will provide optimal thermal performance and energy efficiency.
What is the best way to insulate interior walls?
If you’re adding insulation to existing interior walls, the best option is loose-fill insulation. Available in common insulation materials like mineral wool, cellulose, and fiberglass, loose-fill can be blown into a small hole cut into your drywall, minimizing the amount of work (and mess) of the project.
Insulating interior walls is an important step in creating a comfortable and energy-efficient home. Proper insulation helps to regulate temperature, reduce noise, and lower energy costs. There are several methods available for insulating interior walls, each with its own advantages and disadvantages.
Batt insulation is one of the most common and cost-effective methods of insulating interior walls. It consists of fiberglass or mineral wool batts that are placed between the wall studs. This type of insulation is relatively easy to install and provides good thermal performance. However, it can be difficult to achieve a tight fit around electrical outlets and other obstructions.
Blown-in insulation is another option for insulating interior walls. This method involves blowing loose insulation material, such as cellulose or fiberglass, into the wall cavities. Blown-in insulation is effective at filling gaps and voids, providing excellent thermal performance. However, it requires special equipment and professional installation.
Spray foam insulation is a popular choice for insulating interior walls. It is applied as a liquid and expands to fill the wall cavities, creating an airtight seal. Spray foam insulation provides superior thermal performance and helps to reduce air leakage. However, it is more expensive than other insulation methods and requires professional installation.
Rigid foam insulation is another option for insulating interior walls. It consists of rigid panels made from materials such as polystyrene or polyisocyanurate. Rigid foam insulation provides excellent thermal performance and can help to reduce noise transmission. However, it is more expensive than other insulation methods and may require additional framing.
Can I put insulation in interior walls?
Insulating the right interior walls can regulate temperatures from room to room and between floors in your home. This is especially beneficial if your home has rooms used infrequently or closed off for parts of the year. Noise control. Soundproofing interior walls is an additional benefit of interior wall insulation.
Yes, it is possible to put insulation in interior walls. Insulating interior walls can provide several benefits, including improved energy efficiency, soundproofing, and increased comfort. However, there are a few factors to consider before adding insulation to your interior walls.
Firstly, it is important to determine the type of insulation that is suitable for your interior walls. There are various types of insulation available, such as fiberglass, cellulose, and foam. Each type has its own advantages and disadvantages, so it is essential to choose the one that best suits your needs and budget.
Secondly, you need to assess the condition of your interior walls.
If there are any existing issues, such as moisture problems or structural damage, these should be addressed before adding insulation. Insulation can exacerbate these issues if they are not properly resolved beforehand.
Thirdly, it is important to consider the potential impact on electrical wiring and outlets. Adding insulation to interior walls may require moving or rerouting electrical wiring, which should be done by a qualified electrician to ensure safety and compliance with building codes.
Additionally, it is worth noting that insulating interior walls may require removing the existing drywall or plaster. This can be a messy and time-consuming process, so it is advisable to hire a professional contractor who has experience in insulation installation to ensure a proper and efficient job.
While it is possible to put insulation in interior walls, it is crucial to consider factors such as the type of insulation, the condition of the walls, potential impact on electrical wiring, and the need for professional assistance. By carefully considering these factors, you can enjoy the benefits of insulation in your interior walls while ensuring a safe and effective installation process.
Can I install wall insulation myself?
With certain types of insulation materials, installing your own insulation is definitely doable—and you can save money not hiring a professional. Installing fiberglass or mineral wool insulation are simple DIY projects.
Installing wall insulation yourself can be a cost-effective option if you have the necessary skills and experience. If you are comfortable working with tools and have some basic knowledge of construction, you may be able to successfully install insulation in your walls. There are many resources available online and in home improvement stores that can provide guidance on how to properly install insulation.
There are also some factors to consider before deciding to install insulation yourself. First, you will need to determine the type and amount of insulation that is appropriate for your home. This will depend on factors such as the climate in your area and the construction of your walls. Additionally, you will need to consider any potential health and safety risks associated with the installation process.
If you decide to hire a professional to install wall insulation, it is important to choose a reputable contractor who is experienced in insulation installation. They will be able to assess your home’s insulation needs and recommend the best type and amount of insulation for your walls. Hiring a professional can give you peace of mind knowing that the insulation is being installed correctly and efficiently.
Which insulation is best for walls?
Closed cell spray-foam insulation is the most energy efficient wall insulation. Applications can reach much higher R-values for each inch of thickness than other insulation products, with values as high as R-6.2 per square inch (roughly R-34 on a 2×6 wall).
When it comes to insulating walls, there are several options available, each with its own set of advantages and disadvantages. The best insulation for walls depends on various factors such as the climate, budget, and personal preferences. In this article, we will explore some of the most commonly used insulation materials for walls and discuss their pros and cons.
Fiberglass insulation: Fiberglass insulation is one of the most popular choices for wall insulation. It is made from tiny glass fibers that are woven together to create a fluffy material. Fiberglass insulation is affordable, easy to install, and provides good thermal performance. However, it can be irritating to the skin and respiratory system if not handled properly.
Spray foam insulation: Spray foam insulation is a versatile option that can be used in various wall types.
It is applied as a liquid and expands to fill the wall cavity, creating an airtight seal. Spray foam insulation provides excellent thermal insulation and helps to reduce energy costs. However, it is more expensive than other insulation materials and requires professional installation.
Cellulose insulation: Cellulose insulation is made from recycled paper and treated with fire retardants. It is an eco-friendly option that provides good thermal and sound insulation. Cellulose insulation is also resistant to pests and mold. However, it can settle over time, reducing its effectiveness.
Rigid foam insulation: Rigid foam insulation is a durable and moisture-resistant option. It is available in various thicknesses and provides excellent thermal insulation. Rigid foam insulation is easy to install and can be used in both new construction and retrofit projects. However, it is more expensive than other insulation materials and may require additional protection against fire.
How thick should wall insulation be?
The insulation is usually made from one of several forms of foamed plastic. It should normally be at least 60mm thick, and can be up to 100mmm.
Climate: The climate of the region where the building is located is a significant factor in determining the thickness of wall insulation. In colder climates, where the winters are harsh and temperatures drop significantly, thicker insulation is generally recommended to provide better thermal resistance and prevent heat loss. On the other hand, in warmer climates, where the focus is on keeping the heat out, thinner insulation may be sufficient.
Building Design: The design of the building also plays a role in determining the thickness of wall insulation. Buildings with larger surface areas or more exposed walls may require thicker insulation to compensate for the increased heat transfer. Additionally, the presence of windows, doors, and other openings in the walls can affect the overall insulation requirements.
Energy Efficiency Goals:
The desired level of energy efficiency also influences the thickness of wall insulation. If the goal is to achieve a high level of energy efficiency and minimize energy consumption, thicker insulation may be necessary. However, if the focus is on cost-effectiveness, a thinner insulation layer may be chosen.
It is important to note that there are industry standards and building codes that provide guidelines for the minimum required insulation thickness based on climate zones. These standards take into account factors such as the R-value of the insulation material, which measures its thermal resistance. The higher the R-value, the better the insulation’s ability to resist heat transfer. Consulting these standards can help determine the appropriate thickness of wall insulation for a specific project.
Installing insulation in interior walls involves several steps to ensure proper insulation and energy efficiency. The first step is to gather all the necessary materials and tools, which include insulation batts or rolls, a utility knife, a tape measure, a staple gun, and a caulk gun.
What materials and tools are needed for installing insulation in interior walls?
When it comes to installing insulation in interior walls, there are several materials and tools that are essential for the job. Firstly, you will need the insulation material itself, which can vary depending on your specific needs and preferences. Common types of insulation for interior walls include fiberglass batts, foam boards, and blown-in insulation.
In addition to the insulation material, you will also need a few tools to ensure a successful installation. These tools include a utility knife for cutting the insulation to size, a tape measure to accurately measure the wall dimensions, and a staple gun or adhesive to secure the insulation in place. It is also important to have safety equipment such as gloves, goggles, and a dust mask to protect yourself during the installation process.
Are there any specific safety precautions to consider when installing insulation in interior walls?
When installing insulation in interior walls, it is crucial to prioritize safety to prevent any accidents or health hazards. Here are some specific safety precautions to consider:
1. Personal Protective Equipment (PPE): Before starting the installation process, make sure to wear the necessary PPE. This includes safety goggles, gloves, a dust mask, and long-sleeved clothing to protect your skin from any potential irritants or allergens present in the insulation material.
2. Proper Ventilation: Ensure that the area where you are installing insulation is well-ventilated. Open windows and use fans to circulate fresh air, especially if you are working with insulation materials that release fumes or particles.
3. Handling Hazardous Materials: Some insulation materials, such as fiberglass or mineral wool, can cause skin irritation or respiratory issues if not handled properly. Avoid direct contact with these materials and use caution when cutting or manipulating them. If necessary, use a respirator mask to protect yourself from inhaling any harmful particles.
4. Electrical Safety: If you are installing insulation near electrical outlets or wiring, ensure that the power is turned off before starting the installation process. This will prevent any potential electrical shocks or accidents.
5. Ladder Safety: If you need to work at heights, always use a sturdy ladder and follow proper ladder safety guidelines. Make sure the ladder is stable and secure before climbing on it, and avoid overreaching or leaning too far to maintain balance.
By following these safety precautions, you can minimize the risk of accidents and ensure a safe installation process for insulation in interior walls.
How does the type of insulation used impact the installation process for interior walls?
The type of insulation used can have a significant impact on the installation process for interior walls. Different types of insulation have different properties and installation requirements, so it is important to choose the right type for your specific project.
Fiberglass insulation is one of the most common types used for interior walls. It is relatively easy to install and can be cut to fit into the wall cavities. However, it can cause skin irritation, so it is important to wear protective clothing and gloves when handling it. Additionally, fiberglass insulation should be installed with caution to avoid compressing it, as this can reduce its effectiveness.
Spray foam insulation is another popular option for interior walls. It is applied as a liquid and expands to fill the wall cavities, providing an airtight seal. However, spray foam insulation requires special equipment and training to install properly. It is important to follow the manufacturer’s instructions and wear protective gear, as the chemicals used in spray foam insulation can be hazardous if not handled correctly.
Are there any common mistakes to avoid when installing insulation in interior walls?
When installing insulation in interior walls, it is important to be aware of common mistakes that can compromise the effectiveness of the insulation and potentially lead to issues down the line. One common mistake to avoid is not properly sealing air leaks before installing the insulation. Air leaks can significantly reduce the insulation’s ability to regulate temperature and can also allow moisture to seep into the walls, leading to mold and other problems. It is crucial to thoroughly inspect the walls for any gaps or cracks and seal them with caulk or weatherstripping before installing the insulation.
Another mistake to avoid is compressing the insulation. Insulation works by trapping air pockets, which provide the desired thermal resistance. When insulation is compressed, these air pockets are reduced, resulting in decreased insulation performance. It is important to carefully measure and cut the insulation to fit snugly in the wall cavity without compressing it. Additionally, it is essential to wear protective gear, such as gloves and a mask, to avoid skin irritation and inhalation of insulation fibers.

Conclusion
Installing insulation in interior walls is an important step in improving the energy efficiency and comfort of a home. By properly insulating interior walls, homeowners can reduce heat loss, lower energy bills, and create a more comfortable living environment. This process involves selecting the right type of insulation, preparing the walls, and installing the insulation correctly. While it may seem like a daunting task, with the right tools and knowledge, homeowners can successfully install insulation in their interior walls.
Once the insulation type has been chosen, homeowners need to prepare the walls for installation. This involves removing any existing wall coverings, such as drywall or plaster, and ensuring the walls are clean and free of debris. It’s also important to locate any electrical wiring or plumbing within the walls to avoid damaging them during the installation process. Taking the time to properly prepare the walls will ensure a smooth and successful insulation installation.
Finally, homeowners can begin the process of installing the insulate walls. This typically involves cutting the insulation to fit the wall cavities, ensuring a snug and tight fit. It’s important to wear protective clothing, such as gloves and a mask, to avoid any irritation from the insulation materials. Once the insulation is in place, it’s important to seal any gaps or seams to prevent air leakage.