How To End Baseboard At Stairs
Introduction
How To End Baseboard At Stairs: When it comes to finishing the baseboard at stairs, many homeowners find themselves at a loss. The transition between the baseboard and the stairs can be tricky to navigate, and it’s important to ensure a seamless and professional-looking finish. Whether you’re a seasoned DIY enthusiast or a novice homeowner, this article will provide you with the guidance and tips you need to successfully end your baseboard at stairs.
Firstly, it’s important to understand the purpose of baseboards. Baseboards serve both a functional and aesthetic purpose in a home. They protect the bottom of the walls from damage, such as scuffs and dents caused by furniture or vacuum cleaners. Additionally, baseboards add a finishing touch to a room, providing a clean and polished look. When it comes to stairs, ending the baseboard properly is crucial to achieving a cohesive and visually appealing design.
One option for ending the baseboard at stairs is to use a mitered corner. This involves cutting the baseboard at a 45-degree angle to create a seamless transition between the baseboard and the stairs. To achieve this, you will need a miter saw or a miter box and a hand saw. Measure the length of the baseboard needed for the stairs, and then use the miter saw or miter box to cut the baseboard at a 45-degree angle. This will create a clean and professional-looking corner.
How do you terminate baseboard at stairs?
To end the baseboard at the stairs, you’ll need to measure the height of the stairs. This will give you a starting point for where to cut the baseboard. Keep in mind that you’ll want to leave enough room for the trim. Once you have the measurement, mark it on the baseboard and then use a saw to cut it.
When it comes to terminating baseboard at stairs, there are a few different approaches you can take. The method you choose will depend on the specific design of your staircase and the look you are trying to achieve. In this article, we will explore some common techniques for terminating baseboard at stairs.
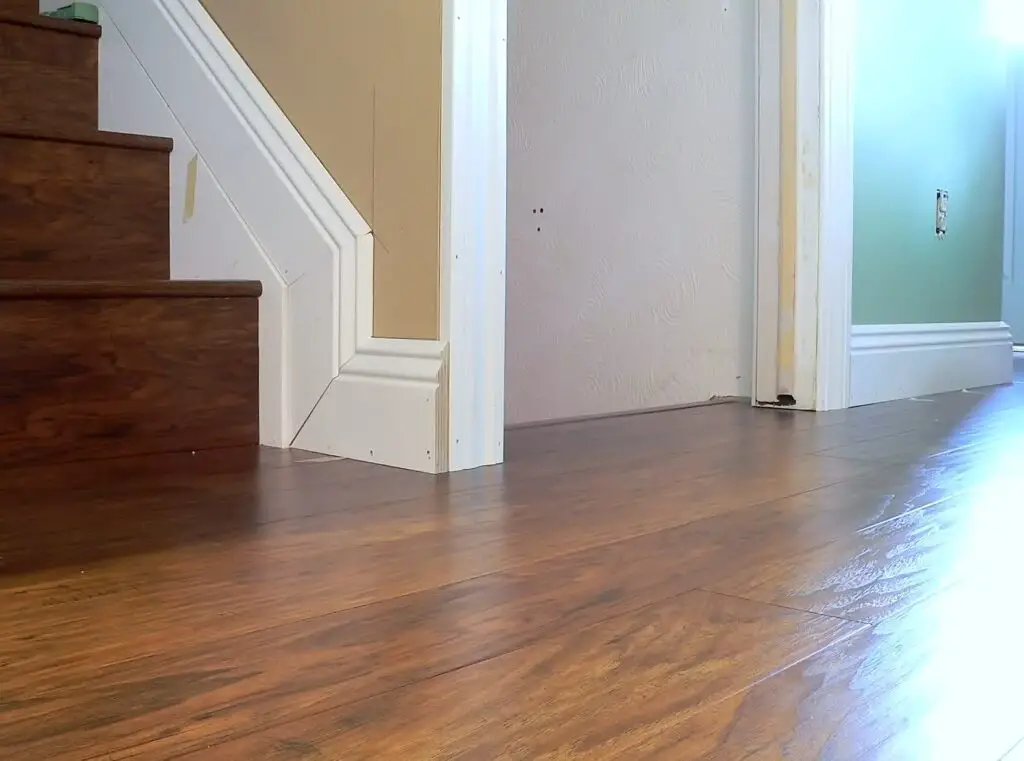
One option is to continue the baseboard along the wall and terminate it at the top of the stairs. This creates a seamless transition from the baseboard on the main level to the stairs. To achieve this, you will need to measure and cut the baseboard to fit the angle of the stairs. This can be a bit tricky, as stairs often have different angles and dimensions than the walls. It may be helpful to use a miter saw to make precise cuts.
Another option is to terminate the baseboard at the bottom of the stairs and start a new piece of baseboard on the stair riser. This creates a clean break between the baseboard on the main level and the stairs. To do this, you will need to measure and cut the baseboard to fit the height of the stair riser. You can then attach the baseboard to the riser using nails or adhesive.
How do you baseboard steps?
Steps on How to Install Baseboard
- Prep Work: Measure, Number and Mark. Photo by Craig Raine.
- Establish the Baseboard Height. Photo by Craig Raine.
- Scribe for a Tight Fit. Photo by Craig Raine.
- Nail Baseboard to Wall.
- Mark Outside Corner Joints.
- Miter-Cut Outside Corner Joints.
- Cut Biscuit Slots.
- Assemble the Biscuit Joints.
When it comes to baseboard installation, one important aspect to consider is how to baseboard steps. Baseboards not only add a finishing touch to a room but also protect the walls from damage. However, when it comes to steps, the installation process can be slightly different compared to flat walls. In this answer, we will discuss the steps involved in baseboarding steps.
Step 1: Measure and cut the baseboard
The first step in baseboarding steps is to measure and cut the baseboard to the appropriate length. Start by measuring the length of the step, taking into account any corners or angles. Use a miter saw to make precise cuts at the measured angles. It is important to ensure that the baseboard fits snugly against the step.
Step 2: Install the baseboard
Once the baseboard is cut to the correct length, it is time to install it. Apply a thin layer of construction adhesive to the back of the baseboard and press it firmly against the step. Use a level to ensure that the baseboard is straight and level. Secure the baseboard in place by nailing it to the step using finishing nails. Be sure to countersink the nails to ensure a smooth finish.
Step 3: Fill any gaps and sand the baseboard
After the baseboard is installed, there may be small gaps between the baseboard and the step. Use a wood filler to fill in any gaps or holes. Once the filler is dry, sand the baseboard to create a smooth and seamless finish. Sanding also helps to remove any rough edges or imperfections.
Step 4: Prime and paint the baseboard
Finally, prime and paint the baseboard to match the rest of the room. Apply a coat of primer to the baseboard and allow it to dry. Once the primer is dry, apply two coats of paint, allowing each coat to dry before applying the next. This will ensure a professional and polished look.
How do you hide the gap between baseboard and floor?
Apply Caulk
Periodically rinse off your finger to remove excess caulk. Apply enough pressure to force the caulk into the gaps, but avoid the urge to overwork the caulk with your finger. A good caulk bead will have a slightly convex shape in the joint between the baseboard and wall.
There are several methods you can use to hide the gap between the baseboard and the floor. This gap can be unsightly and can also allow dust and debris to accumulate, so it’s important to find a solution that not only covers the gap but also looks aesthetically pleasing.
One option is to use caulk or a similar sealant to fill in the gap. This is a relatively simple and inexpensive solution that can be done by most homeowners. Simply apply the caulk along the gap, making sure to smooth it out for a clean finish. Once the caulk is dry, you can paint over it to match the color of your baseboard, further disguising the gap.
Closing Gaps with Style: Quarter Round or Shoe Molding Options
Another option is to use quarter round or shoe molding to cover the gap. These are small strips of wood or plastic that can be attached to the baseboard, extending down to the floor. This not only covers the gap but also adds a decorative element to the room. Quarter round and shoe molding are available in a variety of styles and finishes, so you can easily find one that matches your baseboard.
If you prefer a more seamless look, you can consider installing base shoe molding. This is a thin strip of molding that is installed at the bottom of the baseboard, extending down to the floor. It creates a smooth transition between the baseboard and the floor, effectively hiding the gap. Base shoe molding is typically installed using adhesive or small nails.
In some cases, the gap between the baseboard and the floor may be too large to be covered by caulk or molding. In these situations, you may need to consider more extensive measures, such as installing a baseboard extension or replacing the baseboard altogether. These options may require more time and effort, but they can provide a more permanent solution to the problem.
What is the rule of baseboard?
A general rule of thumb for your baseboards is the 7 percent rule they should equal 7 percent of the overall height of your room.
The rule of baseboard refers to the guidelines and principles that govern the installation and use of baseboards in interior design and construction. Baseboards are the trim or molding that is installed at the bottom of walls, where they meet the floor. They serve both functional and aesthetic purposes, providing a finished look to a room while also protecting the wall from damage.
One of the main rules of baseboard installation is ensuring that the baseboards are properly aligned and level. This means that they should be installed parallel to the floor and at a consistent height throughout the room. This not only creates a visually pleasing appearance but also helps to maintain the structural integrity of the baseboards.
Size and Style Harmony: Choosing Appropriate Baseboard Dimensions
Additionally, the style of the baseboard should complement the overall design and decor of the room. There are various styles of baseboards available, ranging from simple and modern to ornate and traditional. It is important to choose a style that enhances the aesthetic appeal of the room and complements other architectural elements, such as door frames and window casings.
Furthermore, the rule of baseboard installation also includes proper finishing and painting. Baseboards should be sanded, primed, and painted or stained to achieve a smooth and polished look. The color of the baseboard should coordinate with the color scheme of the room, either by matching the wall color or providing a contrasting accent.
Should you remove baseboards?
However, you may choose to remove the baseboards and replace them at the same time as flooring installation if you want to switch to a different baseboard height or change the style to match the overall look of your remodel.
Removing baseboards is a common task that homeowners often face when renovating or remodeling their homes. Baseboards are the trim that runs along the bottom of walls, covering the joint between the wall and the floor. While some people may choose to remove baseboards during a renovation project, others may wonder if it is necessary or worth the effort.
There are several reasons why you might consider removing baseboards. One of the main reasons is to access the wall behind them. If you are planning to paint the walls or make any repairs, removing the baseboards can provide easier access and a cleaner finish. It allows you to paint the entire wall without having to worry about getting paint on the baseboards or having to tape them off.
Most flooring applications do not require you to remove existing baseboards.
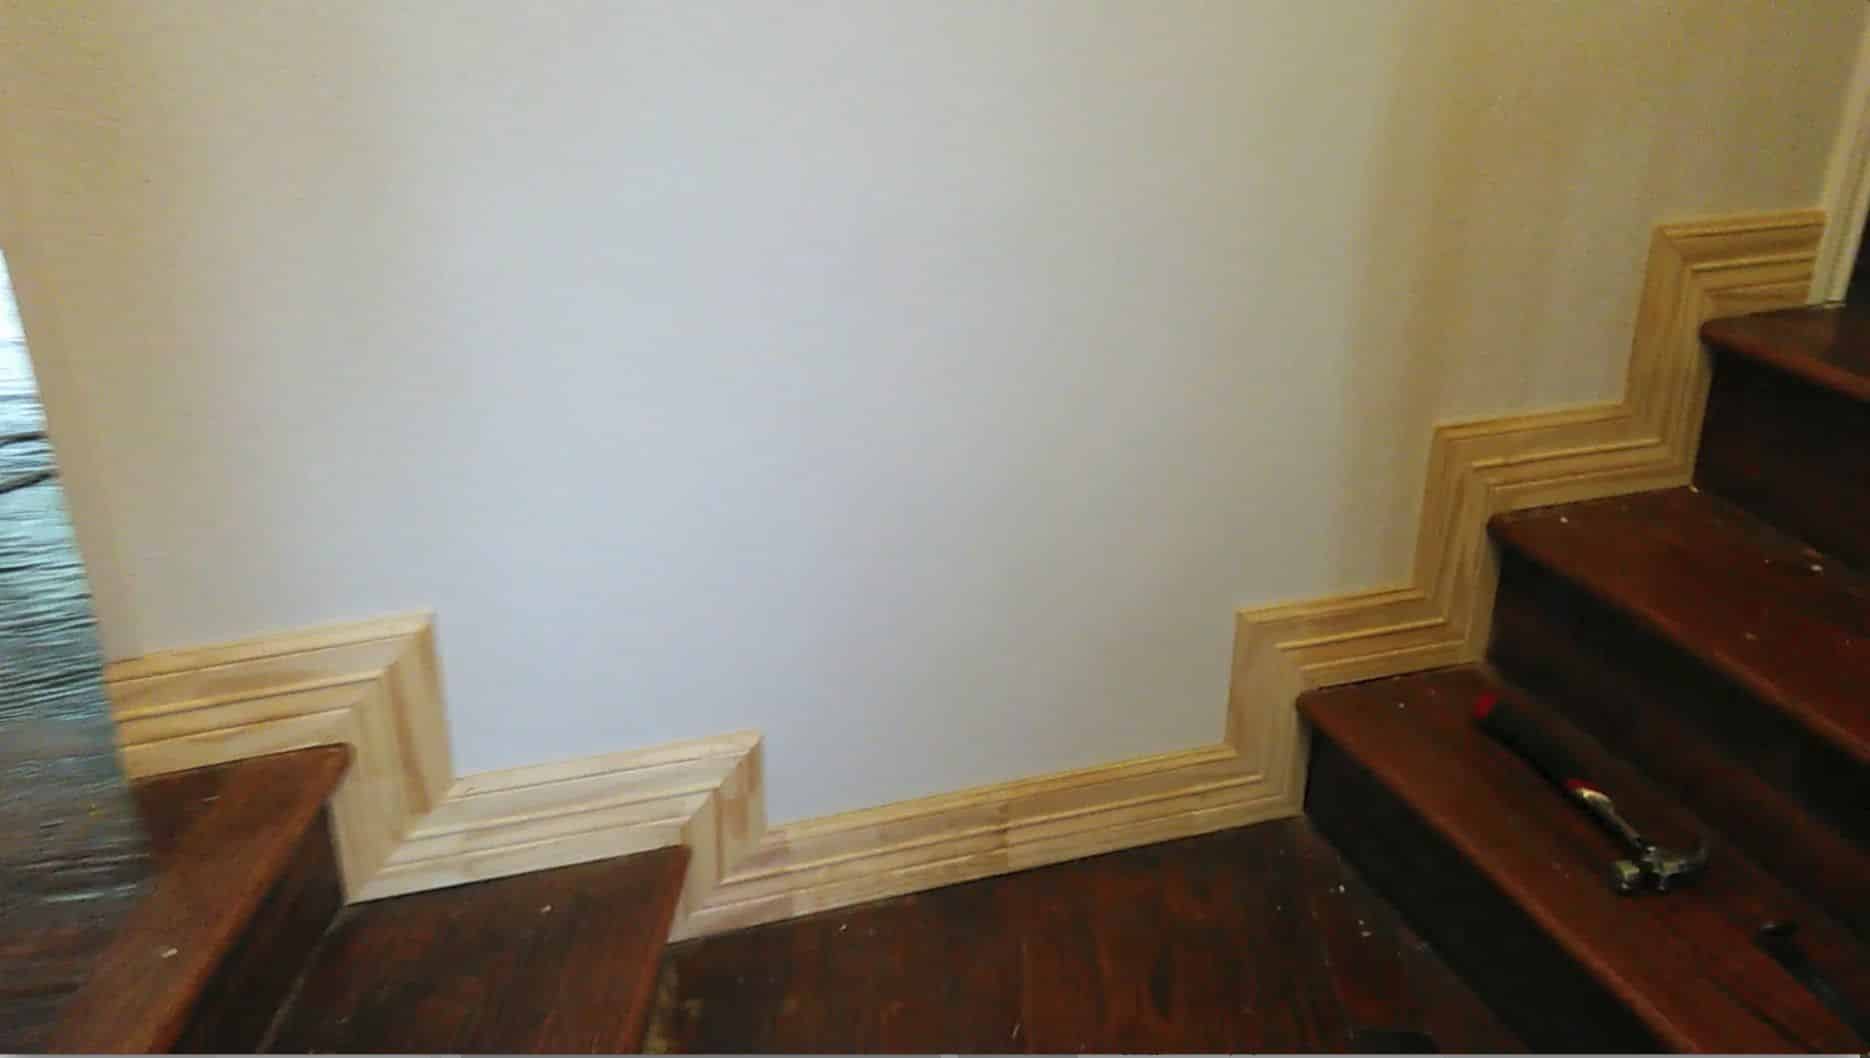
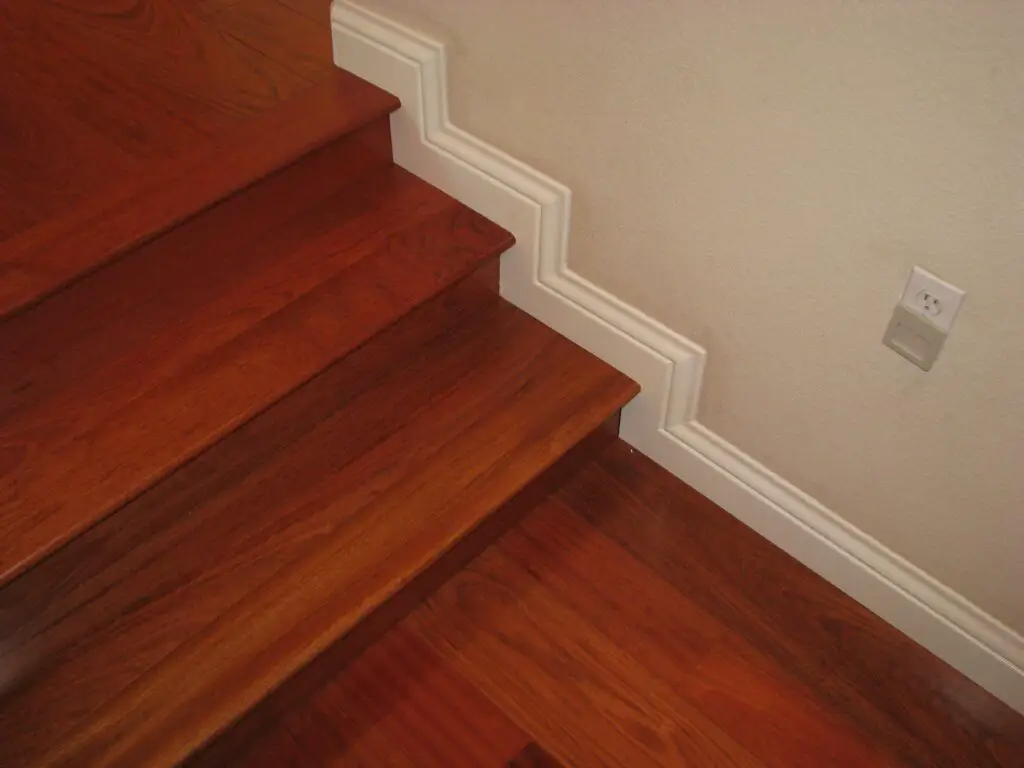
When it comes to properly ending baseboard at stairs, there are a few techniques that can ensure a seamless and professional finish. One common technique is to miter the baseboard at a 45-degree angle where it meets the stair riser. This creates a clean and polished look, as the baseboard follows the angle of the stairs. Another technique is to use a baseboard return, which involves cutting the baseboard at a 90-degree angle and then attaching a small piece of baseboard vertically to cover the exposed end.
Additionally, some people choose to use a baseboard cap or shoe molding to end the baseboard at stairs. This involves installing a small piece of molding that covers the end of the baseboard and provides a decorative touch. Whichever technique you choose, it’s important to ensure that the baseboard is securely attached and properly aligned with the stairs for a professional and finished appearance.
Are there any specific tools or materials needed to end baseboard at stairs?
When ending baseboard at stairs, there are a few specific tools and materials that can help ensure a proper and seamless finish. One essential tool is a miter saw, which allows for precise and angled cuts on the baseboard. This is especially important when dealing with the corners and edges of the stairs. Additionally, a coping saw can be useful for intricate cuts and shaping the baseboard to fit snugly against the stair edges.
In terms of materials, it is important to have enough baseboard to cover the entire length of the stairs. This may require measuring and cutting the baseboard to the appropriate length. It is also recommended to have adhesive or construction adhesive to secure the baseboard to the stairs, ensuring a strong and durable bond.
Can you provide step-by-step instructions for ending baseboard at stairs?
Ending baseboard at stairs requires careful attention to detail to ensure a seamless and professional finish. Here is a step-by-step guide to help you achieve this:
1: Measure the length of the baseboard needed for the stair section. Use a tape measure to get an accurate measurement.
2: Cut the baseboard to the measured length using a miter saw or a coping saw. Make sure to cut the ends at a 45-degree angle to create a clean and precise joint.
3: Apply adhesive to the back of the baseboard piece using a caulk gun. This will help secure it in place and prevent any gaps or movement.
4: Press the baseboard firmly against the wall, aligning the angled end with the edge of the stair. Make sure it is level and flush with the adjacent baseboard.
5: Fill any nail holes or gaps with wood filler or caulk. Smooth out the surface using a putty knife or your finger, and allow it to dry completely.
By following these step-by-step instructions, you can successfully end baseboard at stairs and achieve a professional and polished look.
Are there any common mistakes to avoid when ending baseboard at stairs?
When ending baseboard at stairs, there are a few common mistakes that should be avoided to ensure a professional and seamless finish. One common mistake is not properly measuring and cutting the baseboard to fit the stairs. It is important to take accurate measurements and make precise cuts to ensure a snug fit. Failure to do so can result in gaps or uneven edges, which can be unsightly.
Another mistake to avoid is not properly aligning the baseboard with the stairs. It is crucial to ensure that the baseboard is aligned with the edge of the stairs and follows the same angle. Failing to do so can create an unbalanced and unprofessional look. Additionally, not properly securing the baseboard to the stairs can lead to loose or wobbly baseboards. It is important to use appropriate fasteners, such as nails or screws, to securely attach the baseboard to the stairs.
Are there any alternative methods or creative solutions for ending baseboard at stairs?
Yes, there are alternative methods and creative solutions for ending baseboard at stairs. One option is to use corner blocks or rosettes. These decorative pieces can be installed at the corners of the baseboard where it meets the stairs, providing a clean and finished look. Corner blocks and rosettes come in various designs and styles, allowing you to choose one that complements your overall staircase aesthetic.
Another creative solution is to use a different material for the baseboard at the stairs. For example, instead of using wood baseboard, you can opt for metal or tile. This can create a unique and modern look, especially if the stairs have a contemporary design. Additionally, using a contrasting color or pattern for the baseboard at the stairs can add visual interest and make it stand out as a design feature.
Conclusion
The steps outlined in this guide, you can ensure a seamless transition between your baseboard and stairs, creating a polished and professional look. Firstly, it is important to measure and cut your baseboard accurately to ensure a precise fit. Taking the time to measure the length and angle of the stairs will help you determine the correct length and angle for your baseboard cuts. Using a miter saw or coping saw, carefully cut the baseboard at the appropriate angles to match the slope of the stairs.
Next, it is crucial to properly attach the baseboard to the stairs. Using a construction adhesive, apply a thin layer to the back of the baseboard before pressing it firmly against the wall. Additionally, using finishing nails or a nail gun, secure the baseboard to the stairs at regular intervals to ensure it stays in place.
Finally, it is important to finish the baseboard to create a seamless and polished look. Fill any gaps or nail holes with wood filler, and sand the baseboard to create a smooth surface. Once the baseboard is smooth and free of imperfections, apply a coat of paint or stain to match the rest of the trim in your home.
Ending baseboard at stairs requires careful measurement, precise cutting, proper attachment, and a smooth finish. By following these steps, you can achieve a professional and seamless transition between your baseboard and stairs, enhancing the overall aesthetic of your home.