How To Do A Valley On A Metal Roof
Introduction
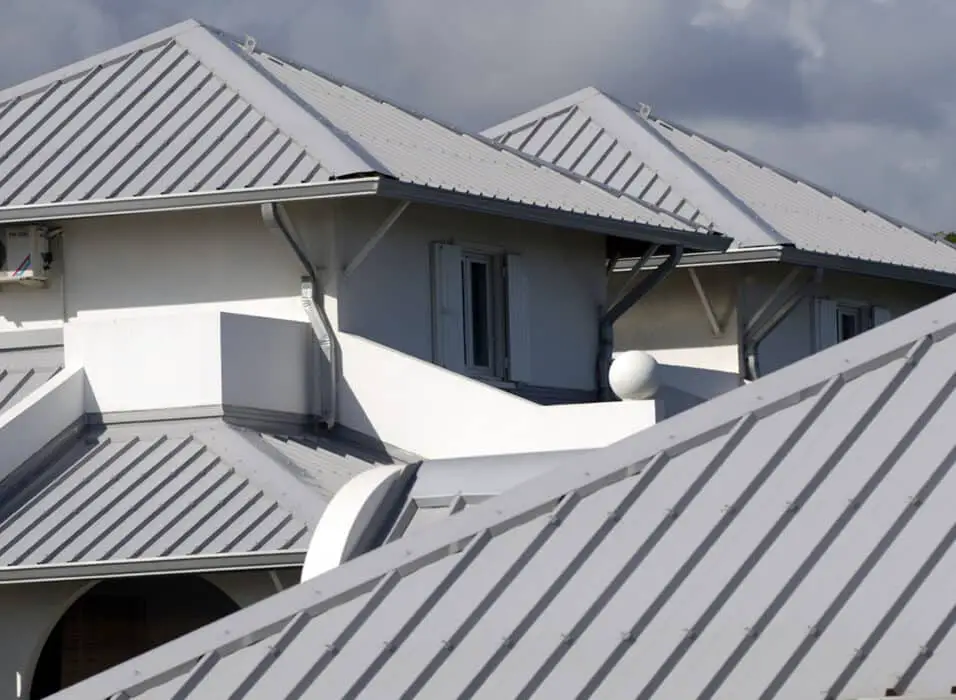
How To Do A Valley On A Metal Roof: When it comes to metal roofs, one of the most important aspects to consider is the proper installation of valleys. Valleys are the areas where two roof planes meet, forming a V-shaped channel that directs water and debris away from the roof. A well-constructed valley not only enhances the aesthetic appeal of the roof but also ensures its longevity and durability.
Installing a valley on a metal roof requires careful planning, precise measurements, and the use of appropriate materials and techniques. In this article, we will guide you through the step-by-step process of creating a valley on a metal roof, ensuring a seamless and effective solution for water drainage.
Valleys play a crucial role in preventing water accumulation and potential leaks on a metal roof. Proper installation of valleys is essential for maintaining the overall functionality and aesthetics of your metal roof. Plan and Measure: Before starting the installation process, carefully plan the location and dimensions of the valley. Measure the length and width of the valley area, ensuring accurate calculations for the required materials.
Prepare the Roof Surface: Clean the roof surface thoroughly, removing any debris or loose materials. Ensure that the surface is smooth and free from any obstructions that may hinder the installation process.

How do you seal a valley on a metal roof?
Valley filling and flashing are needed to keep water out of the roof. First, use roof sealant to fix the metal parts of the valley. Add steamlined metal flashing to finish.
Starting off:
Sealing the valley of a metal roof will keep water out and make it last longer. V-shaped valleys are where two roof planes meet. Rain and rainwater tend to pool and flow through these valleys, making them easy for water to get into. For the roof’s stability and structural safety, these valleys need to be sealed.
Putting valley seal on metal roofs:
There are several ways to close a valley in a metal roof. Metal valley flashing redirects water in the valley to stop leaks.
Sealant is another option.
Sealant and metal valley flashing can stop water from getting in. Sealants made of silicone or polyurethane are used. Sealants go over the ends of metal valley flashing and the gaps and joints between roof panels. It is very important to use a good metal roof cleaner that can stand up to bad weather.
Check and take care of:
To close a metal roof valley, it needs to be maintained and inspected. Every year, especially before the wet season, check the valley for damage or wear and tear. Fix any weak flashing right away to stop water from leaking. Get rid of any twigs and leaves that are in the valley that could stop the water from moving and cause pools.
Sealing metal roof valleys stops leaks and keeps the roof’s structure. If you use metal valley flashing, sealant, and do regular upkeep and checks on your roof, it may stay waterproof for years.
What goes in a valley metal roof?
Using Ice and Water Shield if Using Metal Roof Valleys
If you are using metal roof valleys, it is important to use an ice and water shield beneath the valley. This will help to prevent leaks by keeping water from seeping into the cracks and crevices of the metal roof valley.
The term “”valley”” refers to the area where two roof slopes meet, forming a V-shaped depression. This area is prone to water accumulation, making it crucial to install the right materials to prevent any potential damage.
Importance of Valley Metal:
The valley of a roof is a critical area that requires special attention during the installation process. It is essential to choose the appropriate materials for a valley metal roof to ensure its durability and longevity. One of the primary purposes of valley metal is to channel water away from the roof and prevent it from seeping into the underlying structure. This helps to avoid potential water damage, such as rotting of the roof deck or the growth of mold and mildew.
Materials Used in Valley Metal Roof:
Several materials can be used in the construction of a valley metal roof. One common option is galvanized steel, which is known for its strength and resistance to corrosion. Galvanized steel is often used as a base material for valley flashing, which is installed in the valley area to direct water away from the roof. Another popular choice is aluminum, which is lightweight and highly durable. Aluminum valley flashing is commonly used in areas with high rainfall or snowfall.
Installation Process:
A valley metal roof plays a crucial role in protecting a building from water damage in the vulnerable valley area. The choice of materials, such as galvanized steel or aluminum, is essential to ensure the durability and effectiveness of the valley metal system. Proper installation techniques are also crucial to create a watertight seal and prevent any potential leaks. By investing in a high-quality valley metal roof, property owners can enjoy a long-lasting and reliable roofing solution.
What is the angle of a roof valley?
A hip or valley rafter at a 90° angle (a typical hip or valley) will have a slope of 6-in-16.97 if each roof segment has a 6-in-12 slope.
Roof valleys are important architectural features that affect roof design and functionality. The V-shaped intersection of two sloping roof pieces forms a valley-like depression. Roof valley angle affects water drainage and roof stability, hence it must be considered during construction and design.
Angle significance:
Roof valley angles are critical for water drainage. Rainwater or melting snow collects in the valley and must be channeled away from the roof to prevent water damage. The valley angle controls how rapidly water flows off the roof, reducing leaks and infiltration. Water runoff is faster at steeper angles, reducing water pools and building damage.
Angle-affecting factors:
Several things affect roof valley angle. Climate matters because locations with considerable rainfall or snowfall need steeper angles for water drainage. Some roofing materials require precise slopes for maximum performance, which influences the angle. The roof pitch and shape can also affect the valley angle.
Advice from professionals:
Choosing a roof valley angle requires consulting a roofing contractor or architect. They know how to examine your roof’s needs and recommend the best perspective. To determine the best roof valley angle, local building codes, roof pitch, and roofing material will be considered.
Valley angles are important for roof design and functionality. It regulates water drainage and prevents structure damage. To establish the right angle based on climate, roofing material, and roof design, consult a specialist. By maintaining the right angle, you can extend the life of your roof and prevent water damage.
Which is better an open or closed valley roof?
Most roofing contractors consider the open roof valley superior. Closed roof valleys are sometimes selected for installation. The shingle manufacturer may recommend a closed roof valley, which you should negotiate with your roofer.
Which is better: open or closed valley roof?
Homeowners and builders must decide on an open or closed valley roof. Both have pros and cons, and the choice relies on climate, aesthetics, and budget. This article compares open and closed valley roofs and discusses their merits and cons.
Valley Roof Open:
Traditional open valley roofs have tiles on one side that stretch over the valley and stop at the valley boundary. This leaves a “”open”” valley gap that is filled with metal flashing or other waterproofing materials. Affordableness is a major benefit of an open valley roof. It’s cheaper than a closed valley roof since it requires less material and labor.
Leaks and water damage are more likely on open valley roofs. Water might infiltrate through the valley gap during heavy rain or snowfall. This can cause structural damage and regular repairs. For some homeowners, the valley gap might ruin the roof’s looks.
Valley Roof Closed:
However, closed valley roofs are more modern and popular. The shingles on both sides of the roof reach over the valley and meet in the middle, providing a seamless, “”closed”” image. Metal flashing or other waterproofing materials are subsequently applied to the valley to prevent water infiltration.
The best feature of a closed valley roof is its waterproofing. Leaks and water damage are greatly reduced by reducing the valley gap. In severe rainfall or snowfall areas, it is more sturdy and long-lasting. The closed valley design also improves roof aesthetics by seeming sleek and smooth.
The option between an open or closed valley roof depends on money, climate, and personal preferences. Although cheaper, an open valley roof is more likely to leak and may not be attractive to some homes. Alternatively, a closed valley roof provides better waterproofing and a smooth appearance but costs more. A skilled roofer can help homeowners make an informed decision based on their needs and circumstances.
How do you waterproof a valley roof?
Install a self-sealing membrane in roof valleys and around penetrations to minimize the possibility of roof leaks. Choose a self-sealing membrane such as a bituminous peel-and-stick material or equivalent at all valleys and roof deck penetrations.
Waterproofing a valley roof is an essential step in ensuring the longevity and durability of the roof. Valleys are the areas where two roof slopes meet, forming a V-shaped channel that directs rainwater and snowmelt off the roof. Due to their design, valleys are prone to water accumulation, which can lead to leaks and water damage if not properly waterproofed.
Importance of Waterproofing:
Waterproofing a valley roof is crucial for several reasons. Firstly, it helps prevent water from seeping into the underlying structure of the roof, such as the roof deck and rafters. Water infiltration can cause rotting, weakening the roof’s structural integrity over time. Secondly, waterproofing protects the interior of the building from water damage, including mold and mildew growth, which can be harmful to occupants’ health. Lastly, a properly waterproofed valley roof enhances the overall performance and lifespan of the roof, saving homeowners from costly repairs and replacements in the future.
Methods of Waterproofing:
There are various methods available for waterproofing a valley roof, depending on the specific requirements and budget. One common approach is to use self-adhesive waterproofing membranes. They create a watertight barrier that prevents water from penetrating the roof structure. Another method is to install metal flashing along the valley.
Additional Considerations:
Creating a valley on a metal roof requires numerous procedures for effective and enduring installation. The roof valley must be thoroughly measured and marked initially. This is essential for accuracy and alignment. After marking the place, clean and remove debris from the roof.
Valley flashing goes on after the roof is cleaned. Cutting the metal flashing to the desired length and shape and attaching it to the roof with roofing nails or screws is customary. Flashing must be aligned and tightly attached to avoid water leakage.
After installing valley flashing, caulk the corners and seams to prevent water infiltration. High-quality roofing sealant or glue can do this. Finally, check the valley installation for alignment and sealing. Adjustments and fixes should be done before finishing the installation.
What tools and materials are required to successfully complete a valley on a metal roof?
When it comes to successfully completing a valley on a metal roof, having the right tools and materials is crucial. Here is a list of essential items you will need:
Metal Roofing Panels: These panels will form the base of your valley and should be chosen based on the specific requirements of your project. Ensure that the panels are of high quality and suitable for the type of metal roof you are working on.
Valley Flashing: Valley flashing is an important component that helps to direct water away from the valley and prevent leaks. It is typically made of metal or rubber and should be installed along the length of the valley.
Roofing Nails: High-quality roofing nails are essential for securely fastening the metal roofing panels and valley flashing to the roof. Make sure to choose nails that are specifically designed for metal roofs to ensure proper installation and longevity.
Roofing Adhesive: Roofing adhesive is used to create a watertight
Seal between the metal roofing panels and valley flashing. It helps to prevent water from seeping into the valley and causing damage. Choose a high-quality adhesive that is compatible with metal roofs.
Measuring and Cutting Tools: Accurate measurements and precise cuts are crucial for a successful valley installation. You will need tools such as a tape measure, chalk line, and metal snips to measure and cut the metal roofing panels and valley flashing to the required dimensions.
Safety Equipment: Working on a metal roof can be hazardous, so it is important to prioritize safety. Make sure to have safety equipment such as gloves, safety glasses, and a harness if working at heights. Additionally, consider using a ladder stabilizer to ensure stability while working on the roof.
By having these tools and materials on hand, you will be well-prepared to successfully complete a valley on a metal roof. Remember to follow proper installation techniques and safety precautions to ensure a durable and leak-free valley that will protect your roof for years to come.
Are there any specific safety precautions that need to be taken while working on a metal roof?
When working on a metal roof, it is crucial to prioritize safety to prevent accidents and injuries. There are several specific safety precautions that should be taken into consideration:
Proper footwear: Wearing appropriate footwear with slip-resistant soles is essential to maintain stability and prevent falls. Metal roofs can be slippery, especially when wet or covered in debris, so having good traction is crucial.
Fall protection: It is highly recommended to use fall protection equipment such as harnesses, safety ropes, and anchors when working on a metal roof. This ensures that in the event of a slip or loss of balance, you are secured and protected from falling off the roof.
Weather conditions: Pay close attention to weather conditions before starting work on a metal roof. Avoid working during high winds, storms, or icy conditions, as these can increase the risk of accidents. Additionally, extreme heat can make the metal roof surface hot, so taking breaks and staying hydrated is important.
Proper ladder usage: When accessing the metal roof, always use a sturdy and properly positioned ladder. Ensure that the ladder is securely placed on a level surface and that it extends at least three feet above the roof edge for safe and easy access.
Protective gear: Wear appropriate personal protective equipment (PPE) such as gloves, safety glasses, and a hard hat to protect yourself from potential hazards like sharp edges, falling debris, or tools.
By following these safety precautions, you can significantly reduce the risk of accidents and ensure a safe working environment while working on a metal roof.
How long does it typically take to complete a valley on a metal roof?
Completing a valley on a metal roof can vary in terms of time depending on several factors. The size and complexity of the roof, the experience and skill level of the installer, and the availability of necessary tools and materials all play a role in determining the duration of the project. On average, it can take anywhere from a few hours to a couple of days to complete a valley on a metal roof.
The first step in the process is to carefully measure and mark the area where the valley will be installed. This ensures accuracy and proper alignment. This requires precise cutting and fitting of the metal pieces, which can take some time to ensure a proper fit.
After the flashing or valley pan is installed, the next step is to secure it in place using screws or nails. This process requires attention to detail and careful placement to ensure a secure and watertight seal. Finally, the installer will need to apply a sealant or roofing cement to further enhance the waterproofing and durability of the valley. This step may require additional drying time before the project can be considered complete.
Are there any common mistakes or challenges that people encounter when attempting to do a valley on a metal roof, and how can they be avoided?
When attempting to create a valley on a metal roof, there are several common mistakes and challenges that people often encounter. One of the most common mistakes is improper measurement and alignment of the valley. It is crucial to accurately measure and mark the valley before making any cuts or installations. Failure to do so can result in an uneven or misaligned valley, which can lead to water leakage and structural issues.
Another challenge that people face is improper sealing and waterproofing of the valley. The valley is a critical area where water runoff accumulates, so it is essential to ensure proper sealing to prevent any water penetration. Using a high-quality sealant specifically designed for metal roofs is crucial in achieving a watertight seal. Additionally, it is important to pay attention to the installation of flashing and underlayment in the valley area to provide an extra layer of protection against water infiltration.
Furthermore, inexperienced individuals may struggle with the proper installation of metal roof panels in the valley. It is important to follow the manufacturer’s instructions and guidelines for installing the panels correctly. Failure to do so can result in improper alignment, gaps, or even damage to the panels. Taking the time to carefully read and understand the installation instructions, as well as seeking professional advice if needed, can help avoid these installation mistakes.

Conclusion
Metal roof slopes that drain water away keep water out. Understanding is important for both the success and durability of valley building. Follow these steps to make a metal roof valley.
Before making the valley, measure and mark the centerline of the metal roof. Guided path of the valley. Put in valley flashing made of aluminum or stainless steel. Flashing should go 8 to 12 inches on either side of the valley and cover it.
Place metal roof pieces on top of the valley flashing. Attach or screw the first piece to the middle of the roof. Overlap the remaining pieces to keep water out.
After installing the metal roofing panels, it is crucial to seal the open valley properly to prevent any water infiltration. You can use a high-quality roofing sealant or adhesive to seal the edges of the flashing and the overlapping panels. This will provide an extra layer of protection against leaks and ensure the longevity of the valley.
Creating a valley on a metal roof requires careful planning and precise execution. By following the steps outlined above, you can successfully create a valley that will effectively channel water away from your roof and prevent any potential damage. Remember to measure and mark the centerline, install the valley flashing, secure the metal roofing panels, and seal the valley properly. With proper installation and maintenance, your metal roof valley will provide reliable protection for years to come.