How To Attach A Metal Patio Roof To House
Introduction
How To Attach A Metal Patio Roof To House: It is important to ensure that the porch roof is properly tied to the house to provide stability and support. If so, you’ve come to the right place. In this article, we will guide you through the process of attaching a metal patio roof to your house, providing you with all the information you need to get started.
Before we dive into the details of how to attach a metal patio chairs roof to your house, let’s first discuss why you might want to choose a metal roof in the first place. Metal roofs are known for their durability and longevity, making them an excellent choice for outdoor structures like patios. They can withstand harsh weather conditions, including heavy rain, snow, and strong winds, without deteriorating or requiring frequent repairs. Additionally, metal roofs are fire-resistant, making them a safer option for your home.
Before you begin attaching the metal patio roof to your house, there are a few important steps you need to take to ensure a successful installation. First, you’ll need to gather all the necessary tools and materials, including metal roofing panels, screws, a drill, a ladder, and safety equipment such as gloves and goggles. It’s also crucial to measure the dimensions of your patio and determine the amount of roofing material you’ll need. Taking accurate measurements will help you avoid any unnecessary delays or additional expenses.
How do you tie a porch roof on a house?
Different ways can be used to tie a porch roof to a home, depending on their form and structure.
A horizontal ledger board affixed to the house is a frequent method. Lag screws or bolts secure the ledger board to the house, providing a stable footing for the porch roof. The porch roof can be linked to the ledger board with joist hangers or other connectors.
Using a beam or header supported by posts or columns over the porch width is another option. After attaching the beam or header to the house with brackets or other connectors, the porch roof is affixed. The porch roof is more stable using this method.
The porch roof must be correctly attached to the house to avoid future concerns. Make sure all connections are secure and the porch roof is supported. Porch roof structure must also comply with local building codes.
How to build a roof over a deck attached to house?
A roof over a house-attached deck can give shade, protection, and more outdoor living space. A roof may make your deck more functional and attractive, whether you want to create a cozy outdoor seating space or entertain guests. To ensure safety and structural integrity, building a roof over a deck involves careful design and execution.
Determine the roof type you wish to build first. You can choose a gable, hip, or shed roof. It’s crucial to choose the type that meets your demands and matches your home’s style because each has pros and downsides.
Assess your deck’s structural integrity next. The deck must support the roof’s weight. Additional posts, beams, or footings may be needed to strengthen your deck if it was not meant to hold a roof. A structural engineer or contractor can assist you determine the necessary changes.
After choosing a roof and assessing structural needs, you can begin building. Install roof support posts first. These posts should be anchored to the deck and reach roof height. Number of posts depends on roof size, shape, and deck load-bearing capacity.
How do I attach a roof ledger to an exterior wall?
Attaching a roof ledger to an exterior wall is an important step in the construction of a roof. A roof ledger is a horizontal board that is securely fastened to the exterior wall of a building and provides support for the rafters or trusses that make up the roof structure. This attachment is crucial for ensuring the stability and strength of the roof, as it transfers the weight of the roof to the wall. There are several methods and considerations to keep in mind when attaching a roof ledger to an exterior wall.
Firstly, it is important to determine the location and height of the roof ledger. The ledger should be positioned at the correct height to ensure proper roof pitch and drainage. It should also be placed in a location that allows for the attachment of the rafters or trusses. The ledger should be level and securely fastened to the wall, using appropriate fasteners such as lag screws or through-bolts.
Secondly, it is crucial to ensure that the exterior wall is structurally sound and capable of supporting the weight of the roof. The wall should be inspected for any signs of damage or weakness, such as cracks or rot. If any issues are found, they should be addressed and repaired before attaching the roof ledger.
Thirdly, it is important to use the correct size and type of fasteners when attaching the roof ledger. Lag screws or through-bolts are commonly used for this purpose, as they provide strong and secure connections. The size and spacing of the fasteners will depend on the size and weight of the roof, as well as the local building codes and regulations.
How do you attach a shed roof to an existing roof?
Attaching a shed roof to an existing roof is difficult, but with the correct expertise and tools, it can be done. The way you employ to attach a shed roof to an existing roof depends on your project.
One common method is to use a ledger board to attach the shed roof to the existing roof. This involves attaching a horizontal board, known as a ledger board, to the existing roof. The ledger board is typically attached to the existing roof rafters or trusses using lag screws or bolts. Once the ledger board is securely in place, the shed roof can be attached to it using nails or screws.
Another method is to use a ridge board to connect the shed roof to the existing roof. This method involves installing a ridge board along the peak of the existing roof. The shed roof is then attached to the ridge board using nails or screws. This method is often used when the shed roof is at a different pitch than the existing roof.
If the shed roof is at a lower pitch than the existing roof, a cricket or saddle can be installed to divert water away from the connection point. A cricket is a small, sloped roof section that is installed on the high side of the connection point. It helps to prevent water from pooling and causing damage to the connection. The cricket is typically attached to the existing roof using nails or screws, and the shed roof is then attached to the cricket using nails or screws.
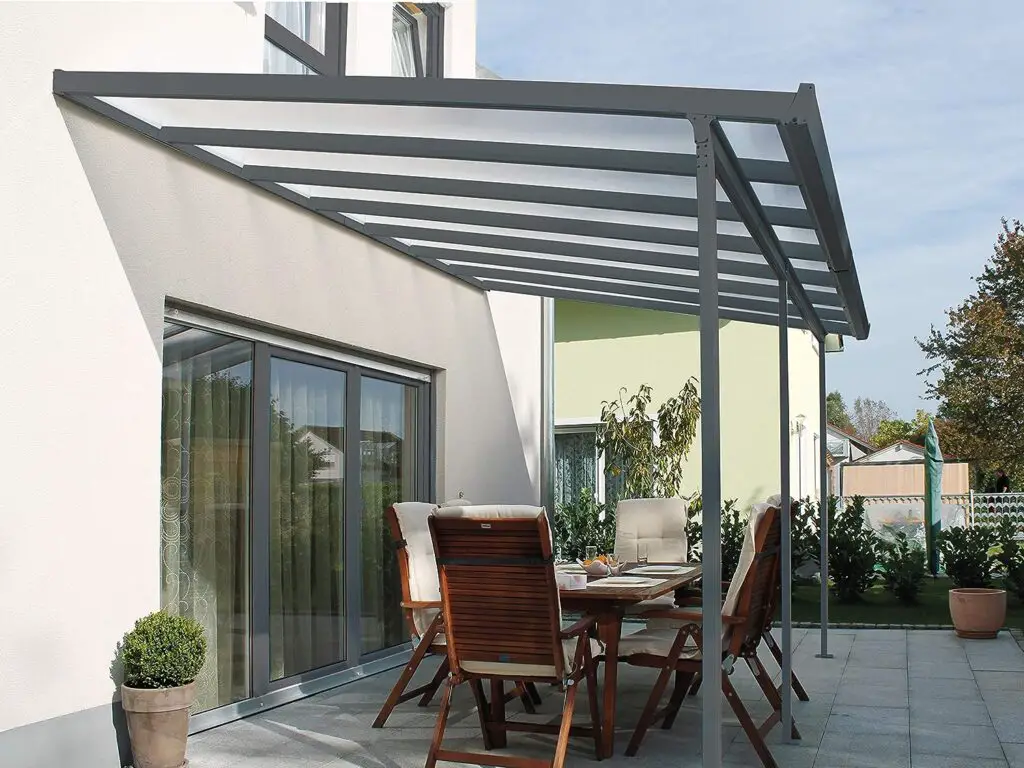
What do you call a roof over a patio?
It provides shade and weather protection, allowing people to enjoy their outside space year-round. Patio covers come in several styles and materials, allowing homeowners to customize their outside living space.
Patio covers are usually attached to a house or standalone in the yard and provide a covered space for dining, relaxing, or entertaining. They can be made of wood, aluminum, or vinyl. Durability, upkeep, and aesthetics vary by material.
Patio roofs are also called pergolas. It has vertical posts or pillars supporting crossbeams and an open lattice roof. Pergolas delineate outdoor spaces and give partial shade, letting sunlight through the roof. Climbing plants and vines can add beauty and a green canopy.
Homeowners benefit from patio umbrellas and pergolas. They allow homeowners to enjoy their outdoor space year-round by expanding their living space. Patio covers shield outdoor furniture and accessories from sun, rain, and other weather elements.
What materials are needed to securely attach a metal patio roof to a house?
Installing a metal patio roof to a house requires numerous components for security and durability. First, you need outdoor-grade metal roofing panels. The panels are usually composed of steel or aluminum, which are strong and weatherproof. Choose panels that are the right size and shape for your patio roof and have a protective coating to prevent rust and corrosion.
Fasteners are needed to secure the roof to your house in addition to roofing panels. Washers, gaskets, and metal roofing screws are needed for a watertight closure. The improper fastener might cause early roof damage, so choose ones that match your roofing panels.
Are there any specific tools or equipment required for attaching a metal patio roof to a house?
Yes, there are specific tools and equipment that are required for attaching a metal patio roof to a house. These tools and equipment are essential for ensuring a secure and successful installation. Some of the tools that you will need include a ladder, a tape measure, a level, a drill, a screwdriver, and a wrench. These tools will help you measure and mark the correct positions for the roof panels, drill holes for screws, and tighten the screws to secure the roof panels in place.
In addition to the basic tools, you will also need specific equipment for attaching a metal patio roof. This includes roofing screws, which are specially designed to secure metal panels to the roof structure. You will also need a sealant or caulk to seal any gaps or joints between the roof panels to prevent leaks. It is important to use the correct type of sealant that is compatible with metal roofing materials. Lastly, you may also need safety equipment such as gloves, safety glasses, and a hard hat to protect yourself during the installation process.
Are there any safety precautions that should be taken when attaching a metal patio roof to a house?
When attaching a metal patio roof to a house, it is important to prioritize safety to prevent any accidents or injuries. Here are some safety precautions that should be taken:
1. Use proper safety equipment: Before starting the installation process, make sure to wear appropriate safety gear such as gloves, safety glasses, and a hard hat. These will protect you from any potential hazards like falling debris or sharp edges.
2. Secure the ladder: If you need to use a ladder to reach the roof, ensure that it is stable and securely positioned. Use ladder stabilizers or have someone hold the ladder for added stability. Avoid overreaching or leaning too far to maintain balance and prevent falls.
3. Be cautious of electrical hazards: Before starting any work, identify and turn off any electrical power sources near the installation area. If you are unsure, consult a professional electrician to ensure your safety.
4. Work in pairs: It is always recommended to have a partner when working on a metal patio roof installation. This not only helps with lifting and positioning heavy materials but also provides an extra set of eyes for safety checks and assistance in case of emergencies.
5. Follow proper lifting techniques: When handling heavy materials, use proper lifting techniques to avoid strain or injury. Bend your knees, keep your back straight, and lift with your legs rather than your back. If a material is too heavy, ask for assistance or use mechanical lifting equipment.
Are there any specific building codes or regulations that need to be followed when attaching a metal patio roof to a house?
Yes, metal patio roofs must be attached to houses according to building requirements. Before commencing the job, check with the local building department or authorities because these codes and regulations differ by area and jurisdiction. Failure to follow these requirements might result in fines, penalties, or patio roof removal.
Building codes may require structural soundness, wind resistance, and fire safety when installing a metal patio roof to a house. Support beam size, spacing, and metal roofing material type and thickness may have minimum requirements. There may also be distance restrictions between the patio roof and existing structures like the home or nearby buildings.
Project permits should also be considered. Building permits may be needed depending on installation scope and complexity. Plans and specifications are usually submitted to the local building department for approval. Follow the proper permitting process to install the patio roof safely and in accordance with all laws and requirements.

Conclusion
Attaching a metal patio roof to your house can be a great way to add value and functionality to your outdoor space. Whether you want to create a shaded area for relaxation or protect your patio furniture from the elements, a metal roof can provide the perfect solution. However, it is important to ensure that the roof is properly attached to your house to ensure stability and safety.
One of the first steps in attaching a metal patio roof to your house is to determine the best location for the roof. Consider factors such as the direction of the sun, the layout of your outdoor space, and any existing structures that may impact the placement of the roof. Once you have determined the ideal location, you can begin the process of attaching the roof.
Before you start attaching the metal roof, it is important to prepare the area. This may involve removing any existing roofing materials, cleaning the surface, and ensuring that the area is level and free from debris. It is also important to check the condition of your house’s exterior walls to ensure that they are structurally sound and able to support the weight of the metal roof.
Once the area is prepared, you can begin attaching the metal patio roof to your house. This typically involves using metal brackets or clips to secure the roof to the exterior walls of your house. It is important to follow the manufacturer’s instructions and use the appropriate tools and materials for the job. Additionally, it may be necessary to use sealant or caulk to ensure that the roof is watertight and protected from the elements.